Mastering Email Channel Configurations: A Step-by-Step Guide to Subdomain Delegation and Email channel setup in AJO
In the ever-evolving landscape of digital marketing, email remains a cornerstone of communication between brands and customers. However, ensuring that emails reach their intended recipients can be challenging amidst stringent spam filters and evolving authentication protocols. One essential practice to optimize email deliverability is the strategic use of subdomain delegation and DMARC (Domain-based Message Authentication, Reporting, and Conformance) configurations. In this blog, I'll walk through the process of setting up email channel configurations through subdomain delegation, DMARC configurations, IP pool, and email channel surface creation, highlighting their importance and benefits.
Step 1: Educating the Client
Before diving into the technical aspects, it's crucial to educate clients on the significance of subdomain delegation and DMARC configurations.
Full Subdomain delegation in Adobe Journey Optimizer (AJO) is like granting Adobe authorization to oversee a specific segment of a client's domain. When a client delegates their subdomain to Adobe for the email channel in AJO, it allows Adobe to manage and send emails on their behalf using that part of the domain name. This delegation empowers Adobe to efficiently deliver and track emails within its marketing platform. Essentially, it permits Adobe to utilize a designated portion of the client's online identity to streamline email communication through Adobe's tools, ensuring smoother customer interactions and targeted marketing efforts.
CNAME subdomain delegation in AJO works like this: If the client has specific rules for how their domain works and wants Adobe to assist without taking full control, the client can manage DNS themselves. With CNAME subdomain setup, the client can create a subdomain and link it to Adobe's settings. Both the client and Adobe then handle DNS tasks together, like sending and tracking emails.
DMARC configurations act as security measures, ensuring emails sent from these sections are authentic and safe. They're crucial for preventing email spoofing and phishing attacks, thereby safeguarding customer trust and data.
In simpler terms, subdomain delegation allows teams (client & Adobe) to work independently. Meanwhile, CNAME subdomain delegation enables teams (client & Adobe) to work collaboratively. DMARC configurations ensure email security, and verifying legitimacy, crucial for customer safety.
Step 2: Gathering Prerequisite Info from the Client
When setting up email configurations, partners rely on three key categories of information from clients:
- Subdomain:
Clients are asked to provide a unique subdomain not currently utilized for emails. This ensures exclusivity and prevents conflicts, especially during migration projects. For example, if "marketing.brand.com" is already in use, alternatives like "communications.brand.com" or "comms.brand.com" are sought.
- DMARC Configurations:
When requesting DMARC configurations from clients, we need the following information:
- Action Upon DMARC Failure: Clients can choose how they want email servers to handle emails that fail DMARC authentication:
- Monitor: Deliver emails normally, without taking any special action.
- Quarantine: Send suspicious emails to the recipient's spam folder.
- Reject: Bounce suspicious emails, preventing them from reaching the recipient's inbox.
- Email Addresses for Reporting: Clients should provide a list of email addresses where they would like to receive:
- Aggregate DMARC Reports.
- Forensic DMARC Failure Reports.
By gathering this information, we ensure that DMARC configurations align with the client's preferences and enable effective monitoring and management of email security.
- Email Channel Surface Configurations:
Configurations related to the email channel surface are crucial for effective communication. Clients provide details such as:
- Sender Name: The displayed name for outgoing emails.
- Sender Email: The email address from which emails originate.
- Reply To (name): The displayed name for replies.
- Reply To Email: The email address where replies should be directed.
- Error Email: The designated address for error notifications.
Step 3: Partner Initiation
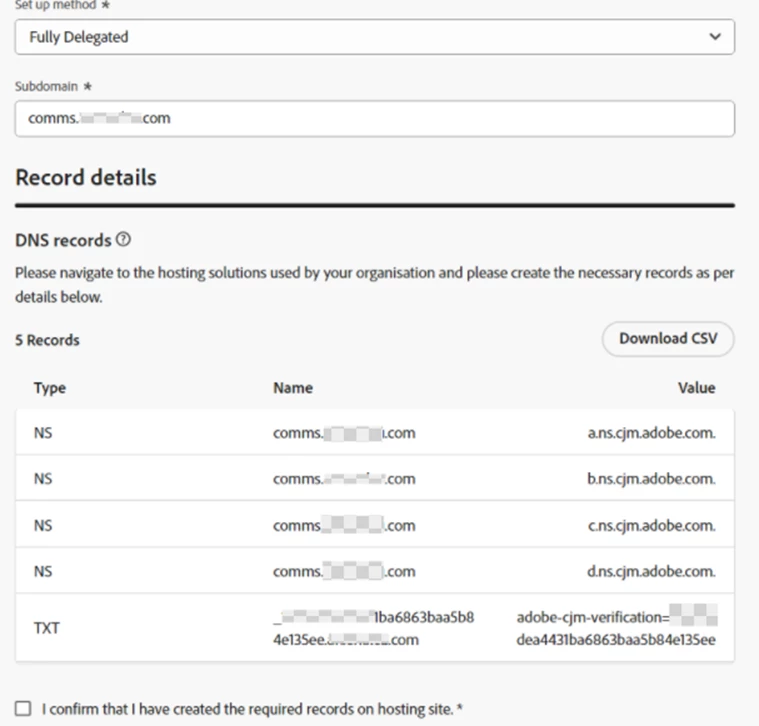
The partner begins the subdomain configuration process, Specifies the name of the subdomain which is gathered from the client to delegate, downloads the DNS records CSV file, and saves the configuration as a draft in AJO.

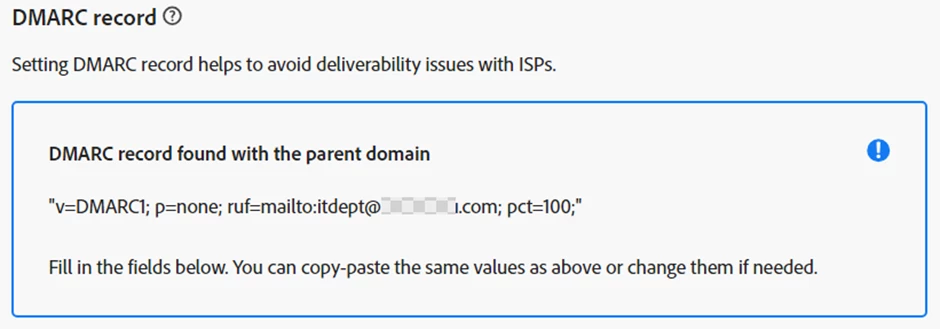
Set up the DMARC record. If the subdomain already has an existing DMARC record, it will be fetched by Journey Optimizer as shown below. You can use the same values or change them as gathered from the client in the DMARC configuration.

If the subdomain does not hold an existing DMARC record, the message below will be shown on the UI. Use the DMARC configuration gathered from the client.

Note: If there's a requirement to adjust DMARC configurations following successful subdomain delegation, it's indeed possible to make the necessary modifications.
Reference link : https://experienceleague.adobe.com/en/docs/journey-optimizer/using/configuration/delegate-subdomains/delegate-subdomain
Step 4: Client Collaboration
The partner shares the downloaded DNS records CSV file with the client, who then collaborates with their IT team to configure DNS records in their hosting solution.
Step 5: Confirmation
Once the client confirms the DNS records configuration from their end, the partner clicks on "I confirm that I have created the required records on the hosting site" in the subdomain configuration in AJO. Click Submit.

The following 2 points are specific to CNAME subdomain delegation. If the partner is dealing with a full subdomain, they can skip the following 2 points:
- Wait until Adobe verifies that the records are generated without errors on the client's hosting solution. This process can take up to 2 minutes.
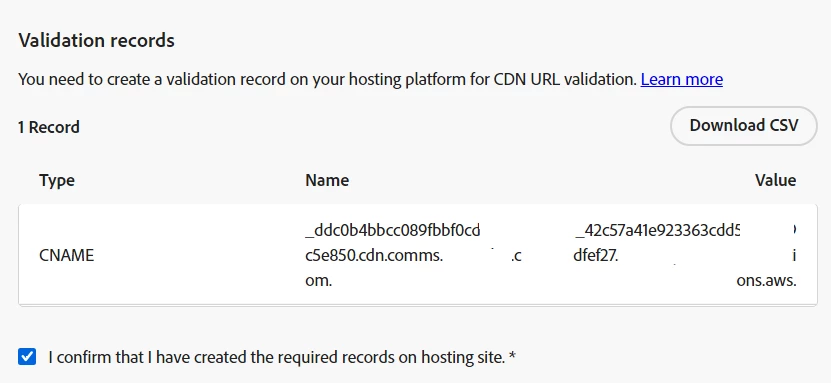
- Adobe generates an SSL CDN URL validation record. Partner shares the record with the client. The client’s IT team configures this validation record into their hosting platform. Once the client confirms record configuration, the Partner checks the box "I confirm that I have created the required records on the hosting site" in the subdomain configuration in AJO and then clicks Submit.

This action changes the delegation status from "Draft" to "Processing"."
Step 6: Verification by Adobe
Adobe conducts essential checks and configures DNS for the delegated domain, establishing MX, SPF, DKIM, A, and CNAME records. Additionally, Adobe creates secure tracking/mirror URLs with SSL and provisions CDN CloudFront, setting up the CDN domain. This step can take up to 3 hours.

Reference link : https://experienceleague.adobe.com/en/docs/journey-optimizer/using/configuration/delegate-subdomains/delegate-subdomain#subdomain-validation
Step 7:Add a Google TXT record to a subdomain (optional)
Although the Google TXT record verification step is optional, it is crucial in establishing trust between the client’s subdomain and Google's services, particularly Gmail. Here's what's needed for the verification process:
- Client: The Client’s IT Department utilizes Google Workspace to generate and share the verification code associated with their subdomain with the Partner.
- Partner: Once the verification code is received, the Partner adds the Google TXT record in AJO and saves the configuration.
- Client: Finally, the client’s IT Department initiates the verification step from Google Workspace to complete the process.

Reference link : https://experienceleague.adobe.com/en/docs/journey-optimizer/using/configuration/delegate-subdomains/google-txt
Step 8: PTR Records Creation
The pointer record (PTR) assists mail servers in verifying whether the IP address of a sending server matches the name it claims to have. This ensures that emails are genuinely sent from their claimed origin, thereby reducing the risk of spam or fraudulent emails.
PTR records are automatically generated once the subdomain status changes to "success".

Step 9: IP Pool Creation
To set up an IP pool, all the IP addresses associated with the subdomain are listed in a dropdown menu. When selecting IPs, you can view the PTR records (Which was created in step 😎 linked to each IP address. At least one IP address must be chosen. After submission, it takes only a couple of minutes to generate the IP pool.
The number of IPs required in the pool depends on the desired email send throughput. Each IP has a limited sending capacity due to ISP restrictions. Generally, having more IPs in the pool can improve throughput, ensuring smoother email delivery.
Reference link : https://experienceleague.adobe.com/en/docs/journey-optimizer/using/configuration/delegate-subdomains/ip-pools#create-ip-pool
Step 10: Email Channel Surface Creation
Create an email channel surface by specifying details such as the email type (e.g., marketing or transactional), subdomain (Step 3), and IP pool (step 9) configured in previous steps, along with sender and reply information (step 2) gathered from the client. After submission, this process takes approximately 3 hours to complete.


Reference link : https://experienceleague.adobe.com/en/docs/journey-optimizer/using/email/configure-email/get-started-email-config
Step 11: Email Delivery Validation
Once the email channel surface is created, it's important to validate email delivery.This can be validated by sending an email proof with the email channel surface created in step 9. Upon receiving emails, confirmation can be made that the email channel configuration is successful for the delegated subdomain.
Reference link : https://experienceleague.adobe.com/en/docs/journey-optimizer/using/content-management/preview-test/proofs
By following these streamlined steps, partners and clients can effectively set up subdomain configurations and email channel surfaces, ensuring seamless communication channels and optimal email deliverability.

