Tuesday Tech Bytes – Adobe Campaign Classic – Week 05 – Use case
Use Case: Sending Personalized Product Recommendations After Purchase Using Adobe Campaign Classic
Scenario Overview
John purchases a mobile phone from your e-commerce store. Historical data shows that customers who buy a mobile phone often purchase a phone case and a screen protector within a few days. If John does not purchase these items within two days, a personalized recommendation email will be sent on the third day. Data is ingested into Adobe Campaign Classic from the CRM system in batch mode nightly.
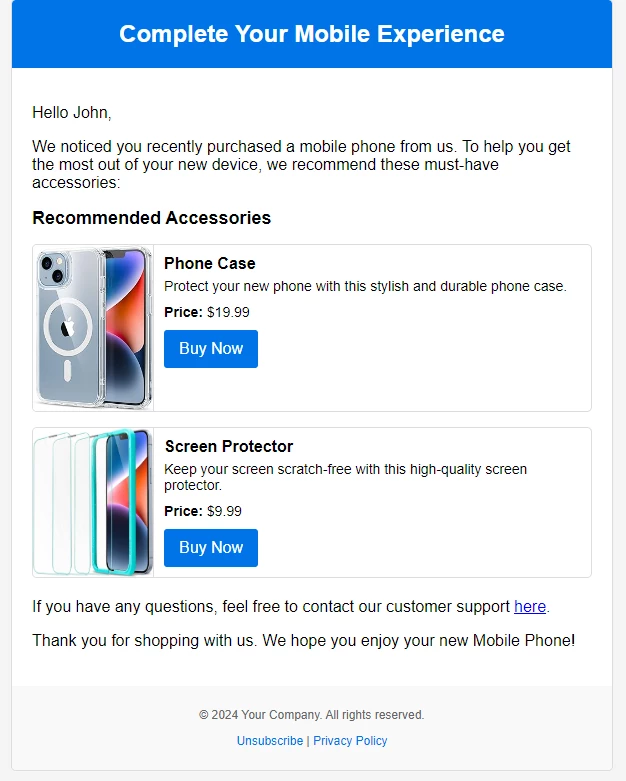
Personalized Email Example

Step-by-Step Implementation
- Prepare Your Data Sources
Ensure your customer, order, and product data are properly organized and imported into Adobe Campaign Classic:
- Customer Data: Includes details such as name, email, communication preferences, and consent information.
- Order Data: Includes order details such as order IDs, order dates, and customer IDs.
- Order Details Data: Includes order detail information such as order ID, product ID, quantity, and price.
- Purchase History: Ensure you have historical order data for at least three months, updated daily or hourly as needed. This time period can be less or more based on your requirement.
- Product Data: Includes details about the product such as product ID, product name, price, image, descriptions, etc.
- Product Recommendations Data: Contains relationships and recommendations based on historical purchasing data of other customers. This relationship calculation can be done outside of Adobe Campaign, for example in your CRM, data warehouse, or other data platforms. This is independent from current order. There is information regarding the product and best recommendations related to this product.
- Create the Data Models
Learn how to create schemas: Adobe Campaign Schema Documentation
Set up necessary data models in Adobe Campaign Classic:
- Recipient Table: Most customer-related fields are available out-of-the-box, such as first name, last name, email address, and consent information. If you need to store extra information like CRM ID or business unit ID, create a recipient extension table.
- Order Table: Create an order schema with fields like order ID, order date, recipient ID, and set up joins with the recipient table.
- Order Details Table: Create an order details schema with fields like order detail ID, order ID, product ID, quantity, and price. Set up joins with the order table and the product table.
- Order ID: Foreign key linking to the Order table.
- Product ID: Foreign key linking to the Product table.
- Product Table: Create a product schema with fields like product ID, product name, price, image, and descriptions. Use the product ID as the primary key.
- Product Recommendations Table: Create a product recommendation schema with fields like main product ID, recommended product1 ID, recommended product2 ID, etc.
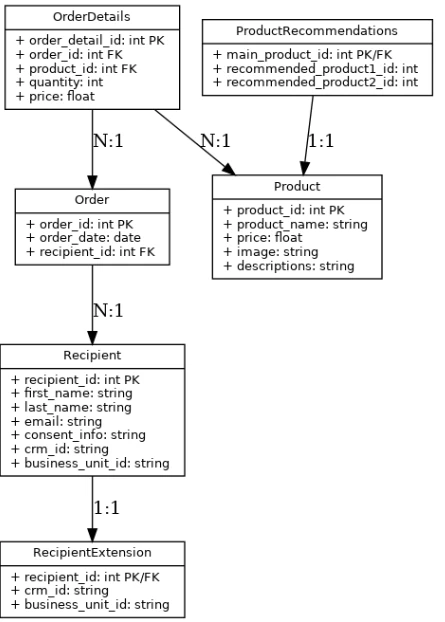
Entity-Relationship (ER) diagram representing the described relations:

Note: The RecipientExtension is shown separately for explanation purposes. In Adobe Campaign, when you create an extension, these fields are added to the same `nms:recipient` table.
- Set Up Import Workflow
Learn about setting up import workflows: Adobe Campaign Import Workflow Documentation
There are different ways to import data, depending on your data source, such as file import or direct connection with systems like MS Dynamics. The most common method is file import.
- Files can be imported from local servers, SFTP, AWS S3, Blob Storage, etc.
- For all schemas created or extended (e.g., recipient, order, product, product recommendation relationship), create a workflow and schedule the import daily or hourly, depending on data availability.
- Setup a central workflow to pre process the Imported data
Learn more about setting up workflow in AC: https://experienceleague.adobe.com/en/docs/campaign-classic/using/automating-with-workflows/introduction/about-workflows
- This workflow start when all the required import workflow is finished.
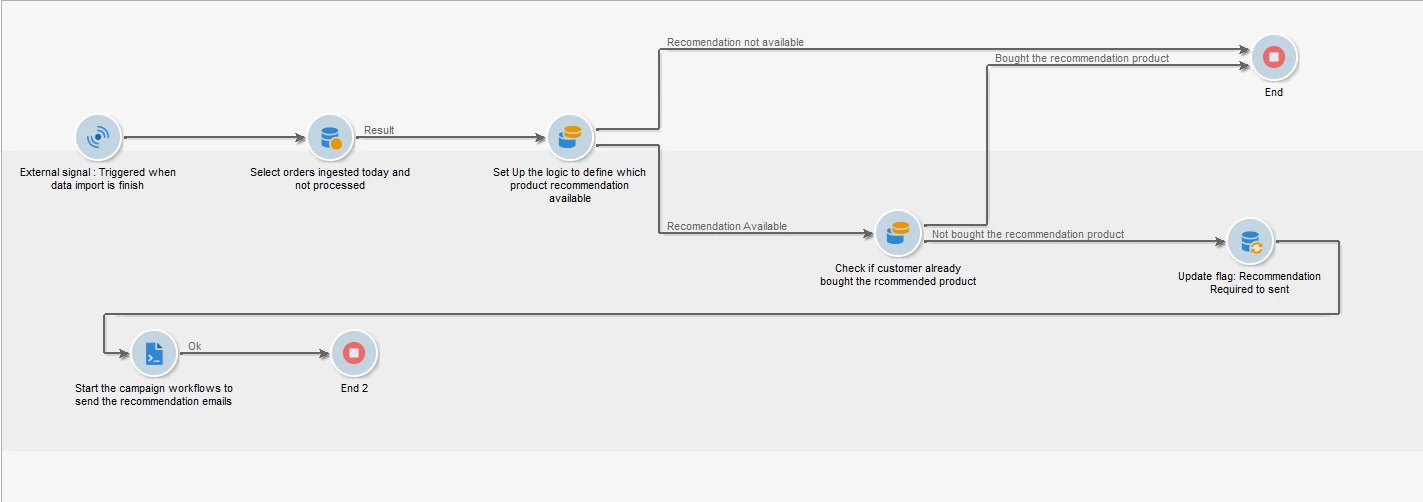
- There you can define the logic to determine which products need to be selected for which you product recommendation will be sent . For e.g. You have two product mobile and shoes. You can enable product recommendation only on mobile.
- You can also add logic to select all newly ingested orders and determine if recommendations are required based on purchase history. For e.g. if a customer already bought a phone case and a screen protector then recommendation is not required on that order etc.
- Similar you can add as many conditions as required.
- This way you can centralize the logic of recommendations calculation process. For example, if you create multiple campaigns to send recommendation based on different content, you can do some common work here.
- Suggested fields on the order table (or a related table):
- Is Recommendation Required to sent: Boolean
- Is Recommendation Sent: To track if recommendation emails have been sent.
- PropensityToBuyRecommendedProduct (Optional): This score indicates the likelihood of a customer buying the recommended product. It is useful when selecting the right order if a customer is eligible for multiple recommendations. For example, if a customer bought two products and each has its own recommendation, but you only want to send one recommendation email, you can use this score to decide which recommendation to send.
Simple e.g. of workflow:

- Set Up a Campaign workflow
Learn more about setting up a campaign:
- Create a campaign and add a workflow.
- Start the workflow with a signal activity triggered by the workflow in step 4, or add a scheduler.
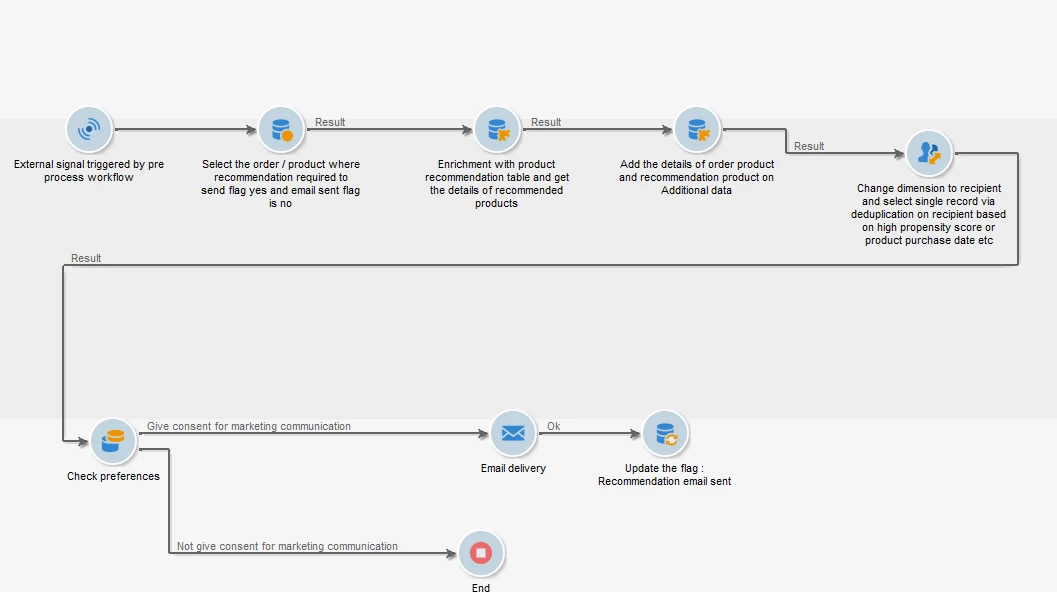
- Create a query activity on the order details table to select records where recommendations are required and emails have not been sent.
- Enrich the data with recommended product details like name, description, and images.
- Add order product details and recommendation product details in additional data.
- Change dimension to recipient table.
- Add a split activity to check communication preferences, selecting only customers who have opted in.
- Create an email template based on personalized fields, with content updated from additional data added by the enrichment activity.
- Once the email is sent, update the flag indicating the recommendation email has been sent to avoid selecting the same order again.
A simple e.g. of workflow:

- Test the Workflow
Before deploying, thoroughly test the workflow:
- Use Test Data: Verify with sample orders and customer profiles.
- Validate Content: Ensure recommendations and personalization appear correctly.
- Deploy and Monitor
Once tested, deploy the workflow and monitor its performance:
- Track Metrics: Measure open rates, click-through rates, and conversion rates for the recommendations.
- Optimize: Use insights to refine your recommendation algorithm and email content.

