
Web SDK Part 2: The missing map

I have a confession to make; this is not the blog article I was planning to write this week. In fact, this week's original blog article was practically finished when I received a message. The message, in response to Part 1 of my series, made me stop in my tracks and realise I needed to cover something far more fundamental before going any further.
The realisation was that the biggest challenges we face as existing Adobe Analytics implementation experts are:
- Adobe Analytics is so ingrained in our thinking
- there is no map to find our way from Adobe Analytics to Web SDK
During this series I am deliberately avoiding doing a rewrite of Adobe's technical documentation (and that's not about to change!). However, following my above 'light bulb' moment, I've decided to go a lot further in providing some basic directions to help people on their way.
So, if you will forgive me, we're going to take a detour from my planned route, to help you orientate yourself and navigate the right path (and don't worry, there are no more map-based puns from here on in!).
What will this article cover?
This article is going to take you through step by step, the end-to-end basics of how to get Web SDK to work with Adobe Analytics. This will be using my preferred method, that I discussed in part 1 of this series, of mapping Adobe Analytics variables client-side (rather than server-side via processing rules). This will include:
- Server-side setup
- Schemas
- Datastreams
- Client-side setup
- Installing the Web SDK extension
- Sending data (both page views and link tracking)
To give you fair warning, this article is a very long read, much longer than I would normally aim for in a blog article. In fact, I've had so many reservations about doing this blog article that I've almost abandoned it about five times! However, I felt it was important to bring this information together in one place. Ultimately, the thought that has kept me going is how much I think I would have benefited if someone had produced something similar before I had to tackle Web SDK. Hopefully you will find this useful!
So, if you are ready, take a deep breath...
The Edge Network (server-side setup)
First a bit of background; with Web SDK we are moving away from point-to-point solutions e.g. Adobe Analytics JavaScript sending data to an Adobe Analytics server, Adobe Target JavaScript sending data to an Adobe Target server etc. Instead, we have a single JavaScript tag (Web SDK) communicating with an Adobe Edge Network Server. The Edge Network then forwards data server-side to the various Adobe solutions.

The important thing to know (and something you may not be used to) is that the Edge Network part of the process requires some configuration, and the client-side Web SDK is dependent on this. So, before you do anything with the Web SDK, you need to setup two things server-side:
- a Schema
- a Datastream
and to do this we first need to talk about Sandboxes...
Sandboxes
If you are just using Adobe Analytics and want to get something working, Sandboxes are something I think you can almost completely ignore for now; I say 'almost' because when we finally get onto installing the Web SDK extension, it asks you to 'Select a Sandbox', at which point you'll need an answer! Therefore, I will very briefly cover sandboxes now...
Sandboxes are a way to organise, manage and control Adobe Experience Platform capabilities at the very top level. However, most of the capabilities we are using do not live inside a 'Sandbox'. Adobe Analytics sits outside, and Data Collection - Tags also sits outside. So, from our perspective, the only things that will sit inside and are governed by a Sandbox are the Schema, and Datastream we set up.
By default, Adobe will have already set up a single production Sandbox for you - and for the purposes of getting up and running, this is good enough for us - we just need to know what it is called and understand that the Schema and Datastream we create will sit inside it.
To find out the name of the Sandbox, log into the Adobe Experience Cloud, navigate to Data Collection, and select 'Schemas' from the left-hand menu. Once there, the name of the Sandbox is displayed at the top of the screen as shown below - make a note of this for later.

Schemas
In part 1 of this series, I talked about the fact that the Web SDK takes a more modern approach to capturing data. Rather than sending props or eVars it transmits a generic XDM data object back to the Edge Network. The XDM object is basically just a JSON Object. We get to decide what format the JSON object takes and what variables it contains. However, Adobe requires us to define this upfront. We do this by creating a schema which documents the format/structure of the JSON object. This has a direct impact on the client-side Web SDK in that, if you want to be able to set a particular variable client-side, then that variable needs to be in your schema or it won't be available to you.
Create a new schema:
- Log into the Experience Cloud and navigate to 'Data Collection'
- Select 'Schemas' from the left-hand menu
- In the top right-hand corner of the screen, click the 'Create schema' button (This launches a 2-step wizard)
- In the first step of the wizard, select 'Experience Event', then click the 'Next' button (note: you must use the 'Experience Event' type for website data collection)
- In the second step of the wizard, enter a 'Schema Display Name' (e.g. 'Website data schema'), then click the 'Finish' button
This will have created a new schema, but the schema will only contain a few data fields. We now need to add the additional fields we need to support Adobe Analytics data collection to the schema.
Add Adobe Analytics fields to the schema:
When adding to a schema you can either create your own new custom fields or you can use Adobe's 'pre-canned' Field Groups which are predefined groups of variables that Adobe have anticipated will be needed for various use cases. For our set up we are going to use an Adobe provided Field Group called 'Adobe Analytics ExperienceEvent Template'. This Field Group contains all the fields that can be used to automatically map data to Adobe Analytics variables.
To add this to our schema:
- While still within the schema we've just created, under 'Field groups' on the left-hand side, click 'add'
- In the 'search field' search for 'Adobe Analytics ExperienceEvent Template'
- Tick the checkbox next to 'Adobe Analytics ExperienceEvent Template' in the list
- click the 'Add field groups' button (when it returns to the previous screen it may look like nothing is happening, but give it a minute and it should refresh, and the new fields appear)
- Once the new fields have appeared, click the 'Save' button
We now have a useable Schema and need to turn our attention to the Datastream.
Datastreams
A Datastream manages data that is arriving to the Edge Network from a particular source and forwards it on to other Adobe capabilities. You will typically have a separate Datastream for each separate source of data. From our perspective we need to create a Datastream for collecting data from the website and configure it. There are two aspects of the configuration that we need to take care of:
- selecting a Schema for the Datastream (this dictates what variables the Datastream is expecting to receive and therefore what we can send to the Edge Network from the Web SDK)
- selecting which Adobe products the Datastream will forward data to (in our case, Adobe Analytics)
Create a Datastream:
- While still within 'Data Collection', select 'Datastreams' from the left-hand menu
- Click the 'New Datastream' button
- Enter a 'Name' for the Datastream (e.g. 'Website data collection')
- Under the 'Event Schema' drop down menu, select the Schema we previously created (e.g. 'Website Data Schema')
- Click the 'Save' button (not 'Save and Add Mapping', which is another option)
We now need to tell the Datastream to forward incoming data to Adobe Analytics. We do this by adding Adobe Analytics as a service.
Add Adobe Analytics as a Service
- From within the Datastream we just created, click the 'Add Service' button
- From the 'Service' drop down menu, select 'Adobe Analytics'
- Click the 'Add Report Suite' button
- Enter your production/live Report Suite ID that you want the Datastream to forward data to
- Expand the 'Advanced Options' section
- In the Report Suite Overrides list, find any report suites you normally use for Dev or Staging and tick the checkbox next to them (we will configure these to be associated with the dev/staging environments client-side in the Web SDK extension. However, you must first whitelist them here or it won't work!)
- Click the 'Save' button
We now have a functioning Datastream!
A final note on Schemas and Datastreams
Here we have set up one schema and one Datastream which will act as a conduit to get incoming website data through the Experience Platform and on to Adobe Analytics - which is all we need.
However, the bigger picture is that we are moving to a mechanism that can deal with far more than just website data. Theoretically, multiple Schemas and/or Datastreams can be set up to cover different scenarios (e.g. if you were using Customer Journey Analytics, you could set up a new Schema and Datastream to handle incoming call centre data).
Client-side setup
Note: This section is going to be based around using Data Collection - Tags for your implementation and I am going to assume some prior knowledge of this capability.
I am going to cover:
- Basic set up of the Web SDK extension
- Basic steps to send data to Adobe Analytics (page views and link tracking)
To begin, log into Data Collection - Tags, and enter the Tag Property you want to set Web SDK up in (it may be best to use a brand new property to experiment with but this is up to you).
Install the Web SDK Extension
In your Data Collection - Tags property, go to the extensions catalogue and search for 'Adobe Experience Platform Web SDK' and install the extension. This launches the configuration wizard for the extension. Some of the fields will be prepopulated. However, there are quite a few we need to fill in or make changes to, which we'll take section by section (note: I'm only going to mention the fields you need to do something with - If I don't mention it, leave as default!):
Fields in the 'Alloy' Section
Edge Domain - You don't have to do anything with this field. However, if you have already done a CNAME implementation to give Adobe Analytics permission to use one of your subdomains for data collection, you can make Web SDK also use this subdomain with zero effort. Simply enter the domain here (e.g. smetrics.mysite.com) and it will use your existing configuration (no additional DNS changes required!). If you have no idea what I am talking about, just leave the default value in the field and move on.
Fields in the 'Datastreams' Section
Using the input method 'Choose from list', repeat the following for Production, Staging and Development environments:
- use the 'Select a Sandbox' dropdown menu to select the Sandbox we made a note of earlier
- from the new dropdown menu that appears, select the Datastream we created
Note: All three environments will have identical settings. You may remember when you configured the Datastream that it is set up to send data to the production Report Suite, which is not what you want for Dev/Staging! Don't worry, there is an 'override' section further down that we will use to change the report suite for Dev/Staging.
[In case you are wondering, an alternative approach would have been to set up additional Datastreams for Dev and Staging. Then within each Datastream, select the appropriate Report Suite for Dev/Staging. However, I think the override approach I am suggesting is probably simpler.]
Fields in the Privacy/Identity/Personalization Sections
You will probably need to make some changes here before you go live (or at least understand what these sections do). However, in the interest of getting something up and running, I suggest you skip over these for now (and make a mental note to come back).
Fields in the 'Data Collection' Section
For now, I suggest you disable the automatic click data collection by unchecking the tick box. You almost certainly will want to enable this before you go live. However, there are a few 'quirks' that you need to deal with, and I am going to cover these in a future post (Update 16-Feb-24: now available in Part 4 of this series). Until then, I suggest you turn this off (or at least be aware it probably isn't doing what you'd expect it to be doing - you've been warned!!).
Fields in the 'Datastream configuration overrides' Section
This is where we are going to make sure our Dev and Staging environments send data to the correct Adobe Analytics Report Suite.
- Under the 'Development' tab, find the 'Report Suites' field and enter the Report Suite ID you use for Dev
- Switch to the 'Staging' tab, find the 'Report Suites' field and enter the Report Suite ID you use for Staging
***REMEMBER! You can only use Report Suites that you've previously whitelisted for overriding during the setup of the Datastream!! (See the 'Add Adobe Analytics as a service' section of this post)***
Finally, click 'save' in the top right-hand corner of the screen to finish installing the extension. It's been a long journey, but we are now ready to send some data!
The fundamentals of sending data
You'll probably find that like me, everything in your Adobe Analytics implementation life so far has come down to either sending a Page View or sending a Custom Link Tracking call. What I wish had been more obvious when starting out with Web SDK was simply how to make each of these things happen! I'm going to try to fill that gap.
In Data Collection - Tags, using Web SDK to send data comes down to two things:
- Populating the XDM object using Data Elements
- Sending data using a Rule
One important thing to note is: with Adobe Analytics we are used to calling different functions to determine whether something is a Page View s.t() or a custom link tracking call s.tl(). With Web SDK this is no longer the case. We have a single action to send data. Whether it is considered a Page View or a Link Tracking call is determined by the values that are populated into the XDM object.
Let's examine this from both a Page View and Custom Link Tracking perspective.
How to make a Page View call
Prerequisites:
- A data element containing your page name value
- An event (such as a _ satellite.track() call) that will act as the trigger for a page view
Step 1: Create and populate the XDM Object
Create the XDM Object
- Navigate to the Data Elements and click the 'Add Data Element' button
- Enter a name for the new Data Element (e.g. 'Page View XDM Object')
- Change the extension to 'Adobe Experience Platform Web SDK'
- From the 'Data Element Type' drop down menu, select 'XDM Object'
- From the 'Sandbox' drop down menu, select the Sandbox that we made a note of earlier
- From the 'Schema' drop down menu, select the Schema we previously created
At this point a tree appears representing the structure of our XDM object.
Populate the XDM Object
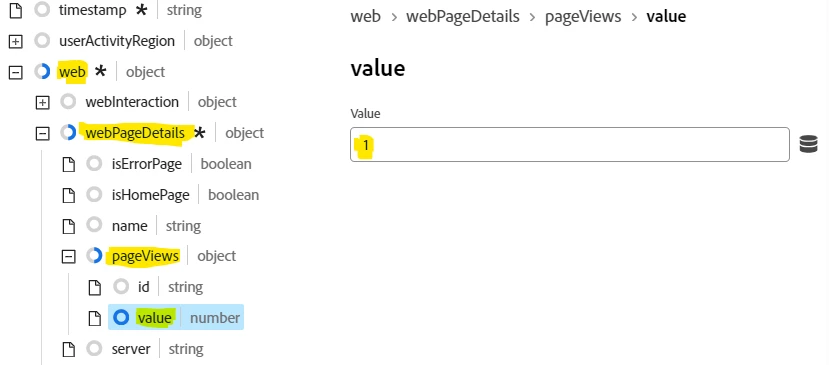
To make a basic page view, there are two fields we need to populate, both are located under the 'web' branch:
- web > webPageDetails > pageViews > value
- This tells Adobe we are performing a page view (set to '1')
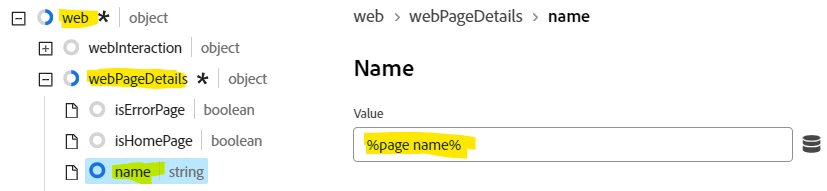
- web > webPageDetails > name
- The value that will appear in the page name variable in Adobe Analytics
Expand out the 'web > webPageDetails > pageViews' branch and under 'value' enter a value of '1' as shown in the screen shot below. This value tells Adobe that we are making a page view.
Next, we need to provide a page name value. To do this expand out the 'web > webPageDetails' branch and under 'name' map your Data Element that contains your page name value as per the screen shot below. Note: you can reference a Data Element as you do in other parts of the tool, by wrapping the Data Element name in percent symbols e.g. %page name%
Finally, click the 'Save' button to save the Data Element.
We now have an XDM object, populated with the minimum we need to produce a page view. Let's look at how we send this to Adobe Analytics.
Step 2: Send data using a Rule
- Navigate to 'Rules' and click the 'Add Rule' button
- Enter a name for the new Rule e.g. 'Send Page View'
- Add an 'Event' to the Rule, set this event to be your page view event that will act as the trigger for sending data (You'll need to work out what this is based on your current implementation)
- Add an 'Action' to the Rule, and configure as follows:
- set the 'Extension' to be 'Adobe Experience Platform Web SDK'
- set the 'Action Type' to be 'Send Event' (this causes additional fields to appear)
- In the 'Data' section:
- set the 'Type' field to be 'web.webpagedetails.pageViews' (technically optional, but recommended)
- set 'XDM' field to be the XDM Data Element you previously created for page views. You can either use the picker, or type in the Data Element name wrapped in percent symbols e.g. %Page View XDM Object%
- No further configuration is required, so save the Action, then Save the Rule
- Finally add everything to a Library and test
How to make a Custom Link Tracking call
Prerequisites:
- A data element containing your custom link name value
- An event (such as a _ satellite.track() call) that will act as the trigger for the link tracking
Step 1: Create and populate the XDM Object
Create the XDM Object
- Navigate to the Data Elements and click the 'Add Data Element' button
- Enter a name for the new Data Element (e.g. 'Link Tracking XDM Object')
- Change the extension to 'Adobe Experience Platform Web SDK'
- From the 'Data Element Type' drop down menu, select 'XDM Object'
- From the 'Sandbox' drop down menu, select the Sandbox that we made a note of earlier
- From the 'Schema' drop down menu, select the Schema we previously created
At this point a tree appears representing the structure of our XDM object.
Populate the XDM Object
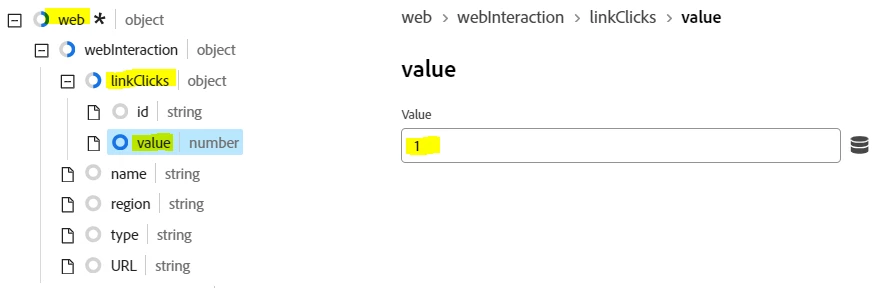
To make a basic link tracking call, there are three fields we need to populate, all three are located under the 'web' branch
- web > webPageDetails > webInteraction > linkClicks > value
- This tells Adobe we are doing link tracking (set to '1')
- web > webPageDetails > webInteraction > name
- The value that will appear in the Custom Link variable in Adobe Analytics
- web > webPageDetails > webInteraction > type
- The type of link tracking being performed: 'other', 'download', 'exit'
Expand out the 'web > webPageDetails > webInteraction > linkClicks' branch and under 'value' enter a value of '1' as shown in the screen shot below. This value tells Adobe that we are recording a link tracking interaction (rather than a page view).
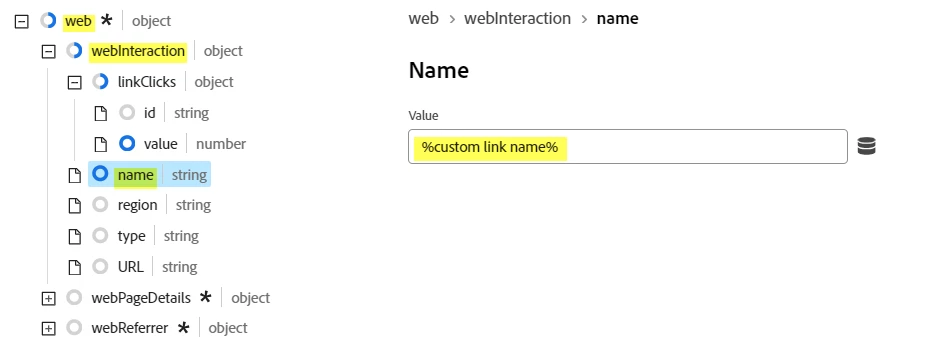
Next, we need to provide a link name value - this is the value that will appear in the Custom Link variables in Adobe Analytics. To do this expand out the 'web > webPageDetails > webInteraction > name' branch and under 'name' map your Data Element that contains your custom link name value as per the screen shot below (again, percent symbols can be used to reference the Data Element name).
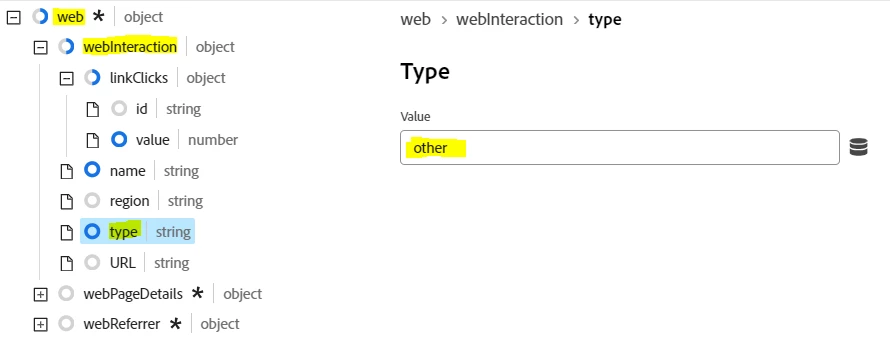
Lastly, we need to tell Adobe what type of link tracking we are doing ('other', 'download', or 'exit'). To do this expand out the 'web > webPageDetails > webInteraction > type' branch and enter the appropriate value (normally 'other').
Finally, click 'Save' to save the Data Element.

We now have an XDM object, populated with the minimum we need to produce a page view. Let's look at how we send this to Adobe Analytics.
Step 2: Send Link Tracking data using a Rule
- Navigate to 'Rules' and click the 'Add Rule' button
- Enter a name for the new Rule e.g. 'Send Link Tracking'
- Add an 'Event' to the Rule, set this event to be your link tracking event that will act as the trigger for sending data (You'll need to work out what this is based on your current implementation)
- Add an 'Action' to the Rule, and configure as follows:
- set the 'Extension' to be 'Adobe Experience Platform Web SDK'
- set the 'Action Type' to be 'Send Event' (this causes additional fields to appear)
- In the 'Data' section:
- set the 'Type' field to be 'web.webinteraction.linkClicks' (technically optional, but recommended)
- set 'XDM' field to be the XDM Data Element you previously created for link tracking. You can either use the picker, or type in the Data Element name wrapped in percent symbols e.g. %Link Tracking XDM Object%
- No further configuration is required, so save the Action, then Save the rule
- Finally add everything to a Library and test
Sending additional fields (e.g. props, eVars etc.)
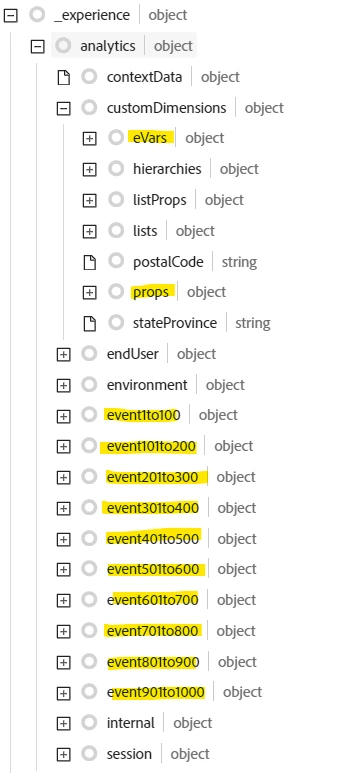
To send additional fields to Adobe Analytics as part of either a page view or link tracking call, simply populate more of the XDM Object tree in the XDM Data Elements we created. Most of the Adobe Analytics Variables that you will want to map (props, eVars, events) are easy to populate and reside under the '_experience > analytics > customDimensions' part of the tree as shown below. Other fields such as s.products and list vars take a little more work (possibly a subject for a future post). In the meantime, this Experience League article gives details of all the automatically mapped variables:
https://experienceleague.adobe.com/docs/analytics/implementation/aep-edge/variable-mapping.html
Final Reflections
If you've made it this far - well done! If I'd realised quite what an undertake this would be I probably wouldn't have started this and I've gone further in rewriting Adobe documentation than I intended when I set out. However, I'm glad I've got it down on paper and I'm hoping I've given you a head start with Web SDK. Thanks for taking the time to read this and if you would like updates when I post please consider following me on LinkedIn.