
Breaking Down Barriers: How Adobe Journey Optimizer's Custom Delegation Feature Is Solving Enterprise Compliance Challenges
When enterprises face compliance requirements that restrict third-party domain management, we didn't just listen—we rebuilt how domain configuration works.
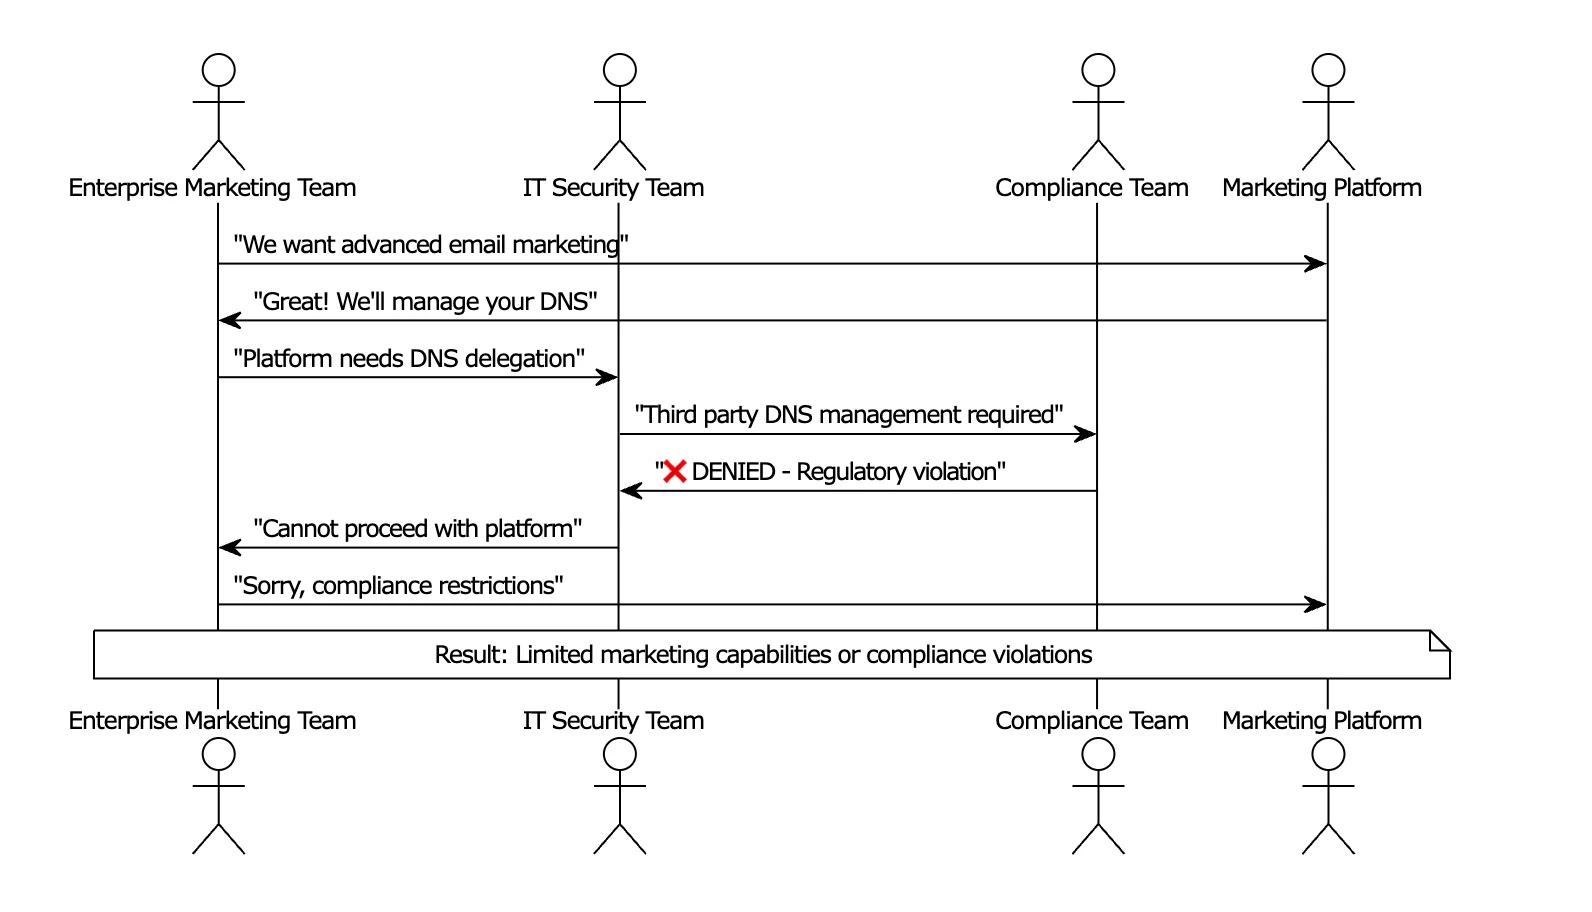
The Core Challenge
Traditional marketing automation platforms require customers to delegate DNS management to the platform provider. For regulated enterprises, this creates an impossible choice:
Why This Feature: Addressing Enterprise Compliance Challenges
In highly regulated industries, marketing teams often face a critical barrier: compliance requirements that prevent third-party domain management. Whether it's HIPAA in healthcare, FINRA in financial services, or SOX compliance for public companies, these organizations need complete control over their domain infrastructure. This provides a complete separation between customer infrastructure and platform services :
- No shared credentials between systems
- Customer-managed certificates with full SSL chain control
- Isolated infrastructure with no cross-customer dependencies
Key Enterprise Requirements:
- Complete Domain Control: DNS records must remain under customer management
- Certificate Ownership: SSL certificates must be generated and managed internally
- Regulatory Compliance: Zero third-party dependencies for regulated communications
- Security Standards: No shared credentials or external access to domain infrastructure
The Four-Phase Setup Process

Phase 1: DNS Configuration
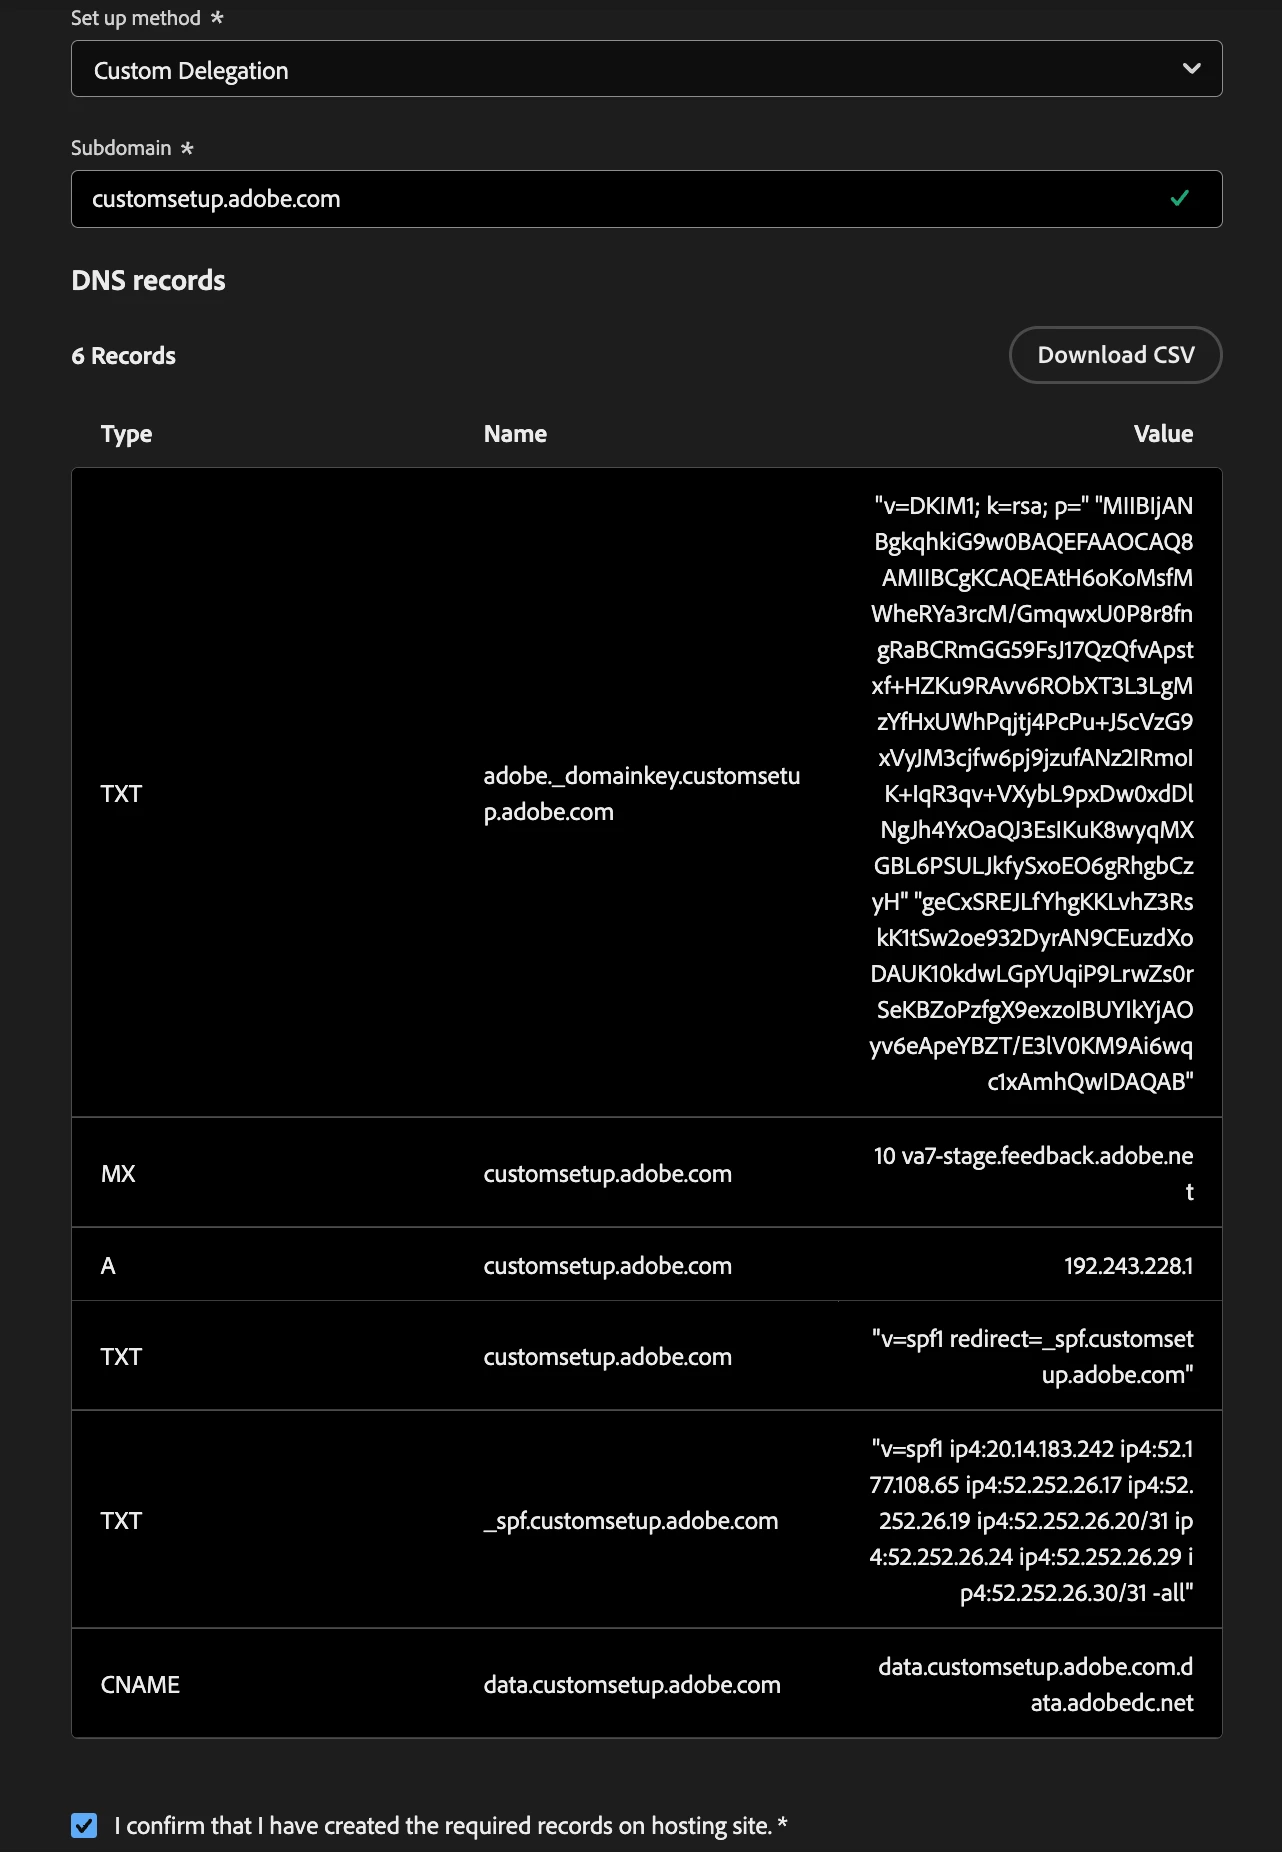
In this phase, you configure the required DNS records in your own DNS management system. The platform provides you with the exact record specifications and validates them in real-time.
1. In the UI, click the "Download CSV" button to get the required DNS records
2. Configure the following records in your DNS management system:
Record TypeNameValue/TargetPurpose
| TXT | adobe._domainkey.yoursubdomain.com |
DKIM public key (provided by Adobe) | Email authentication and anti-spoofing |
| MX | yoursubdomain.com |
10 ind2.feedback.adobe.net(according to the region) |
The MX record points to Adobe so that bounce and complaint emails go directly to Adobe’s servers. It must stay under adobe.net since Adobe manages the mail flow, compliance, and deliverability, and this cannot be hosted by the customer. |
| A | yoursubdomain.com |
192.243.228.1 | Email delivery infrastructure |
| TXT | yoursubdomain.com |
"v=spf1 redirect=_spf.yoursubdomain.com" |
SPF policy redirect |
| TXT | _spf.yoursubdomain.com |
"v=spf1 ip4:4.188.230.193 -all" | Actual SPF IP allowlist |
| CNAME | data.yoursubdomain.com |
data.yoursubdomain.com.data.adobedc.net |
Data collection and tracking |
3. After configuring all records, check the confirmation box in the UI indicating completion
Please Note:
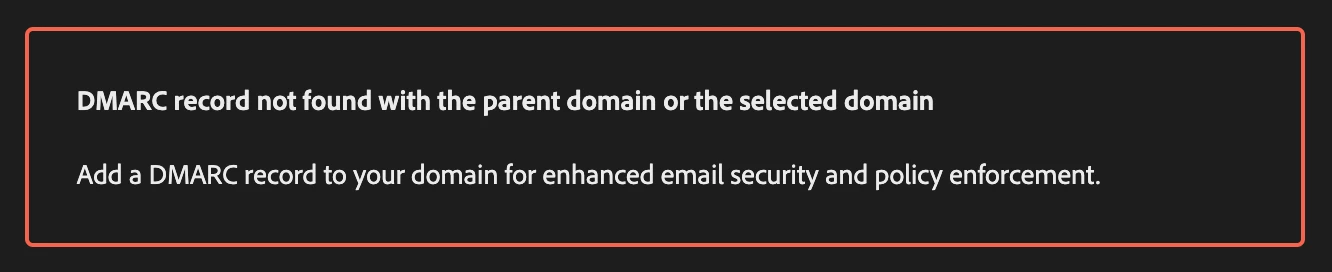
DMARC Validation: DMARC policy is mandatory and must be configured at either subdomain level (_dmarc.yoursubdomain.com) or parent domain level (_dmarc.yourdomain.com) for complete email authentication. Setup cannot proceed without proper DMARC configuration.
Optional DNS Records(can be configured later):
These records must be configured in your DNS management system like
- Google Domain Verification: TXT record for Google Workspace/Gmail integration
- Additional Security Records: CAA records, additional DKIM selectors, etc.
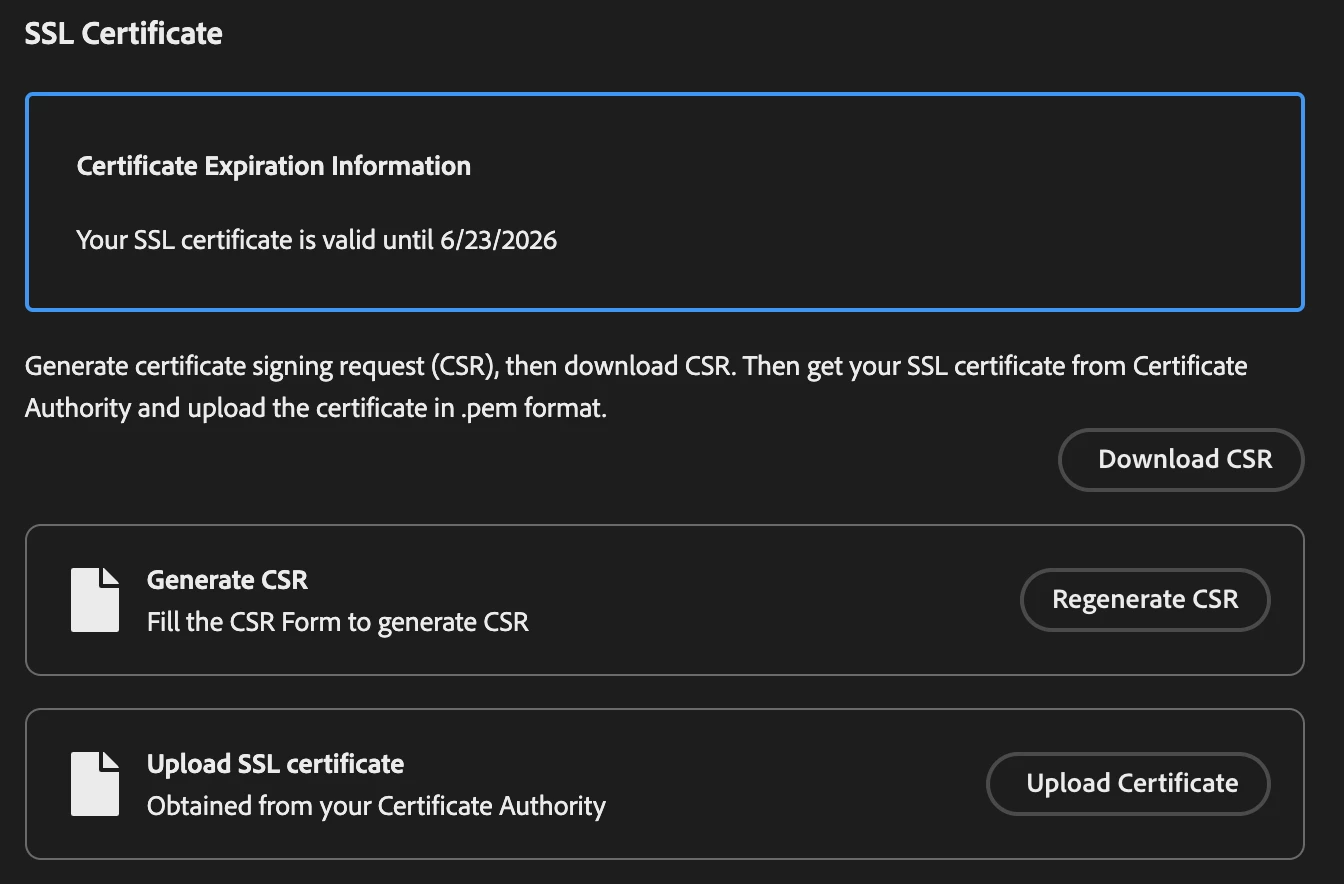
Phase 2: SSL Certificate Setup

The SSL certificate setup process involves several steps using the platform's UI:
Step 1. Click the "Generate CSR" button to create a new Certificate Signing Request
CSR Requirements:
- Country Code: Must be 2-letter ISO country code (e.g., US, CA, GB)
- Key Length: RSA 2048 or 4096-bit (cannot be changed after subdomain creation)
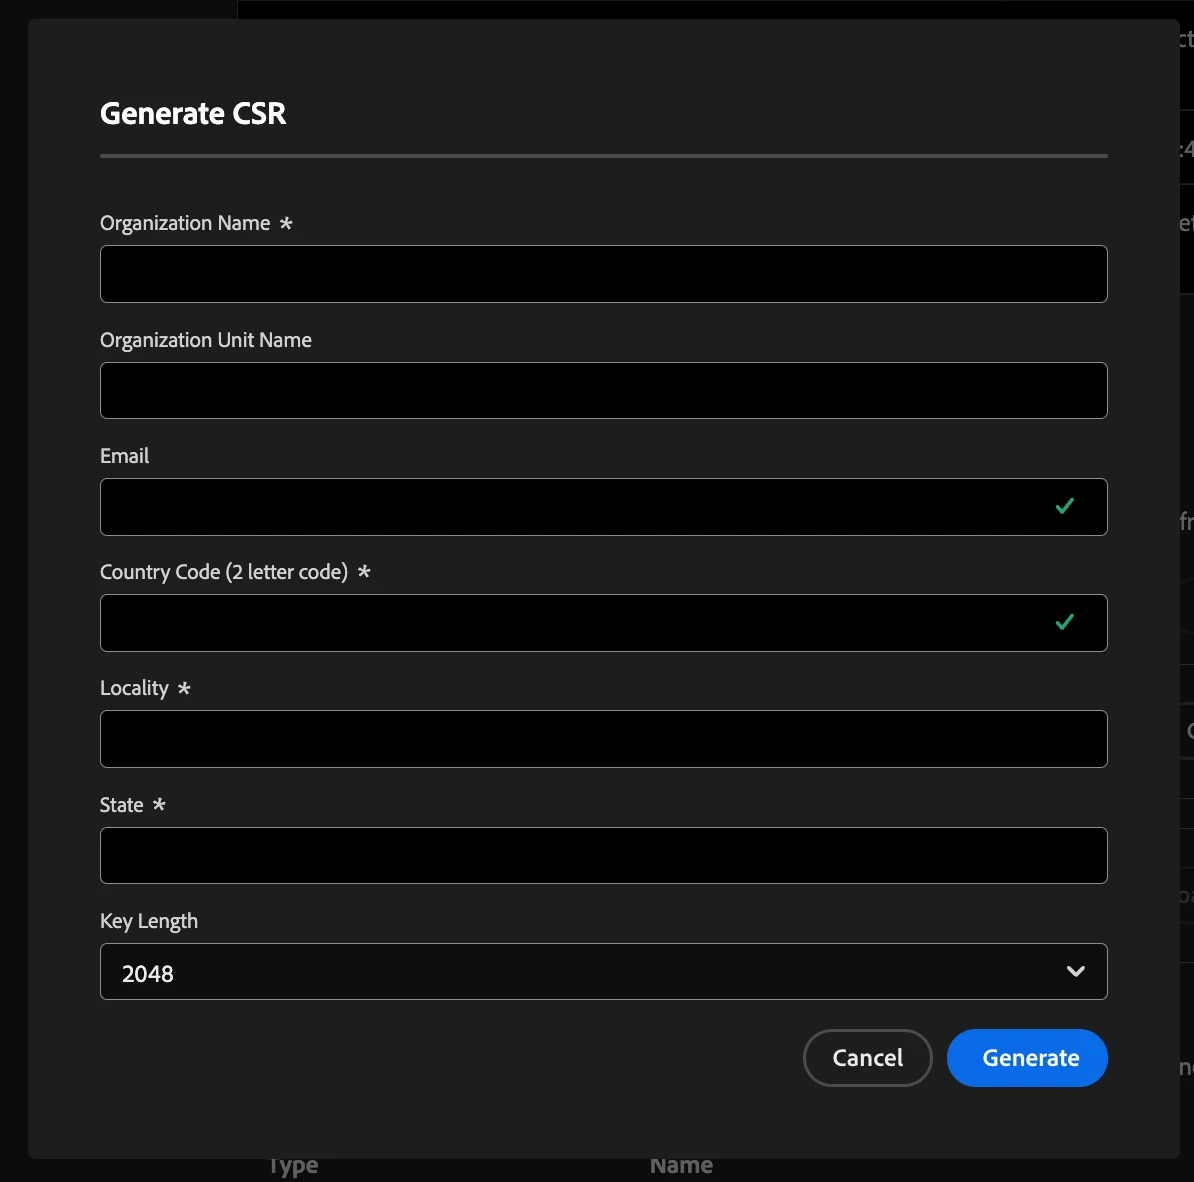
Step 2. Use the "Download CSR" button to save the generated CSR file
Step 3. Submit the CSR to your Certificate Authority (CA) for signing
Certificate Requirements:
- Subject Alternative Names (SANs): The certificate must include both data.subdomain.com and cdn.subdomain.com within a single certificate. For example, if you are trying to delegate example.adobe.com then by data.subdomain.com we mean data.example.adobe.com and by cdn.subdomain.com we mean cdn.example.adobe.com
-The SANs must be added by the customer by requesting them from their Certificate Authority (CA). We will only provide the CSR for data.subdomain.com.
- If supported by your certificate issuing portal, add both subdomains as peer entries.
- Certificate Authority: Any trusted CA that your organization uses
- Certificate Format: PEM format with complete certificate chain
Sample PEM file format
-----BEGIN CERTIFICATE-----
MIIDXTCCAkWgAwIBAgIJALc3... (base64 encoded data)
-----END CERTIFICATE-----
Step 4. Once received from CA, use the "Upload Certificate" button to upload the signed certificate
Important Notes:
- Both data and CDN subdomains must be included in the same certificate
- Certificate validation occurs immediately upon upload
- Once delegation is complete, the customer can view the certificate's expiration date on the subdomain screen. They will also receive expiry warnings 30 days before expiration and must upload a renewed certificate well in advance to avoid downtime or potential data loss
- Customers can either regenerate the CSR or download the existing one to issue a new certificate, which should then be uploaded using the Upload Certificate button
Phase 3: FBL Registration
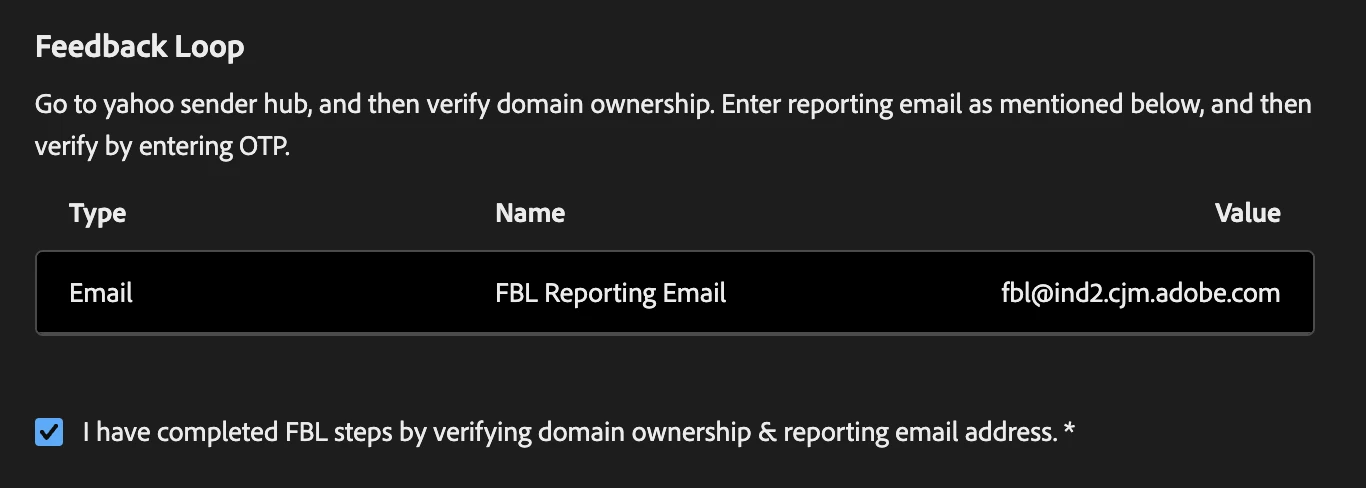
Once the customer completes the FBL registration with assistance from their deliverability consultant for the OTP, they should check the box to confirm the registration is done (more details available here), and then click the 'Continue' button in the top right corner.
Phase 4: CDN Record Configuration
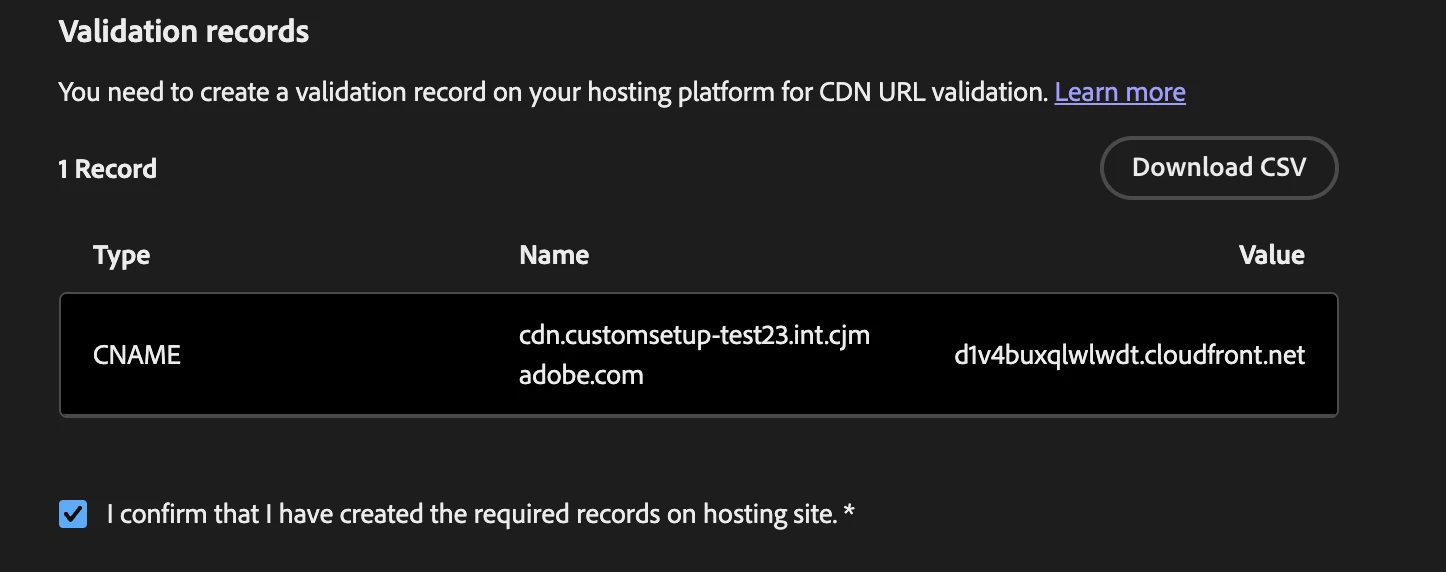
After all the above steps are complete , you'll be prompted to configure the CDN record:
1. Download the CSV containing the CDN record, this will used to serve assets like images.
2. Configure the following in your DNS management system:
3. Check the confirmation box in the UI and click "Submit" to proceed to final verification
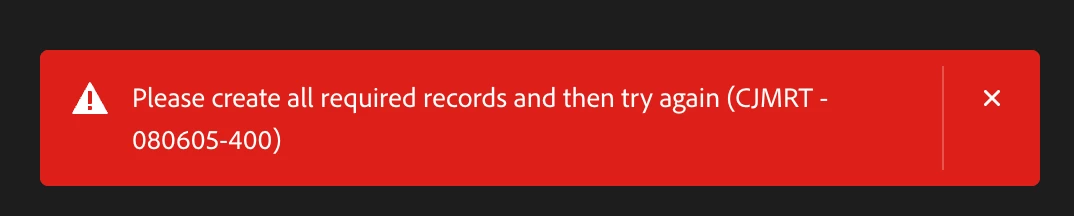
The final phase involves automated validation of your complete setup. The platform verifies that all DNS records are properly configured(if any of the records are missing you'll the above mentioned error), certificates are valid, and email delivery infrastructure is ready.
Verification Checklist:
- ✅ DNS records properly configured and propagated
- ✅ SSL certificate valid and properly chained
- ✅ Email authentication (SPF, DKIM, DMARC) verified
Common Setup Issues and Troubleshooting
Understanding potential challenges and their solutions helps ensure a smooth setup process:
DNS Configuration Issues
If DNS validation fails, these might be the causes:
- Incorrect IP address: Verify the A record points to the exact IP address provided in the setup instructions
- DNS propagation delays: DNS changes can take up to 48 hours to propagate globally - wait and retry validation
- DKIM record formatting: Ensure the TXT record name exactly matches adobe._domainkey.yoursubdomain.com with the provided public key value
- Missing DMARC policy: DMARC record must exist at either _dmarc.yoursubdomain.com or _dmarc.yourdomain.com
- SPF configuration issues: Verify both the redirect record and the actual SPF record are configured correctly
Certificate Upload Issues
If certificate validation fails, check these common issues:
- CSR mismatch: Certificate must be generated using the exact CSR provided by the platform
- Missing SAN domains: Certificate must include bothdata.subdomain.com and cdn.subdomain.com in Subject Alternative Names as peers. The cdn.subdomain.com needs to added as SAN by the customer with the help of their CA.
- Certificate expiration: Ensure the certificate is valid and not expired
- Format issues: Certificate must be in proper PEM format with correct headers and footers
Setup Requirements and Restrictions
Important requirements enforced during setup:
- Country Code: Must be exactly 2 letters (ISO format like US, CA, GB) - this is validated directly in the interface
- Key Length: RSA 2048 or 4096-bit only (cannot be changed after subdomain creation)
- Certificate Authority: Must use a trusted CA that your organization has approved
- DNS Management: All DNS records must be configured in your own DNS management system
- Domain Ownership: You must have administrative control over the domain being configured
Others
If you encounter issues not covered above:
- Check that all DNS records have properly propagated using DNS lookup tools
- Verify your certificate meets all technical requirements before uploading
- Ensure your DNS management system supports all required record types
- Contact support with specific details about which validation step is failing
Benefits for Your Organization
Operational Advantages
- Faster Setup: Automated validation reduces configuration time from weeks to days
- Reduced Errors: Real-time validation prevents common misconfigurations
- Transparency: Full visibility into every configuration step
Security and Compliance
- Complete Control: All domain infrastructure remains under your management
- Zero Dependencies: No third-party access to your domain or certificate infrastructure
- Industry Standards: Support for all major compliance frameworks
Marketing Capabilities
- Full Platform Access: Use all Journey Optimizer features without compromise
- Real-Time Decisioning: Instant campaign optimization while maintaining security
- Unified Experience: Seamless integration with other platform capabilities
Adobe Journey Optimizer's No Delegation feature eliminates the impossible choice between compliance and marketing capabilities, allowing enterprises to maintain complete domain control while accessing advanced marketing automation. This breakthrough proves that the future of enterprise marketing lies in solutions that deliver both security and functionality without compromise.