

Multi Region in a Single Sandbox - Implement Attribute Based Access Control in Adobe Experience Platform
Co-Author: @nereddy
Product Managers: Kapil Gulshan Rohra, Sal Daoud
- Are you struggling with multi region/multi brand scenario in your Adobe Experience Platform implementation using multiple sandboxes?
- Does the ensuing cost, governance, and maintenance overhead impact your total effort and timeline?
Worry no more! Now you can implement Attribute-Based Access Control in a single sandbox to streamline your multi region/multi brand implementation while complying with the organization's Data Governance requirements.
We shall walk you through 'how' you can use Attribute-Based Access Control for implementing multi-region isolation of profiles in a single sandbox of Adobe Experience Platform. We’ll be doing this through the lens of a fictitious example that we’re calling Customer Luma .The customer has different field marketing Roles per region (e.g., APAC/AMER/EMEA) and they want to isolate segments and some sensitive data by each region.
Note: Attribute-based access control & OLAC (Object level Access Control) are also available in Adobe Journey Optimizer but not covered in this article.
One of the key capabilities of Attribute-based access control functionality is XDM (Experience Data Model) field level access control. This allows data stewards to label individual attributes of the schema and enforce access controls to data at a field level. Utilizing Attribute-based access controls at the field level access control capabilities for labelling a unified profile is a flexible solution. This allows a rule based, controlled access to every Adobe Experience Platform Real-Time Customer Profile . Ex: A profile can be labelled as AMERICAS_THEATER or AMERICAS_REGION and thereby can only be accessed by Roles with permissions to AMERICAS_THEATER.
Customer Luma’s Administrators effectively used the field level access controls to limit the access of an Adobe Experience Platform Unified Profile at a Theater or a Region level.
5 Administration Pre-requisite Steps
Prerequisite: Access control for Adobe Experience Platform is provided through the Permissions in Adobe Experience Cloud. This functionality leverages roles, permissions and an Attribute-based access control policy set by a product administrator, which links users with permissions and sandboxes.
For this Attribute based access control walkthrough, we shall use the term ‘Theater’ for region/market.
1. Create a ‘Custom Label’ for each theater/region

2. Create Theater-Based Roles from the ‘Permissions’ Panel
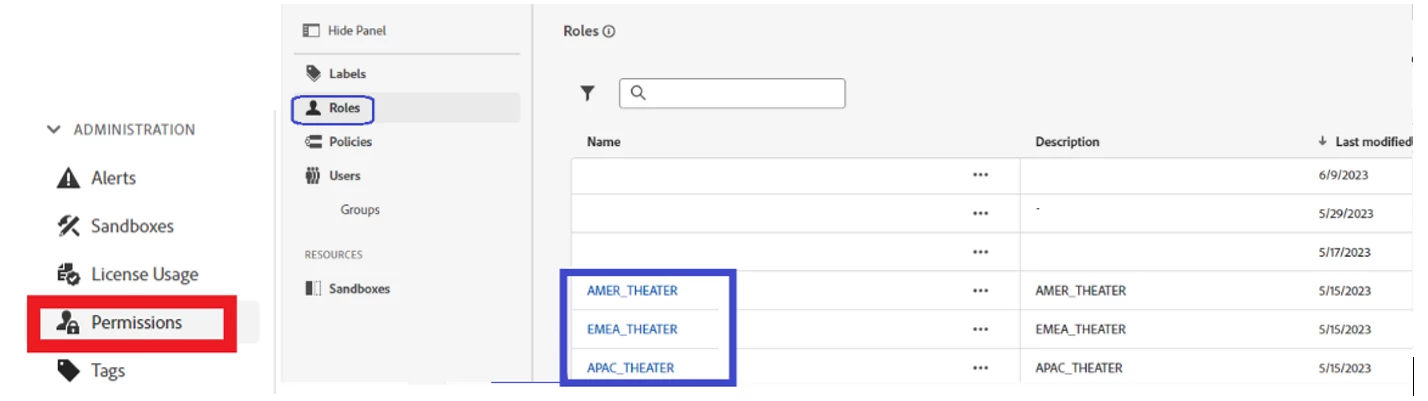
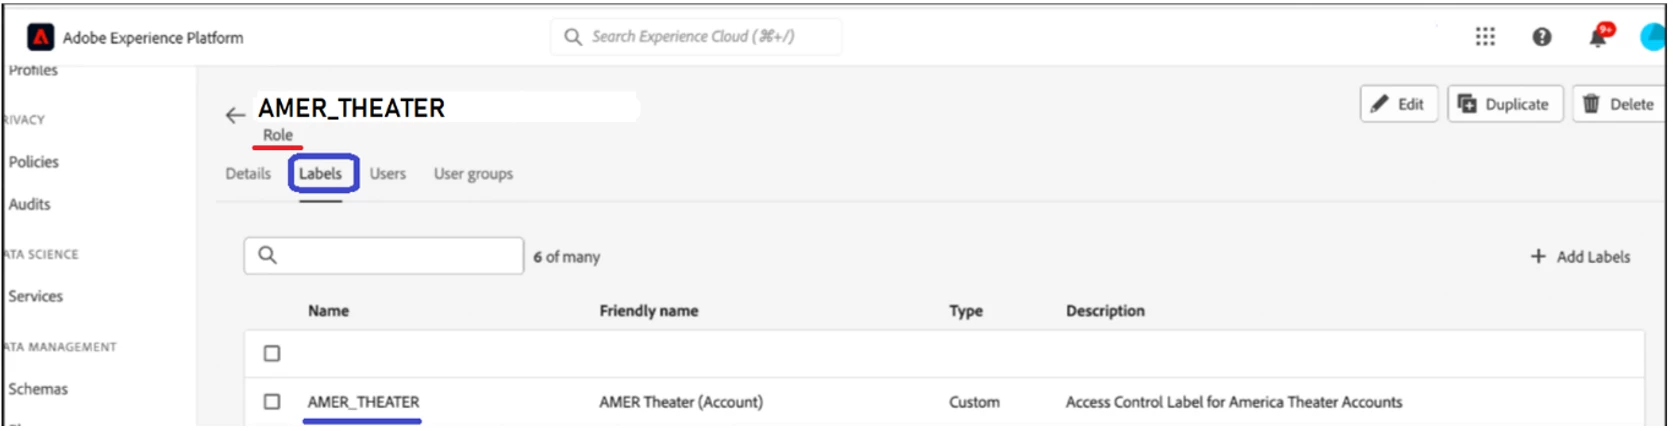
3. Apply the Custom Labels to their Theater-Based Roles.
E.g., “AMER_THEATER role” has been created and ‘AMER_THEATER’ label applied to it.
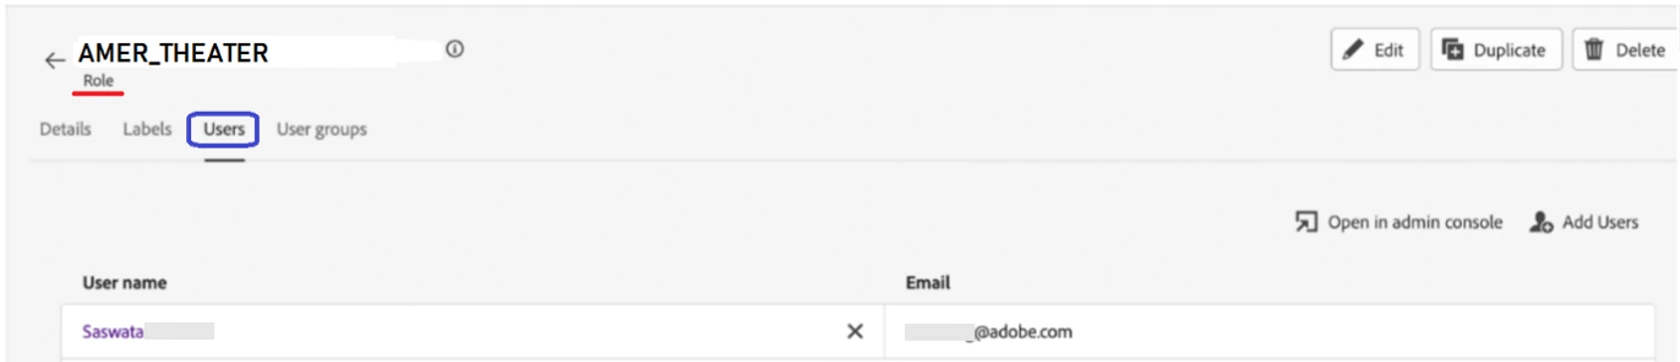
4. Add Users/User Groups to their Theater-Based Roles
5. Activate the ‘Default Label Based Access Control Policy’
Reference: Manage Access Control Policies | Adobe Experience Platform

5-Step Implementation for Multi-Region using ‘Attribute-based Access Control’.
Once the Administrator setup the roles and tied the labels to the roles, then it was time for the Data Architects to model Customer’s data into XDM schema which has theater/region dedicated attributes.
1. Schema: Add a ‘Theater/Region’ Object to the Schema
We have created an ‘Account Theater’ object under _tenant which has an explicit Boolean attribute for each of the theater (AMER, APAC, EMEA).
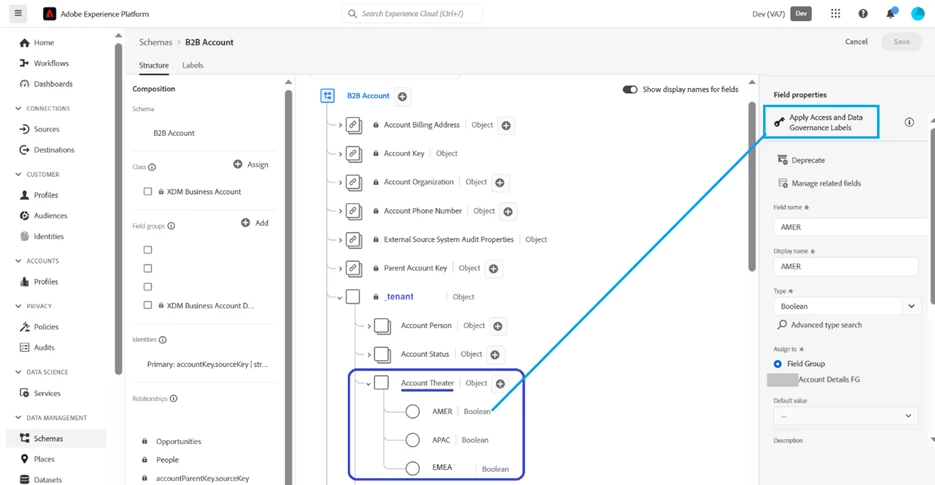
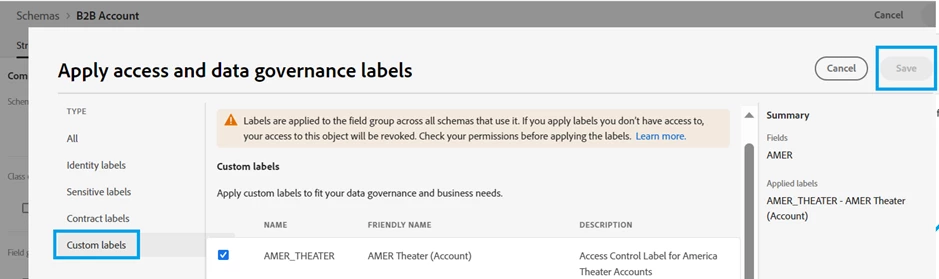
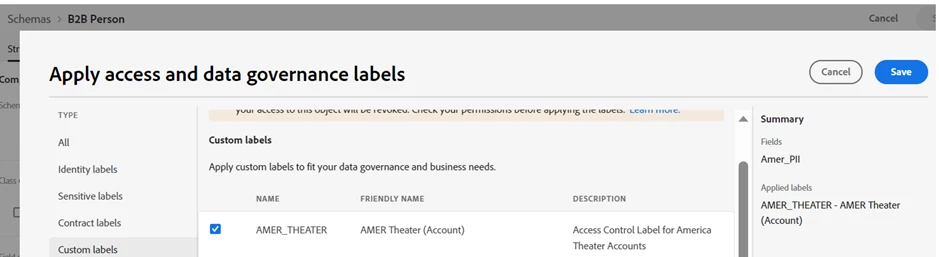
2. Schema: Apply Access Label to the Attribute
Each of the Theater attribute must be tied with the custom label created for it.
E.g.,” Account Theater/AMER” attribute will be labelled with the AMER_THEATER custom label.
This ensures that users from only ‘AMER_THEATER Role’ created by the Administrator will be able to see/use this attribute.
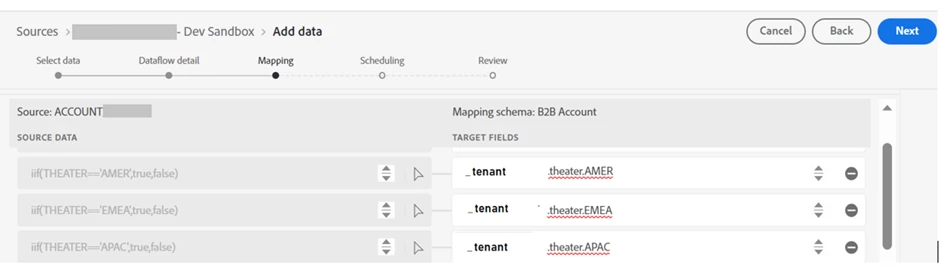
3. Dataset: Populate The Theater Attributes using Data-Prep
Source Data: The Data from Customer has just one ‘THEATER’ attribute populated with either of ‘EMEA,’ ‘APAC’ or ‘AMER’

Once the Data Model for Customer Luma was setup, the Data Engineer ensures that source data is ingested into the theater/region designated attributes only.
Source to Destination XDM Schema mapping:
As row-level filtering is currently not available in Adobe Experience Platform, we transpose the row data to three mutually exclusive theater-specific attributes which populate to ‘true’ when the data belongs to that theater.
The dataflow can be scheduled to ingest data once the mapping step is completed.
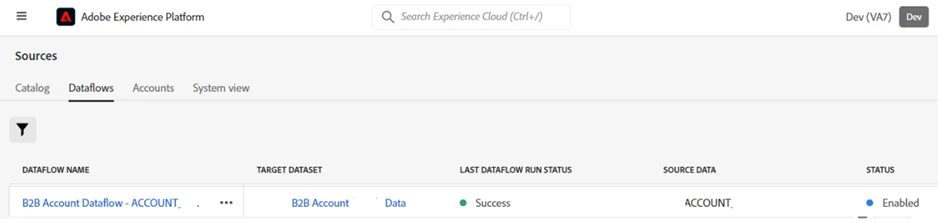
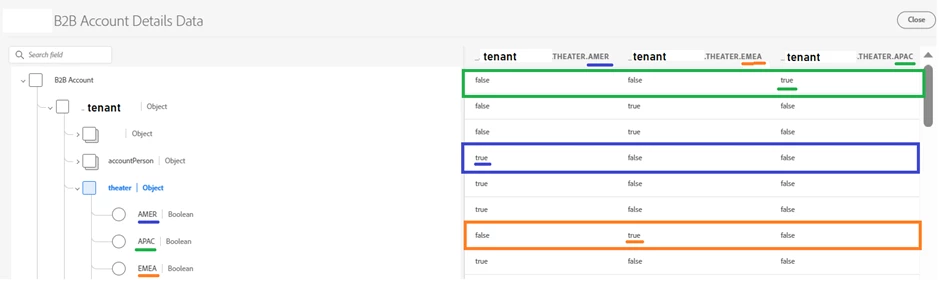
The dataflow runs successfully to populate the ‘THEATER’ object in the dataset and its mutually exclusive theatre attributes as true.
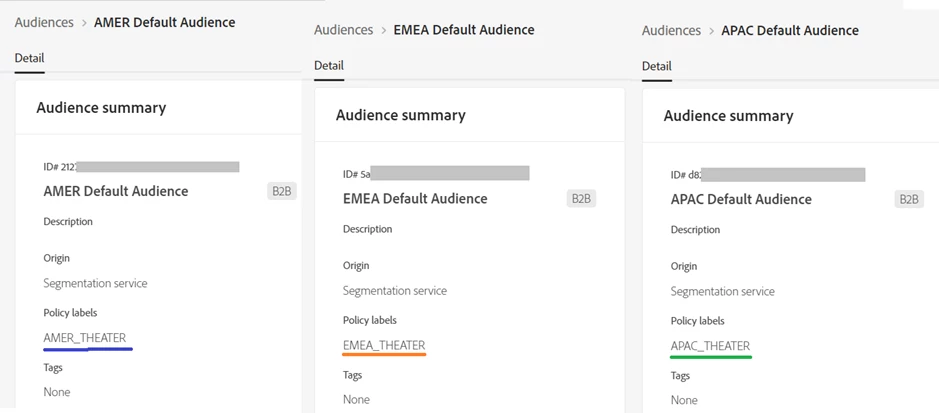
4. Create a ‘Default’ Audience for each Theater.
After previewing the data in the dataset, Realtime-CDP Consultants helped Customer Luma setup the ‘default’ audiences for each theater which would filter the profiles for the specific theater/region.

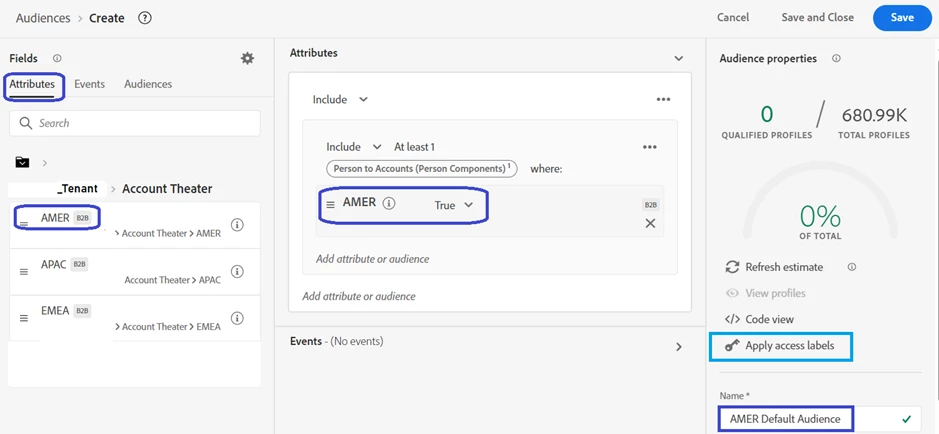
Apply the Access Label for the Theater we had earlier applied on the schema attribute.
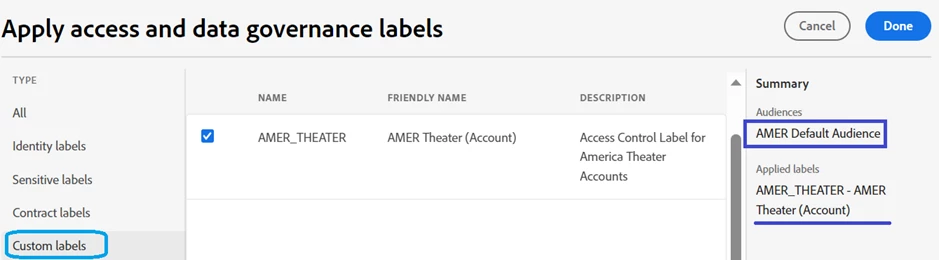
Repeat these steps for the other theater.
’Attribute-Based Access Control’ label applied on a schema attribute hides it for the other roles but does not apply a ‘row-level security/filtering’ on the data itself. Hence this step is important to explicitly apply the filter condition on the ‘default’ audience created for the theater. Customer Luma was asked to provide a guideline to their marketers to not edit these ‘default’ audiences.
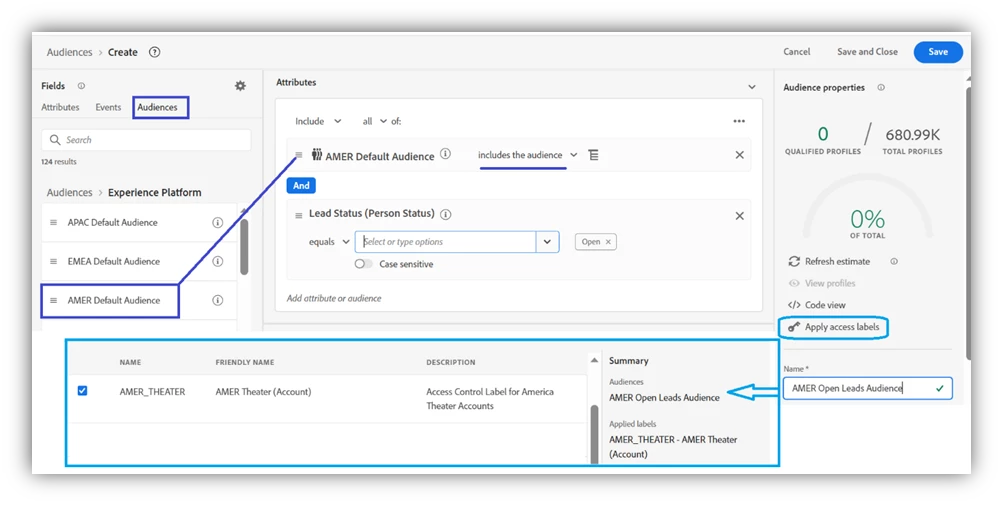
5. Create New Business Audiences using the ‘<Theater> Default Audience.’
Now when the Customer Luma’s marketers created new audiences, they abided by two rules to isolate the audiences of their theater from being accessed by other theater-
- Include the <Theater> Default audience before adding more rules.
- After building the audience rules, ‘Apply the <THEATER> access label’ on this new audience as well.
Bonus Steps Needed for Hiding PII Across Theater/Region
For the sake of simplicity, we showed Customer Luma, how to implement Attribute-based access control at attribute-level. This implementation can be further extended to apply Attribute-based access control at entire Theater/Region-object level wherein each theater/region object has sensitive information like PII (Personally Identifiable Information) which should also be hidden from the users of different regions.
It is sufficient to apply the label at the top object level instead of each attribute under the object hierarchy.
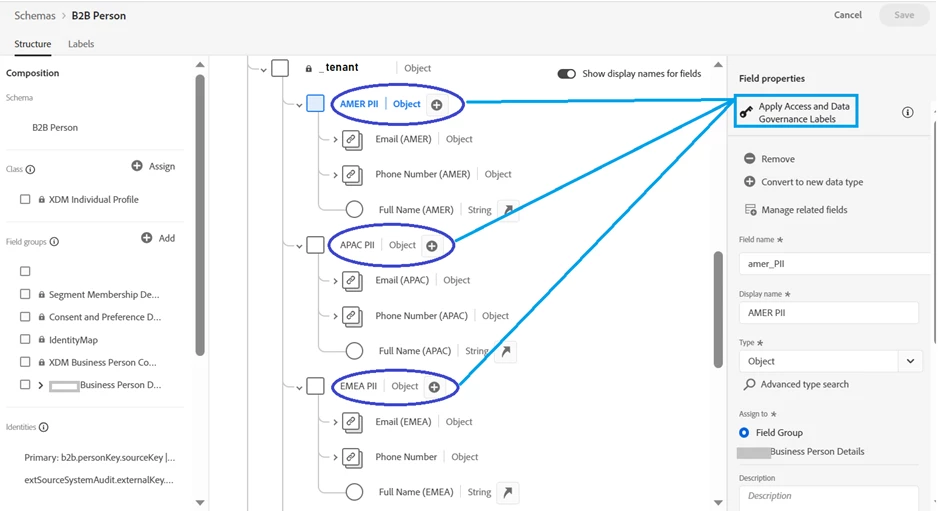
This should be followed by dataflow mapping discussed in the earlier implementation section. Mapping based on the theater/region would ensure that only the PII object for the specific theater is populated. This will ensure that other region users cannot view the PII information at multiple places like Profile UI, dataset preview, segmentation etc. as validated in the next section.
Caution: Attribute redundancy is advisable for a handful of regions/brands/business units only but may not be suitable for e.g., 100 customer entities trying to adopt this single-sandbox approach as it may exceed profile size beyond soft guardrails or licensed profile richness (the average size of your profile data in Experience Platform). For complex use cases like this, you may need to have multiple sandboxes.
3-step API Validation of Access Labels
Customer Luma was also interested to create or validate Attribute based access control in bulk for multiple roles or objects. Hence, we also recommended the following APIs for their automation.
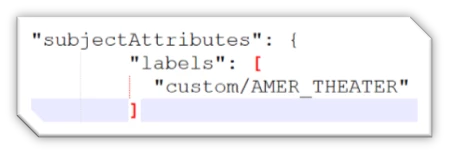
1. Fetch Labels Associated with a Role
Roles API Endpoint | Adobe Experience Platform

A successful API response will return the Role and the access labels applied on the role. E.g.
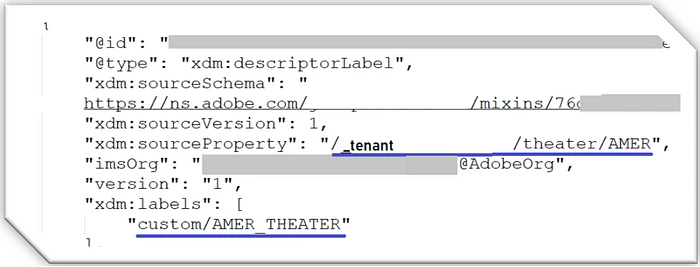
2. Fetch Labels Associated with a Schema Attribute.
Whenever an access label is applied on a schema attribute, a descriptor of type ‘descriptorLabel’ is created for the attribute which has the attribute name, fieldgroup and the access label applied.
Schema Registry API (adobe.com)

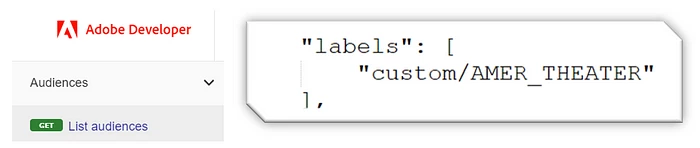
3. Fetch Labels Associated with an Audience.
When we create an Audience and apply an access label, the Audience Definition fetched via API lists the access labels applied on the Audience.
Segmentation Service API (adobe.com)
In this way you can implement and validate the Attribute-based Access Labels on schema attributes and audiences as per your role configuration.
We've covered the business point of view on this dilemma of single vs multiple sandboxes in the Adobe Tech Blog on medium.com:
Brief Summary of the above article:
4 Challenges with the Multi-Sandbox Approach
10-Fold Data-Isolation Outcome
7 Key Considerations
4 Benefits of Single-Sandbox Approach Using Attribute Based Access Control
We are optimistic that you now have all the tools necessary to plan/implement Attribute-based access control in your Adobe Experience Platform sandbox; not just for multi-region use case example above, but for multi-brand or multi-context scenarios as you see fit.
Related Links:
- Attribute-Based Access Control Overview | Adobe Experience Platform
- Attribute-based access control | Adobe Journey Optimizer
- Object level access control | Adobe Journey Optimizer
- Attribute-based Access Control Manage Role Permissions | Adobe Experience Platform
- Manage Access Control Policies | Adobe Experience Platform
- Attribute-Based Access Control End-to-End Guide | Adobe Experience Platform
- Adobe Experience Platform APIs
- Real-Time Customer Profile Overview | Adobe Experience Platform
- Adobe Experience Platform | Data Platform Services
- Adobe Consulting Services
- Contact Us
#AEP #Adobe Experience Platform #ABAC # Access Control #Data Governance #Multi Region