AC Tips & Tricks: Custom API - Expose data in JSON (Part 1)
Alternative approach for exposing campaign data through a custom jssp API by leveraging "Dynamic JavaScript Pages".
- Navigate to "Administration/Configuration/Dynamic JavaScript Pages"
- Create a new page and set a custom name in the following format (namespace:pagename.jssp) i.e. "cus:recipientAPI.jssp"
- Paste the below script:
Script
<%@ page import="/nl/core/shared/nl.js"%>
<%
//required server-side dependencies
NL.ns('NL.API');
NL.require('/nl/core/shared/core.js')
.require('/nl/core/jsspcontext.js');
//response headers
response.setContentType("application/json");
response.addHeader("Access-Control-Allow-Origin", "*")
response.addHeader("Pragma", "no-cache");
response.addHeader("Cache-Control", "no-cache");
response.addHeader("Date", new Date());
response.addHeader("Expires", new Date());
//require authentication
var jsspContext = new NL.JSSPContext(request);
if( !jsspContext.checkAuthentication() ) {
response.sendError(403, "Authentication required");
return;
} else if(request['method'] != 'POST'){ //API only accepts requests made through POST
response.sendError(405, "Method Not Allowed ["+request['method']+"]");
return;
}
//fetch url param id value
var rcpId = request.getParameter('id');
try {
if (rcpId){
var rcpObj = nms.recipient.load(rcpId); //load recipient
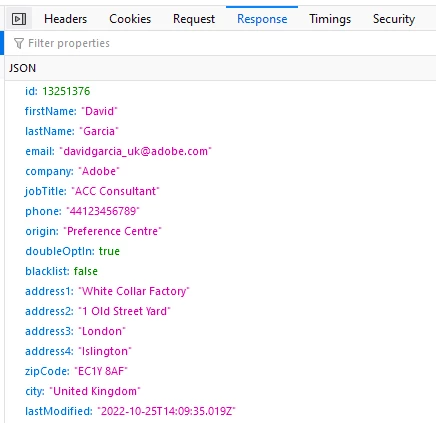
//construct response array, add/remove properties as required from recipient schema
var response = {
'id':rcpObj.id,
'firstName':rcpObj.firstName,
'lastName':rcpObj.lastName,
'email':rcpObj.email,
'company':rcpObj.company,
'jobTitle':rcpObj.JOB_TITLE,
'phone':rcpObj.phone,
'origin':rcpObj.origin,
'doubleOptIn':rcpObj.doubleOptin,
'blacklist':rcpObj.blackList,
'address1':rcpObj.location.address1,
'address2':rcpObj.location.address2,
'address3':rcpObj.location.address3,
'address4':rcpObj.location.address4,
'zipCode':rcpObj.location.zipCode,
'city':rcpObj.location.city,
'lastModified':rcpObj.lastModified
}
document.write(JSON.stringify(response)); //write response data to browser
} else {
response.sendError(400, "Bad request, missing [id] param or value");
}
} catch (err) {//catch errors
response = {'error':err.toString()};
document.write(JSON.stringify(response));
}
%>
Dependencies
The following libraries are mandatory to enforce/verify jssp authentication for security purposes
<%@ page import="/nl/core/shared/nl.js"%>
<%
NL.ns('NL.API');
NL.require('/nl/core/shared/core.js')
  .require('/nl/core/jsspcontext.js');
Headers
Basic headers to control cache, see a list of configurable response headers in the following link https://developer.mozilla.org/en-US/docs/Glossary/Response_header
response.setContentType("application/json");
response.addHeader("Access-Control-Allow-Origin", "*")
response.addHeader("Pragma", "no-cache");
response.addHeader("Cache-Control", "no-cache");
response.addHeader("Date", new Date());
response.addHeader("Expires", new Date());
Authentication
You may control jssp authentication by using "logonEscalation(webapp)" or specify a custom operator, the following functions are available.
| Name | function() |
|---|---|
| logon | function logon() |
| logonEscalation | function logonEscalation() |
| logonWithContext | function logonWithContext() |
| logonWithToken | function logonWithToken() |
| logonWithUser | function logonWithUser() |
Request
- URL structure should be as following: https://<yourinstance>/cus/recipientAPI.jssp?id=1234567
- cus is the namespace set when creating the jssp page and id to contain the recipient id to load.
- method, to test the jssp on your browser, change line 23 (request['method'] != 'POST') to (request['method'] != 'GET'). otherwise, POST method only allows requests from forms or tools which allows to configure the method type.
- You must be logged in to adobe campaign instance as the jssp context relies on a session token, to do this, login to any webapp on the same instance, alternative use the following url structure and fill in your instance URL https://<yourinstance>/nl/jsp/logon.jsp?target=%2FwebApp%2F
Link(s)
- https://experienceleague.adobe.com/developer/campaign-api/api/f-load.html
- https://experienceleaguecommunities.adobe.com/t5/adobe-campaign-classic-questions/campaign-classic-web-service-call-via-rest/td-p/448347
- https://experienceleaguecommunities.adobe.com/t5/adobe-campaign-standard/trigger-a-workflow-using-dynamic-jssp-page/m-p/234908
- https://technowide.net/2018/02/05/jssp-creating-recipients-ac-aem/
- https://blog.floriancourgey.com/2019/03/functions-and-objects-in-adobe-campaign
- https://blog.floriancourgey.com/2018/11/create-jssp-dynamic-javascript-server-page-in-acc/
Part 2
The next blog (link to part 2) will rely on the custom API to load data into a webapp form using AJAX.