Expand my Community achievements bar.

We are excited to introduce our latest innovation to enhance the Adobe Campaign user experience — the Adobe Campaign v8 Web User Interface!
SOLVED

Adobe Campaign(standard) Integration with Magento

Avatar

Level 2

Hi ,

Is there anyway to integrate magento  with adobe campaign standard version.?

1 Accepted Solution

Avatar

Correct answer by
Level 3

Hello

Find the explanation below.

How to set up your bridge step-by-step tutorial

Before you start

  1. Head over to the left sidebar and click on Bridges
  2. You'll be taken to the Bridges section of your account
  3. Click on the Add New button
  4. You'll be taken to the first step of the bridge creation

Step 1: Bridge's Main information

  1. Choose a name for your bridge (this will only be visible inside LeadsBridge)
  2. You may add labels to help you identify your bridge later
  3. Choose Adobe Campaign as the source for your bridge
  4. Choose Magento as the destination
  5. Click on the Next button

Step 2: Setup your Adobe Campaign source

    1. Type in the name you'd like to call your integration
    2. Enter Client ID, Client Secret, API Key, JWT token and Tenant ID to connect your Adobe Campaign with LeadsBridge

  • Adobe Campaign APIs require an "API key" and a "user token" to authenticate users requesting APIs.
    1) Sign into Adobe I/O console (( OPEN LINK) and choose your IMS organization from the organization drop down. Then select New integration.
    2) Select "Access an API" and click Continue.
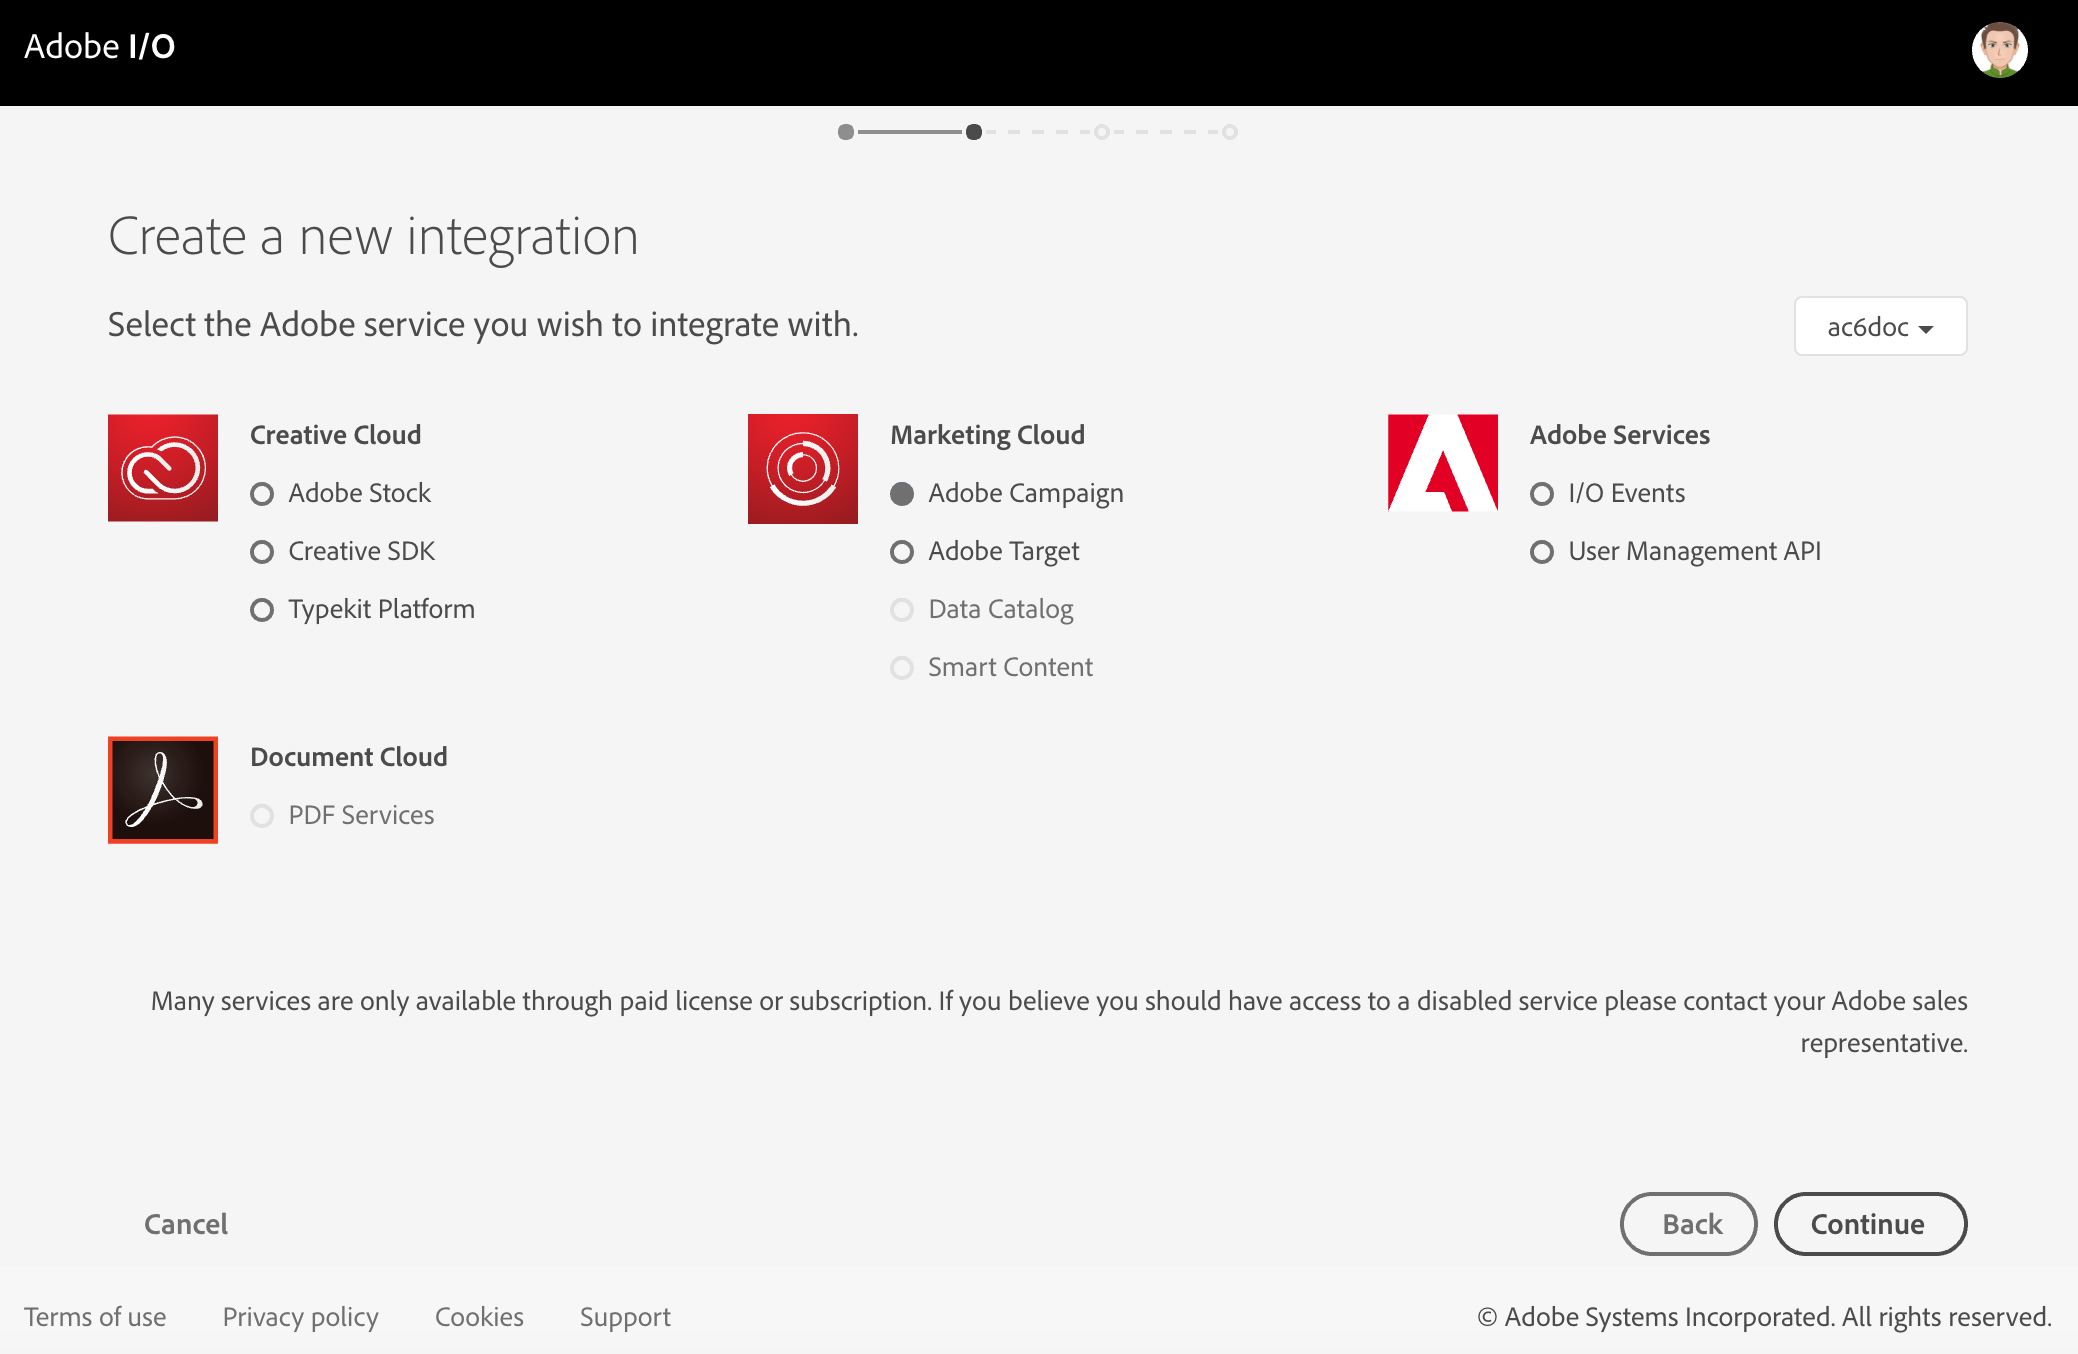
    3) Select Adobe Campaign in the list of possible integrations, under the Marketing Cloud section, and click Continue.
    4) Select New integration and click Continue.
    5) Enter the details needed to create the new integration like Name, Description and the Campaign service to use. Then click Create integration.
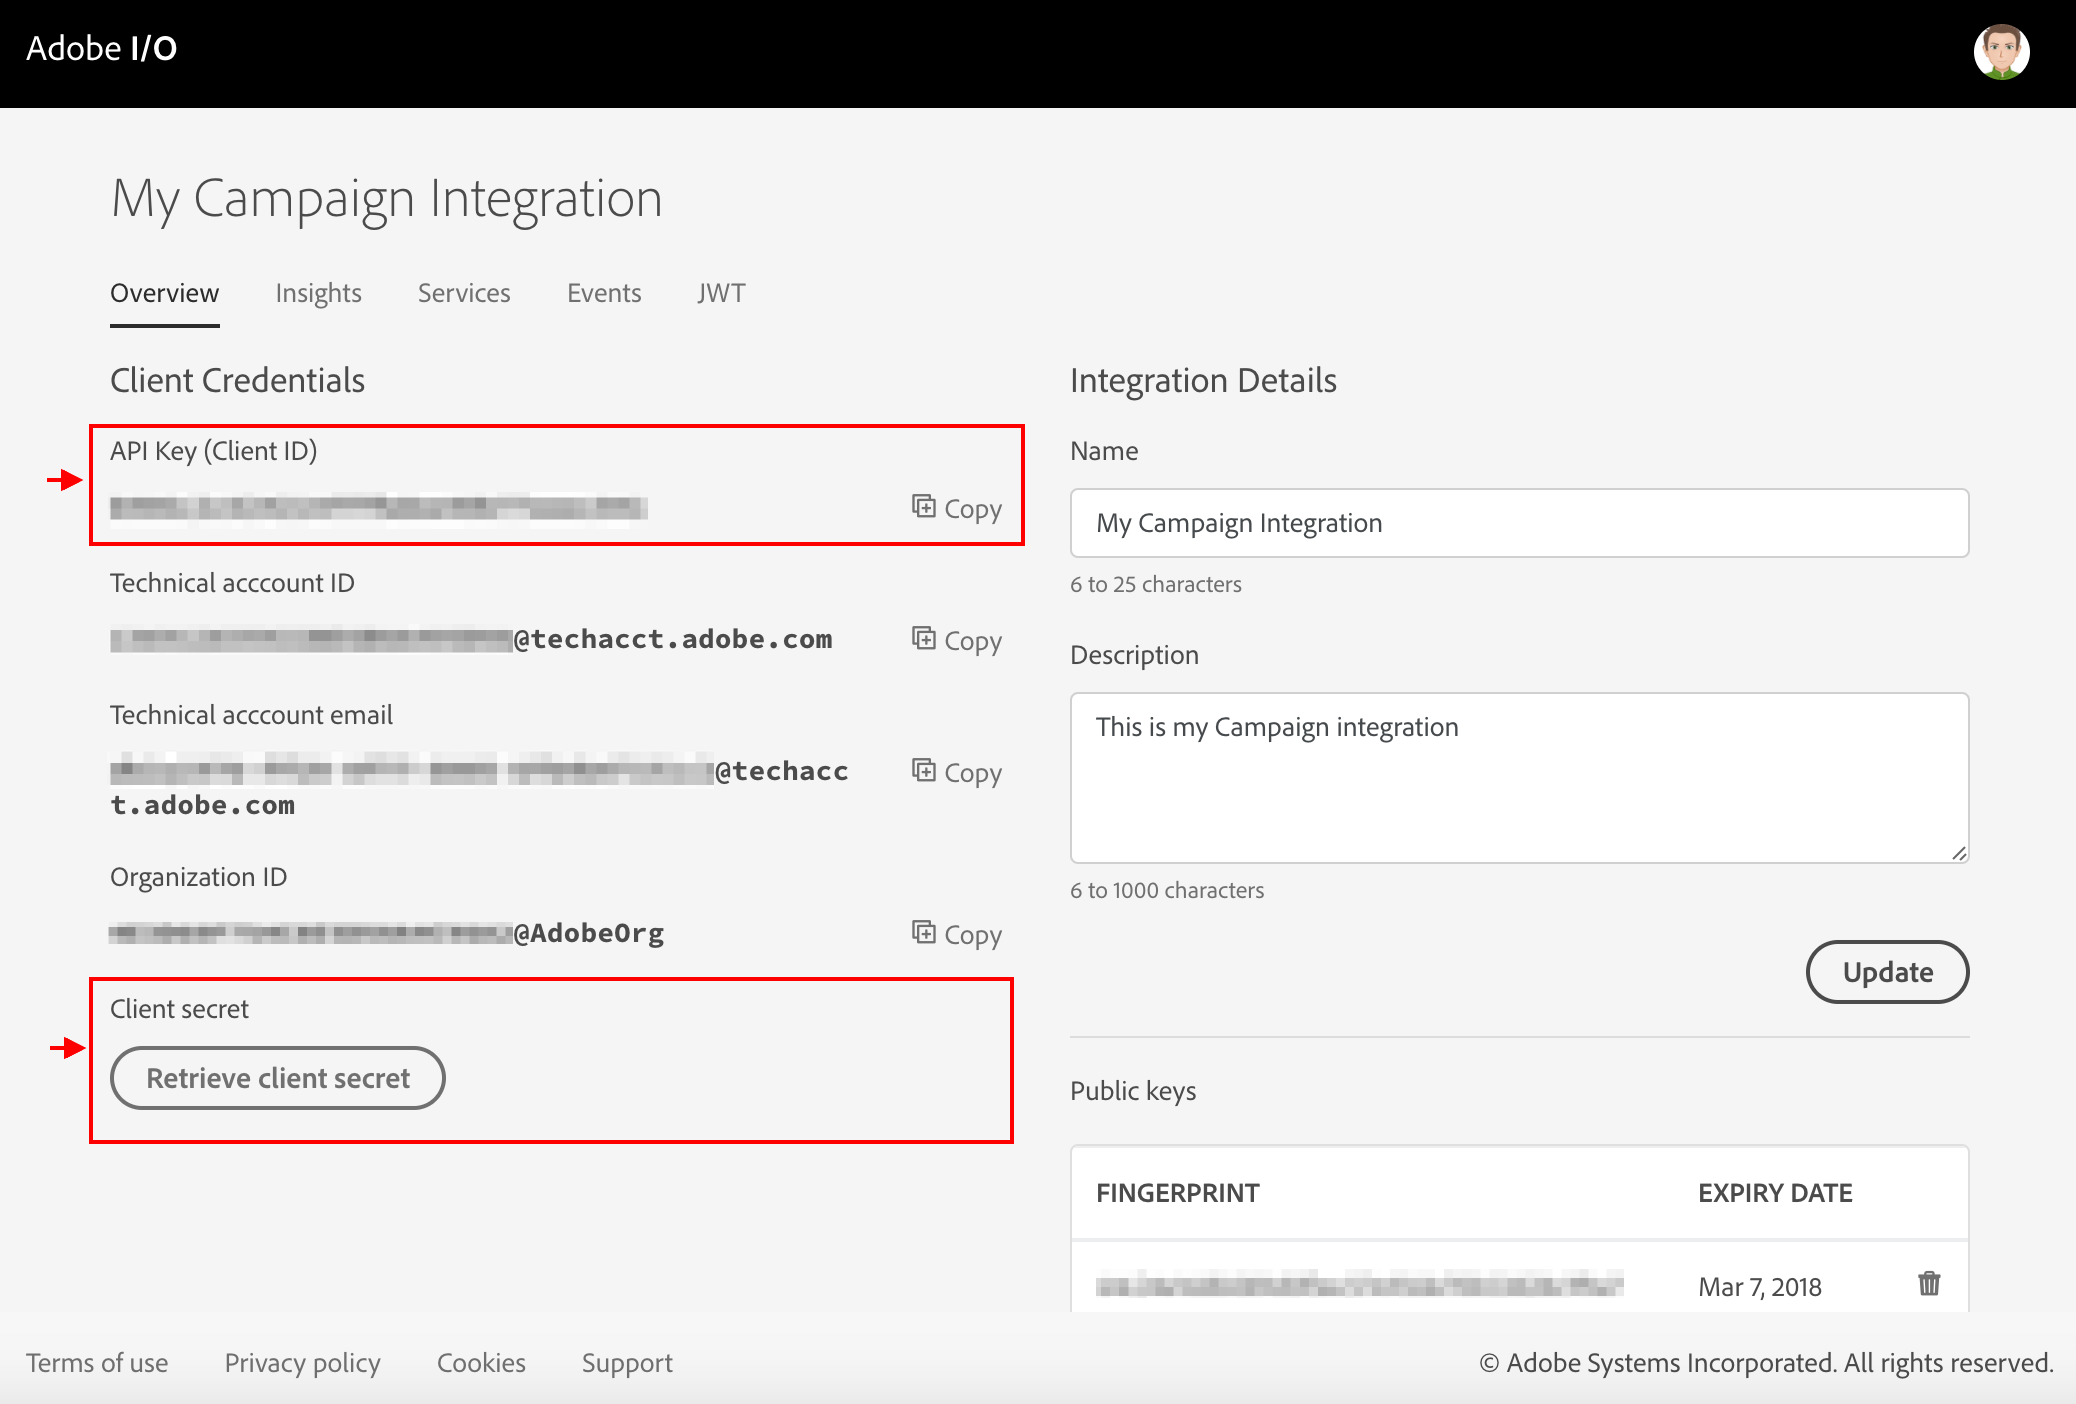
  • Copy the API Key (Client id) and Client Secret credentials generated.( OPEN LINK)
  • Click on the Next button
  • Click on the Next button

Step 3: Setup your Magento destination

    1. Type in the integration's name in the dedicated field
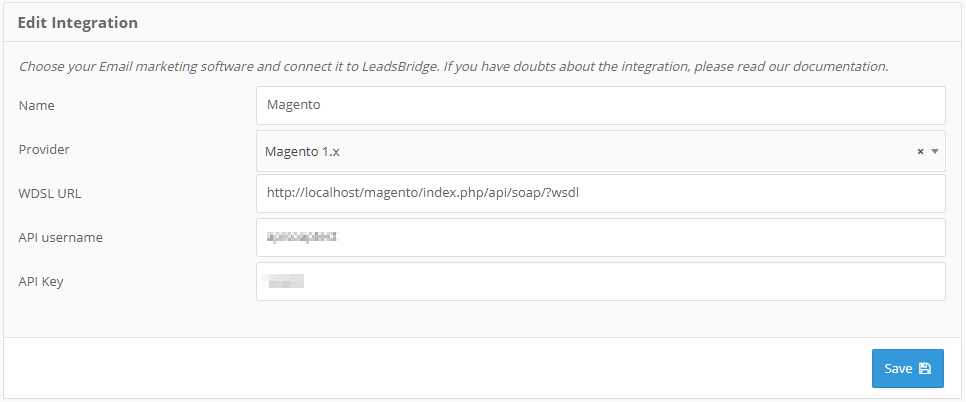
    2. Enter WSDL URL, API Username and API Key to connect Magento with LeadsBridge

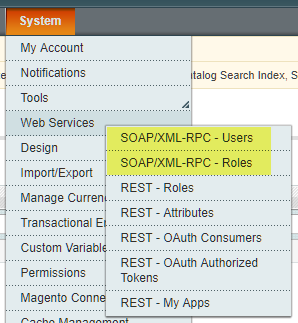
  1. When creating API roles and users it's important to select the SOAP/XML-RPC - Roles and SOAP/XML-RPC - Users menus, respectively.
  2. Click on the Next button
  3. You'll now be able to select the destination segment to send your leads to
  4. You may choose to receive an email receipt for each incoming lead.
    • Type the address(es) where you'd like to receive the receipt
    • You may also modify the Subject line of the email
  5. Click on the Next button

Step 4: Fields Mapping

Here you'll be able to map your source information with your destination fields.You'll see a field name with the destination integration's logo at the top, this indicates the name of the field on Magento.Underneath there's a box where you may add the information you'd like to send.

  • Check each of the Magento fields available
  • Match the information you wish to pass along from Adobe Campaign
  • You may type the information manually and pass them as a static value
  • Use the functions to customize information like reformatting dates and times or modifying text, phone numbers and so on
  • You may also leave blank the box of a field's information you don't want to send through

Custom Fields

    1. If you'd like to add more fields, just look at the bottom of the page
    2. Head over the "Don't find a CRM custom field?" box
    3. Select the field you'd like to add from the dropdown list
    4. Click the Add Custom Field button

  1. The field will appear above
  2. Add the desired information, as you did with the other ones

Once accomplished your desired outcome, just click Next and head to the last step.

Step 5: Test

In this final step, you'll be able to send a lead from LeadsBridge to test if the configuration works properly.

  1. To create a new test lead, fill in the required information when prompted
  2. Click Test Now
  3. To test with a real lead, switch the toogle to "Test with existing lead".
  4. Click Sync Now along the lead you'd like to send
  5. If you did everything right the button will turn green, meaning your lead was synced successfully and the integration is ready
  6. Click Finish to save your settings and turn active your bridge

View solution in original post

3 Replies

Avatar

Employee

Hi,

At present, there is no integration. What are the use cases which you are looking for with this integration.

Avatar

Level 2

Hi pankhris51146706

I have a similar situation and below mentioned are the Use cases:

1. Need to transfer data of customers who visit my website (on magento) for sending real-time transactional communications like cart abandonment, user registration etc.

2. Need to send marketing communications to users (weekly or monthly), for this email communication, the assets like images, gifs, need to be pulled from magento server.

Also a few more information: I am using Adobe campaign classic (v7).

Any information to achieve above mentioned use-cases would be useful.

Regards,

Subrat Sahu

Avatar

Correct answer by
Level 3

Hello

Find the explanation below.

How to set up your bridge step-by-step tutorial

Before you start

  1. Head over to the left sidebar and click on Bridges
  2. You'll be taken to the Bridges section of your account
  3. Click on the Add New button
  4. You'll be taken to the first step of the bridge creation

Step 1: Bridge's Main information

  1. Choose a name for your bridge (this will only be visible inside LeadsBridge)
  2. You may add labels to help you identify your bridge later
  3. Choose Adobe Campaign as the source for your bridge
  4. Choose Magento as the destination
  5. Click on the Next button

Step 2: Setup your Adobe Campaign source

    1. Type in the name you'd like to call your integration
    2. Enter Client ID, Client Secret, API Key, JWT token and Tenant ID to connect your Adobe Campaign with LeadsBridge

  • Adobe Campaign APIs require an "API key" and a "user token" to authenticate users requesting APIs.
    1) Sign into Adobe I/O console (( OPEN LINK) and choose your IMS organization from the organization drop down. Then select New integration.
    2) Select "Access an API" and click Continue.
    3) Select Adobe Campaign in the list of possible integrations, under the Marketing Cloud section, and click Continue.
    4) Select New integration and click Continue.
    5) Enter the details needed to create the new integration like Name, Description and the Campaign service to use. Then click Create integration.
  • Copy the API Key (Client id) and Client Secret credentials generated.( OPEN LINK)
  • Click on the Next button
  • Click on the Next button

Step 3: Setup your Magento destination

    1. Type in the integration's name in the dedicated field
    2. Enter WSDL URL, API Username and API Key to connect Magento with LeadsBridge

  1. When creating API roles and users it's important to select the SOAP/XML-RPC - Roles and SOAP/XML-RPC - Users menus, respectively.
  2. Click on the Next button
  3. You'll now be able to select the destination segment to send your leads to
  4. You may choose to receive an email receipt for each incoming lead.
    • Type the address(es) where you'd like to receive the receipt
    • You may also modify the Subject line of the email
  5. Click on the Next button

Step 4: Fields Mapping

Here you'll be able to map your source information with your destination fields.You'll see a field name with the destination integration's logo at the top, this indicates the name of the field on Magento.Underneath there's a box where you may add the information you'd like to send.

  • Check each of the Magento fields available
  • Match the information you wish to pass along from Adobe Campaign
  • You may type the information manually and pass them as a static value
  • Use the functions to customize information like reformatting dates and times or modifying text, phone numbers and so on
  • You may also leave blank the box of a field's information you don't want to send through

Custom Fields

    1. If you'd like to add more fields, just look at the bottom of the page
    2. Head over the "Don't find a CRM custom field?" box
    3. Select the field you'd like to add from the dropdown list
    4. Click the Add Custom Field button

  1. The field will appear above
  2. Add the desired information, as you did with the other ones

Once accomplished your desired outcome, just click Next and head to the last step.

Step 5: Test

In this final step, you'll be able to send a lead from LeadsBridge to test if the configuration works properly.

  1. To create a new test lead, fill in the required information when prompted
  2. Click Test Now
  3. To test with a real lead, switch the toogle to "Test with existing lead".
  4. Click Sync Now along the lead you'd like to send
  5. If you did everything right the button will turn green, meaning your lead was synced successfully and the integration is ready
  6. Click Finish to save your settings and turn active your bridge