
Resource Management Part 3 - Capacity Planning Using the Resource Planner
As you, your leaders and your organization consider proposed initiatives in the future, available resources need to be considered first before work gets approved and underway. Think of the Resource Planner as a transaction register or a means to capture available capacity based on resource allocation. As each project in prioritized order depletes resources from capacity, less is then available for proposed future work. Eventually, resources may run out leading to a negative number (as shown in red) in Workfront.
To continue the Resource Management series, this week’s blog will provide steps on how to successfully use the Resource Planner to ensure successful capacity planning in Workfront.
1. DEFINE THE DEMAND
In order to know if capacity can meet demand, you must first have an accurate picture of the existing and desired demand for work:
- In Flight Work Demand - The total amount of work represented in projects that are already created and scheduled / assigned to Job Roles (or Users)
- Proposed Demand - The estimated work effort associated with proposed projects. In order to perform capacity planning, the estimated timelines and effort by job role will need to be documented in Workfront.
More detailed information on entering the work demand can be found in the previous blogs on resource management, Part 1 - Introduction to the Tools and Part 2 - Work Planning and Resource Scheduling.
2. DEFINE THE CAPACITY
Once the demand of work has been entered into Workfront, ensure that the capacity of your team to do work is accurately represented. The capacity for a given project will be determined by the Resource Pools associated with that project — more specifically, by the sum of available hours of the users in that Resource Pool (determined by schedule, FTE value, and time off).
- Future Capacity - This is the estimated amount of resource effort available to the organization, represented by the users added to a Resource Pool. Generally, it is measured as a total number of available hours by Job Role.
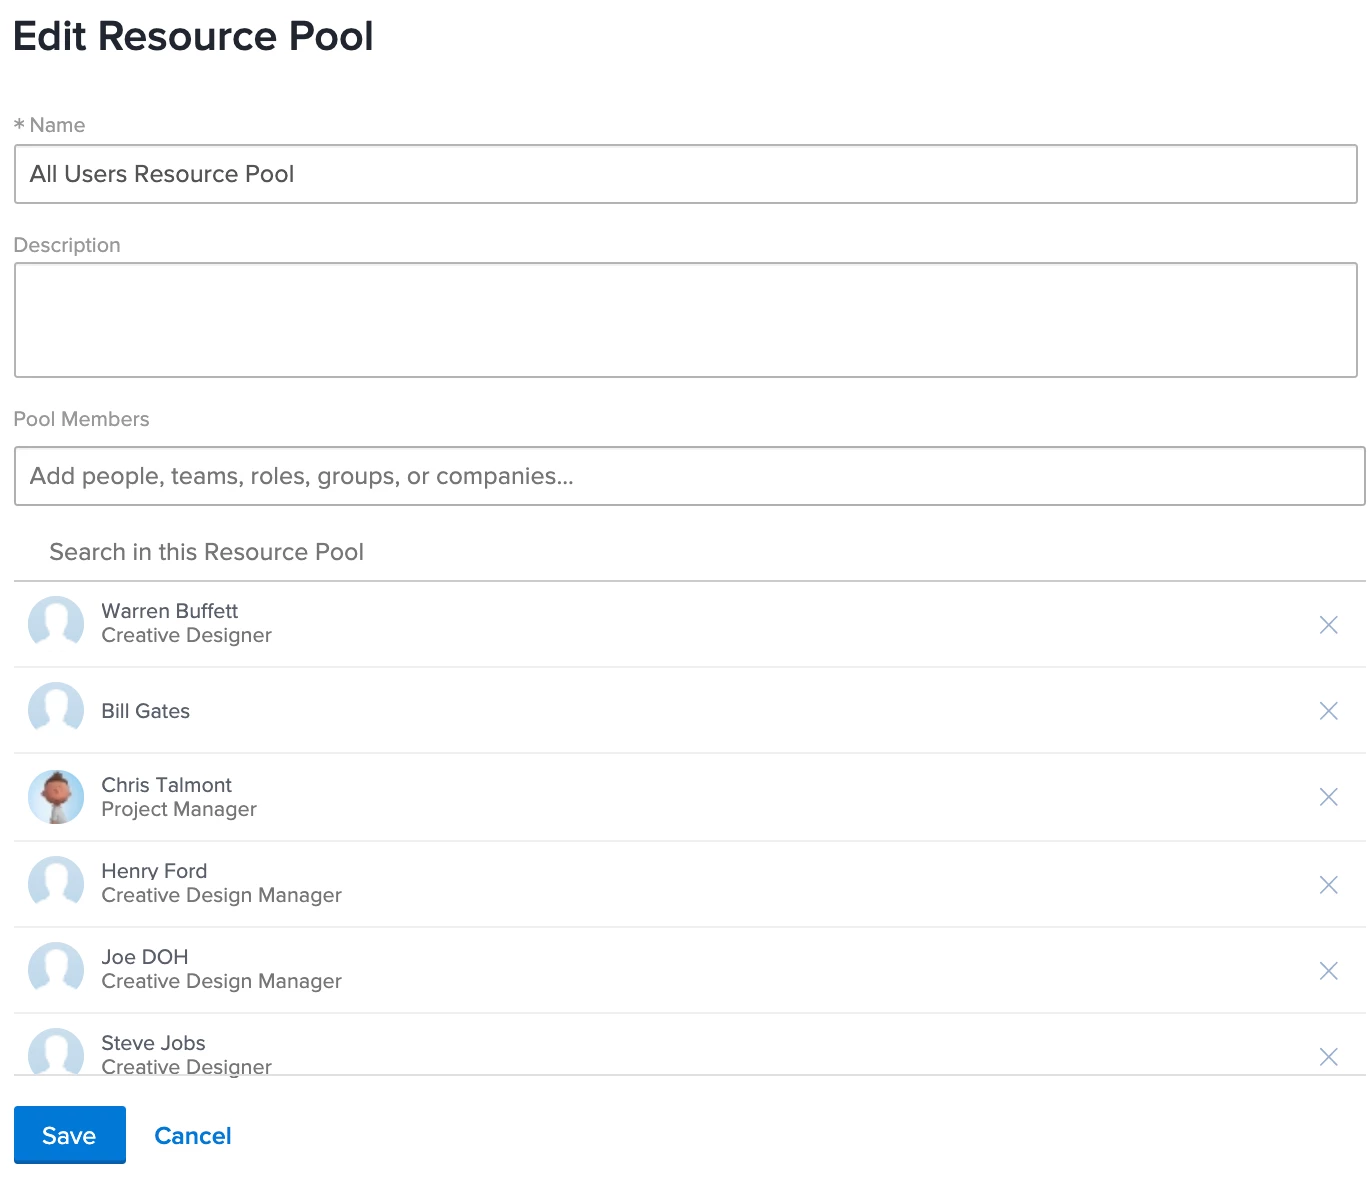
PRO TIP: When getting started with resource pools, it is recommended that you create one pool for all users. Larger organizations may choose to add more Resource Pools by department or sub team. Available capacity for a project will be based on the users listed in the resource pool(s) associated with that project.
3. FILTER AND PRIORITIZE THE WORK
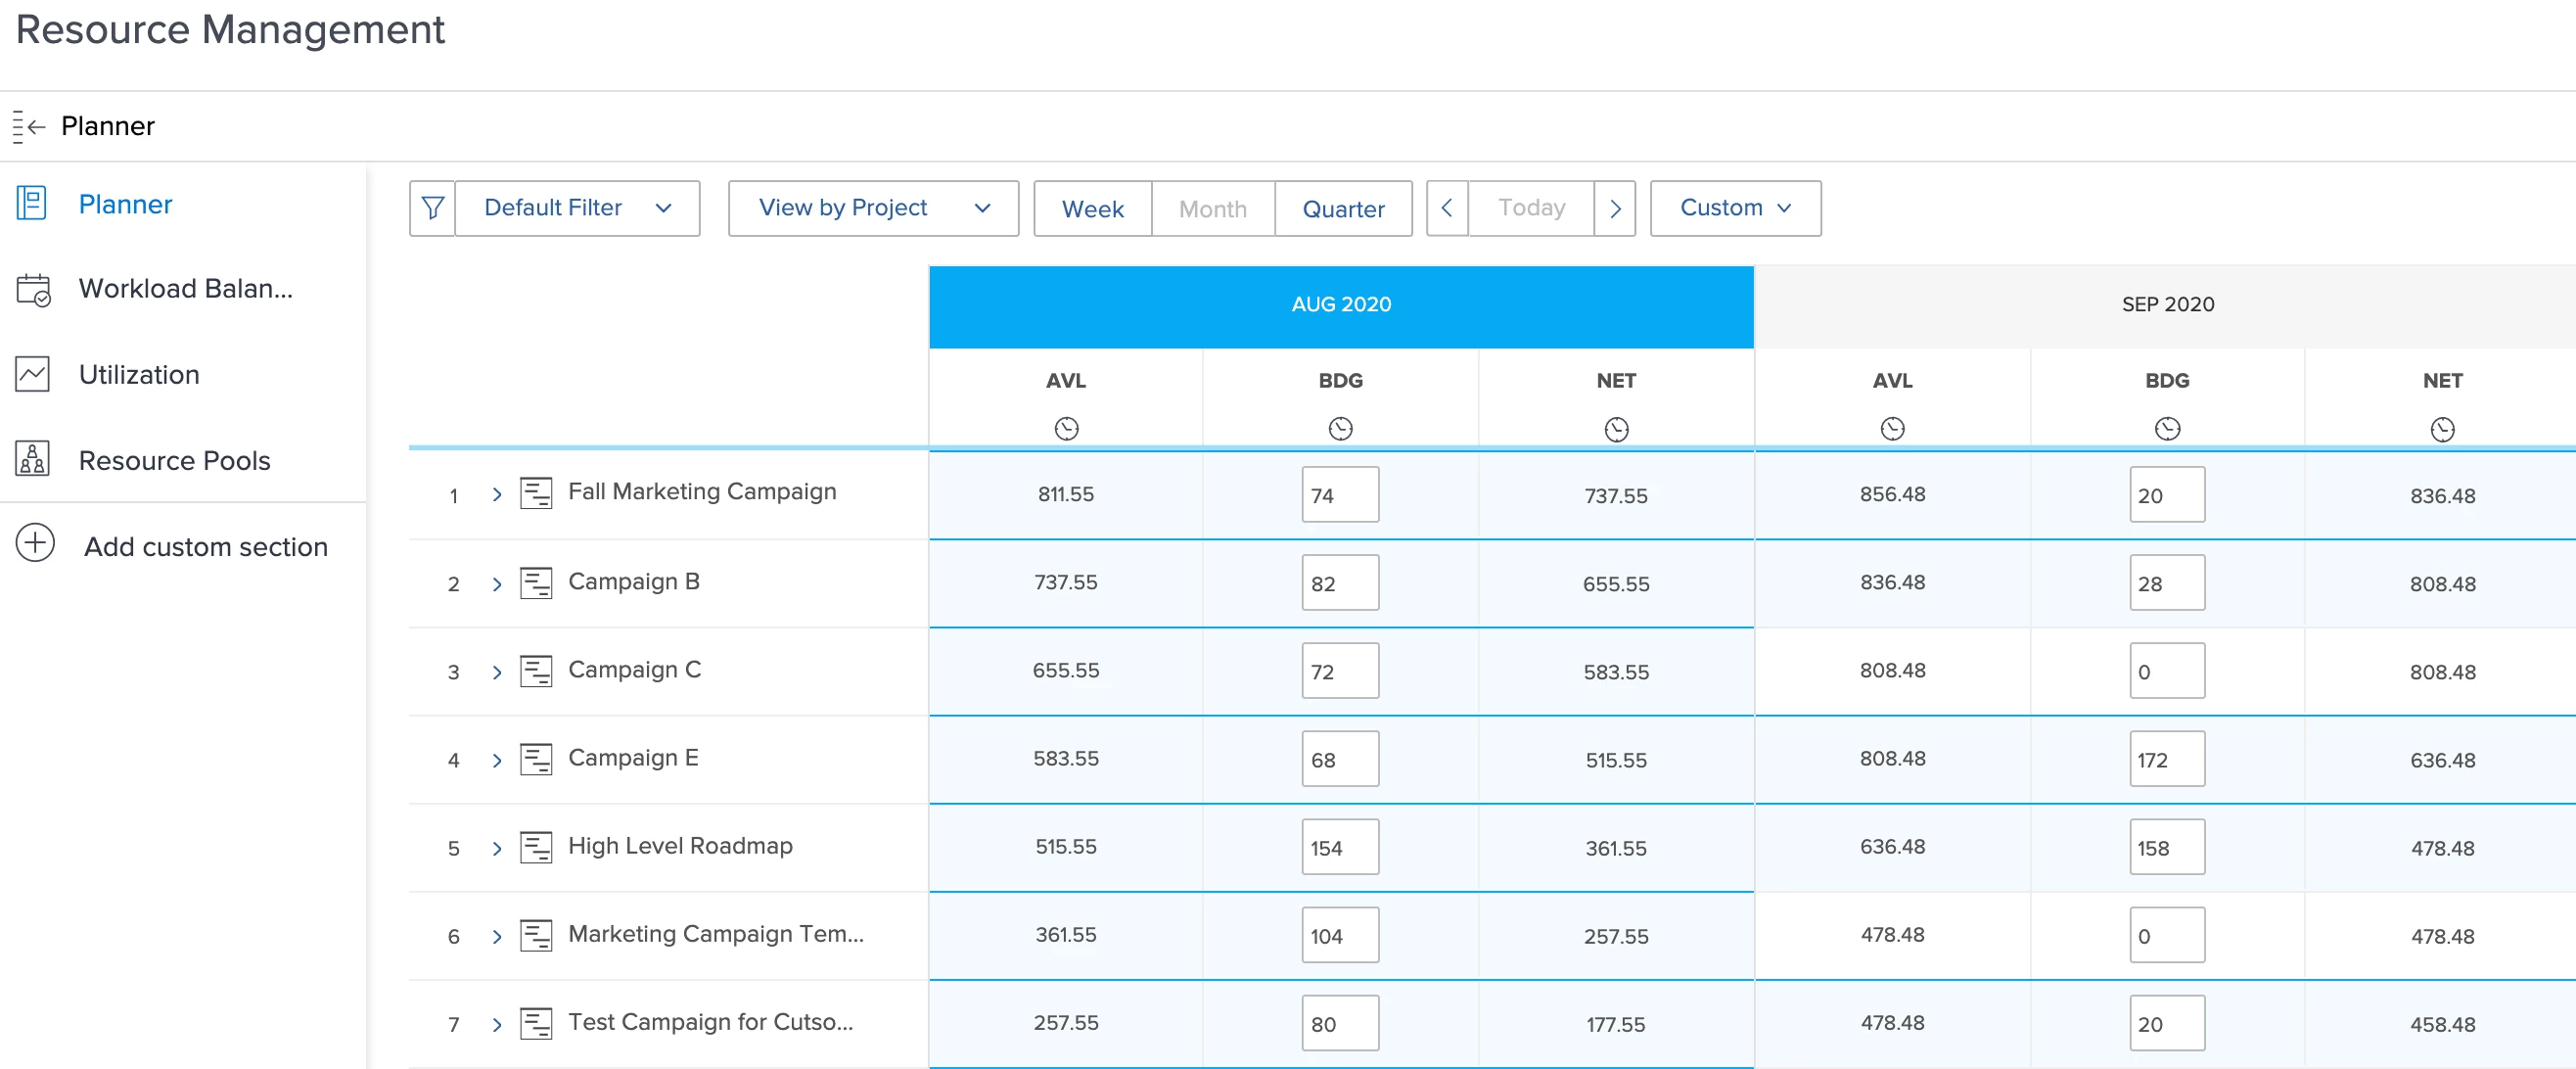
In Workfront, the Resource Planner has two views which will be useful to perform capacity planning, View by Project and View by Role. To get started in capacity planning, start in the View by Project and consider the list of projects you wish to plan for. The filter tool on the left hand side can be used to select a specific subset of projects based on Portfolio, Program, Status, or other criteria. Once you have the appropriate list of projects displayed, arrange them by priority by clicking to the left of the priority number, then dragging and dropping up or down the list. This prioritized list of projects will affect Available Hours of job roles meaning that projects with the highest priority will show job roles fullest availability.
NOTE: You may find yourself in a scenario where demand is greater than capacity, meaning some of the work, most likely the lowest priority items, need to be moved or cancelled. If the work being planned for all comes from a single portfolio, select “Display Portfolio Priorities” from the Settings menu to help.
4. UPDATE RESOURCE BUDGETS
Resource Budgets are the mechanism used to compare work demand against capacity. They can be entered in two areas — the project’s Business Case or the Resource Planner. If a project has accurate planned hours, mirror the budgeted hours with the applicable job role planned hours. To do so, follow these steps:
- Go to the Resource Planner and select View by Project.
- Choose the appropriate date range and apply any filters.
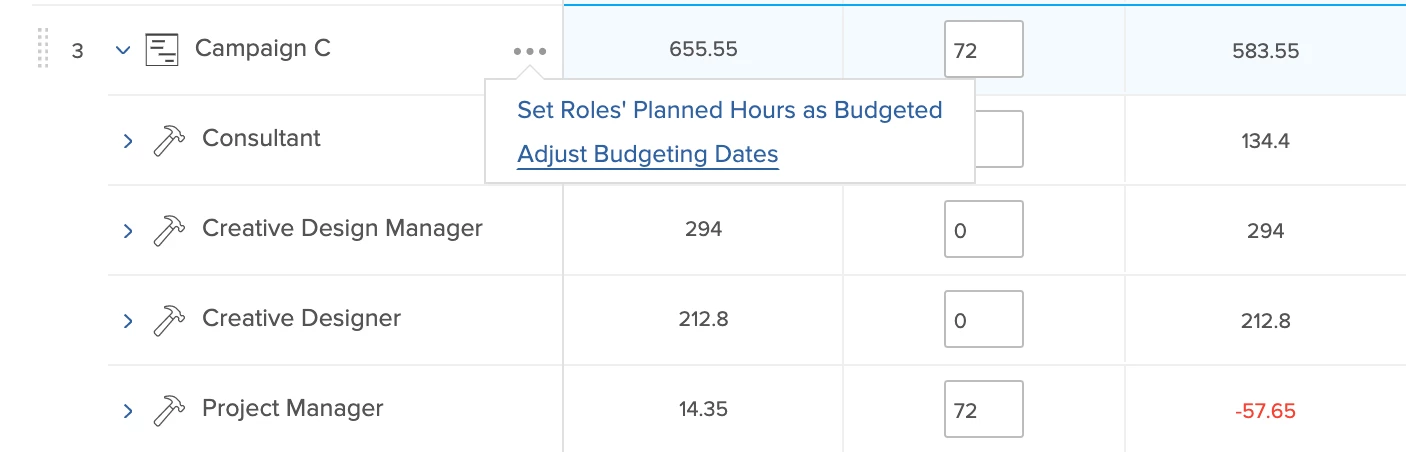
- On the Project Summary row, click the three ellipses “...” to the right of the project name and choose “Set Roles’ Planned Hours as Budgeted.”
- For each job role this will populate the budgeted hours based on the planned hours for the role.
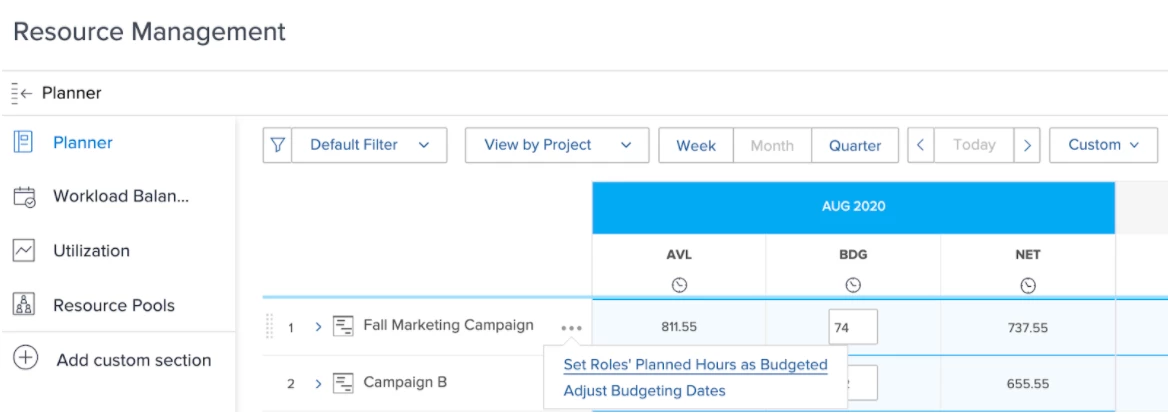
NOTE: When using the “Set Roles’ Planned Hours as Budgeted”, no budgeted hours will be entered for job roles that do not have a resource with the job role in the resource pools associated with the project.
If a project does not have planned hours accurately defined, you can choose to manually enter in budgeted demand for each job role and time unit.
PRO TIP: While many areas in Workfront will save data captured in real time, the Resource Budgeting tool (or Resource Planner) requires a work manager to click the orange “Save” button at the bottom to store this information for further use.
5. IDENTIFY AND RESOLVE CONFLICTS
Once capacity and demand for current and proposed work have been entered into Workfront, you can begin assessing your team’s ability and limitations to perform desired future work. The Resource Planner (View by Project) provides a high-level view of total capacity and total demand for a set or work. As defined in step 3, it is important to understand that the list of projects should be in order of priority so that user availability is allocated to the highest priority items.
- AVL (Availability) - The project with the highest priority should have all resources available to meet its budget demand. The number in the capacity column represents the total amount of hours of the resources found in the Resource Pools for that project in each given time period. You can view the hours for an individual job role by clicking the expand icon to the left of the project name.
- BDG (Budgeted) - The amount of budgeted work based on planned hours or time entered manually by a project or resource manager. See step 4.
- NET (Available minus Budgeted) - Assuming the first priority project uses the resources as needed by its budgeted demand, there will likely be resources left over that can work on other projects — represented by the net remaining column.
NOTE: As you look to the next project in priority, capacity will be based on the resources found in the Resource Pools for that project minus what was consumed by the higher priority project(s). In the common case where the two projects have the exact same Resource Pools, the capacity for Project 2 will be equal to the net remaining after Project 1.
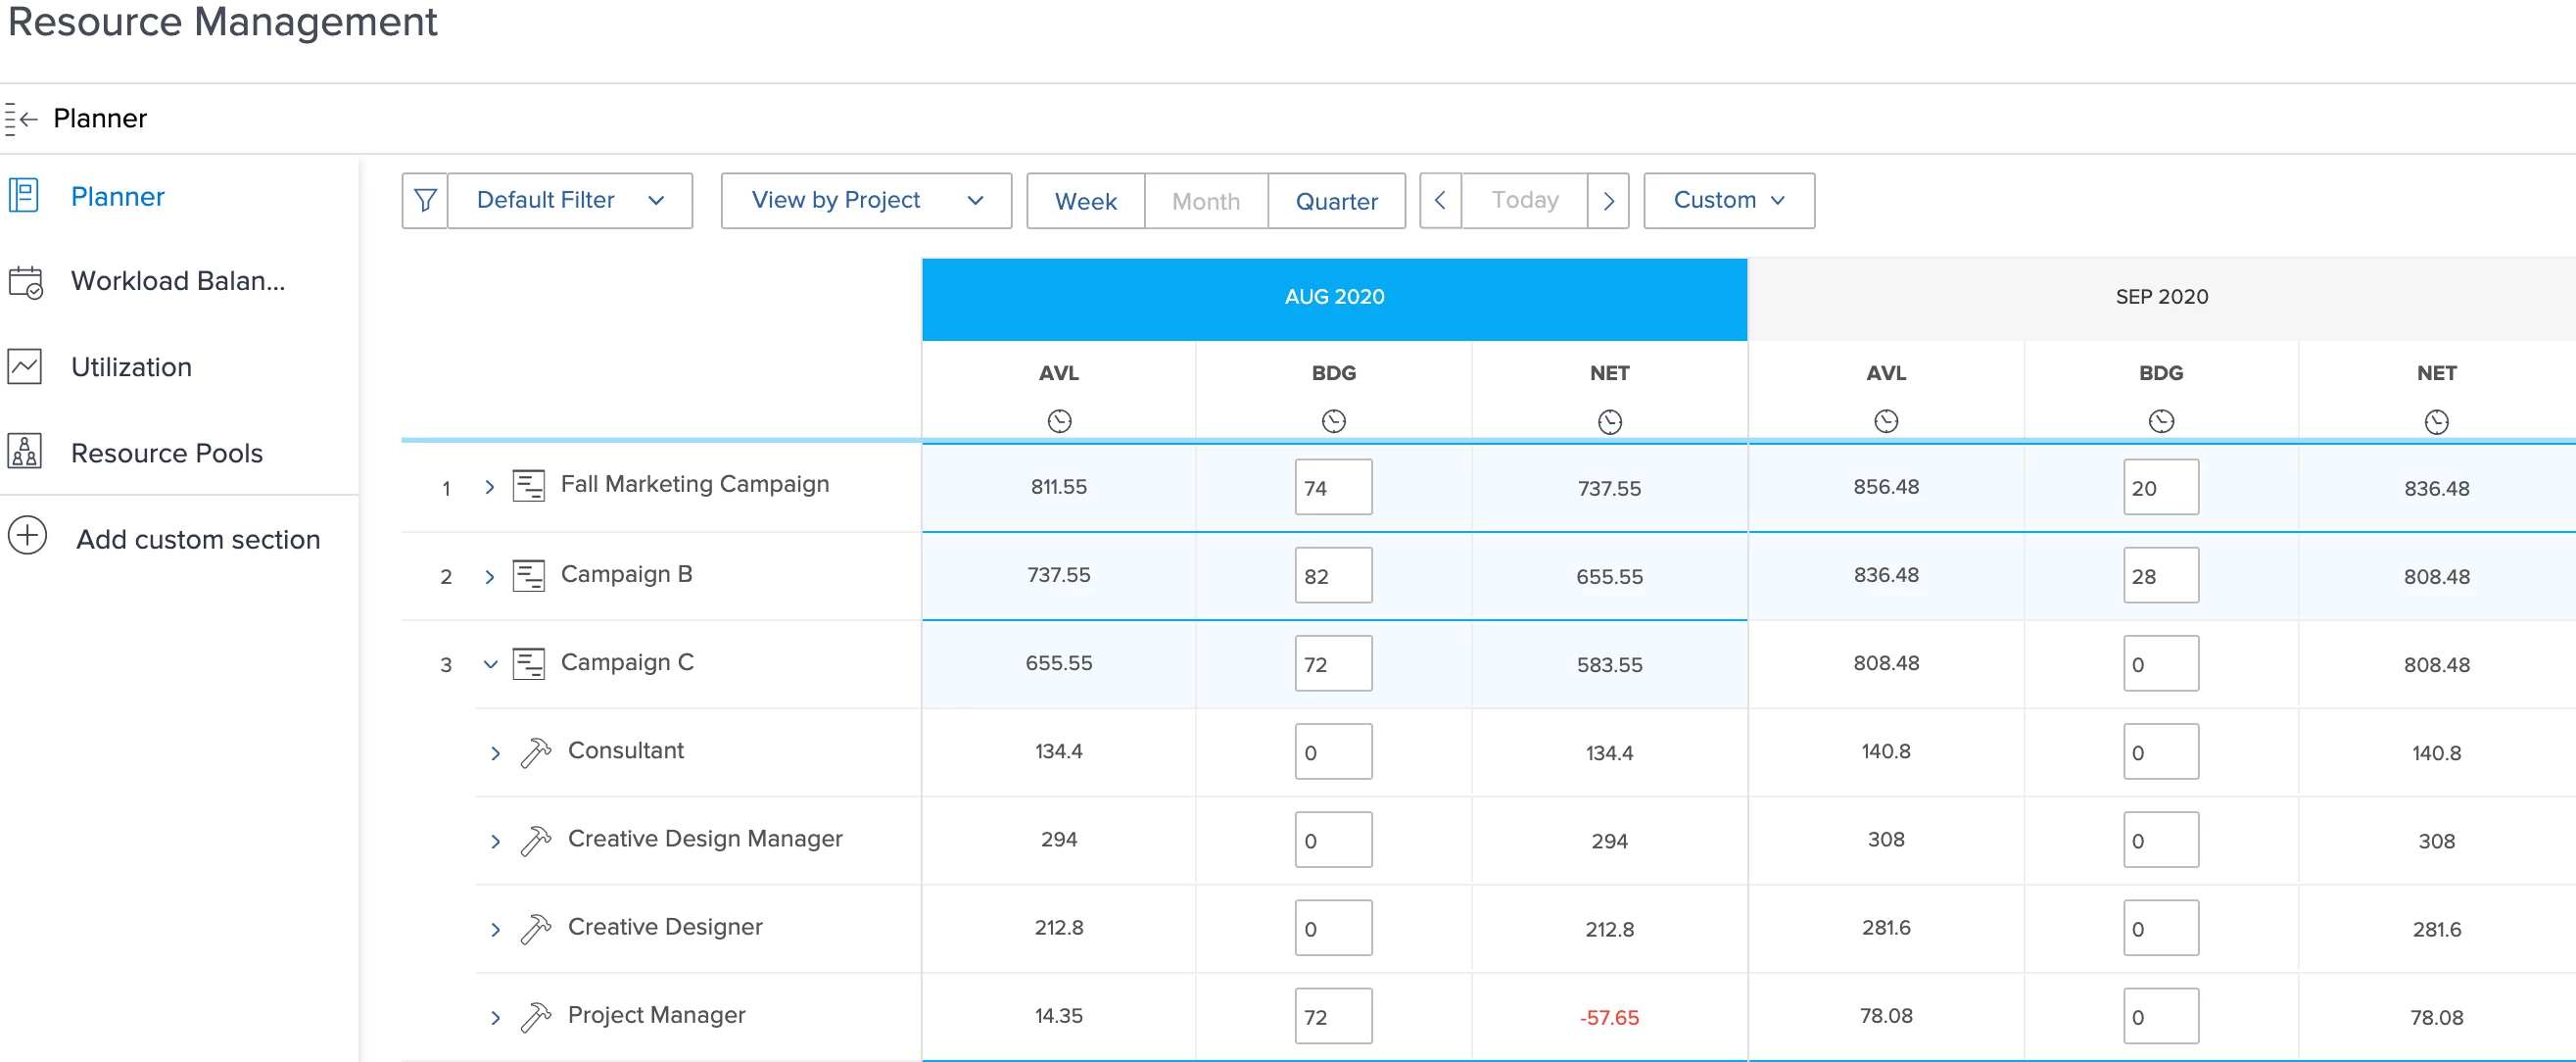
In the screenshot above, the third priority project, Campaign C, has 14.35 hours of Project Manager available for August 2020, however, it requires 72 hours for this job role. The work manager may need to consider delaying this project or hiring more resources for the Project Manager job role.
PRO TIP: When resolving resource conflicts, use the “Adjust Budgeting Dates” tool to visually see how the project can be moved without conflict. In order to adjust the planned hours, a work manager will need to manually update the project plan itself.
MORE TO COME...
The Resource Management Did You Know? blog series will wrap up next week on the topic of identifying and growing your resource management maturity. If you haven’t read through Part 1 or Part 2 of the series, make sure to review those on the blogs page of Workfront One or check out the Video Library for additional resource management videos.