

Stop Crafting Test Events by Hand — Let the Journey Simulation Agent Do It
Introduction
In our previous post, Journey Simulation Agent — Cover Your Whole Journey in a Few Clicks with AI-Built Test Users, No Hand-Crafted Data, we showed how the Journey Simulation Agent generates a minimal, AI-built set of test users to exercise every branch of your journey — no manual profile construction needed. That post kept things simple: a journey with no event nodes.
But most real journeys don't stay simple. They wait on events — a cart addition, a purchase, an app open, a custom behavioral signal. And those event-driven journeys have a few extra moving parts.
This post covers those extra moving parts: how the Journey Simulation Agent automatically generates the test events your journey needs, matches them to the right test users, and triggers them in the right order — so you can go from draft to publish-ready without touching a single event payload by hand.
The Problem: You Need Test Events for Test Users
Here's where most practitioners hit a wall.
The Journey Simulation Agent already handles test user creation. But the moment your journey has event nodes, you need test events too — and building those is its own job.
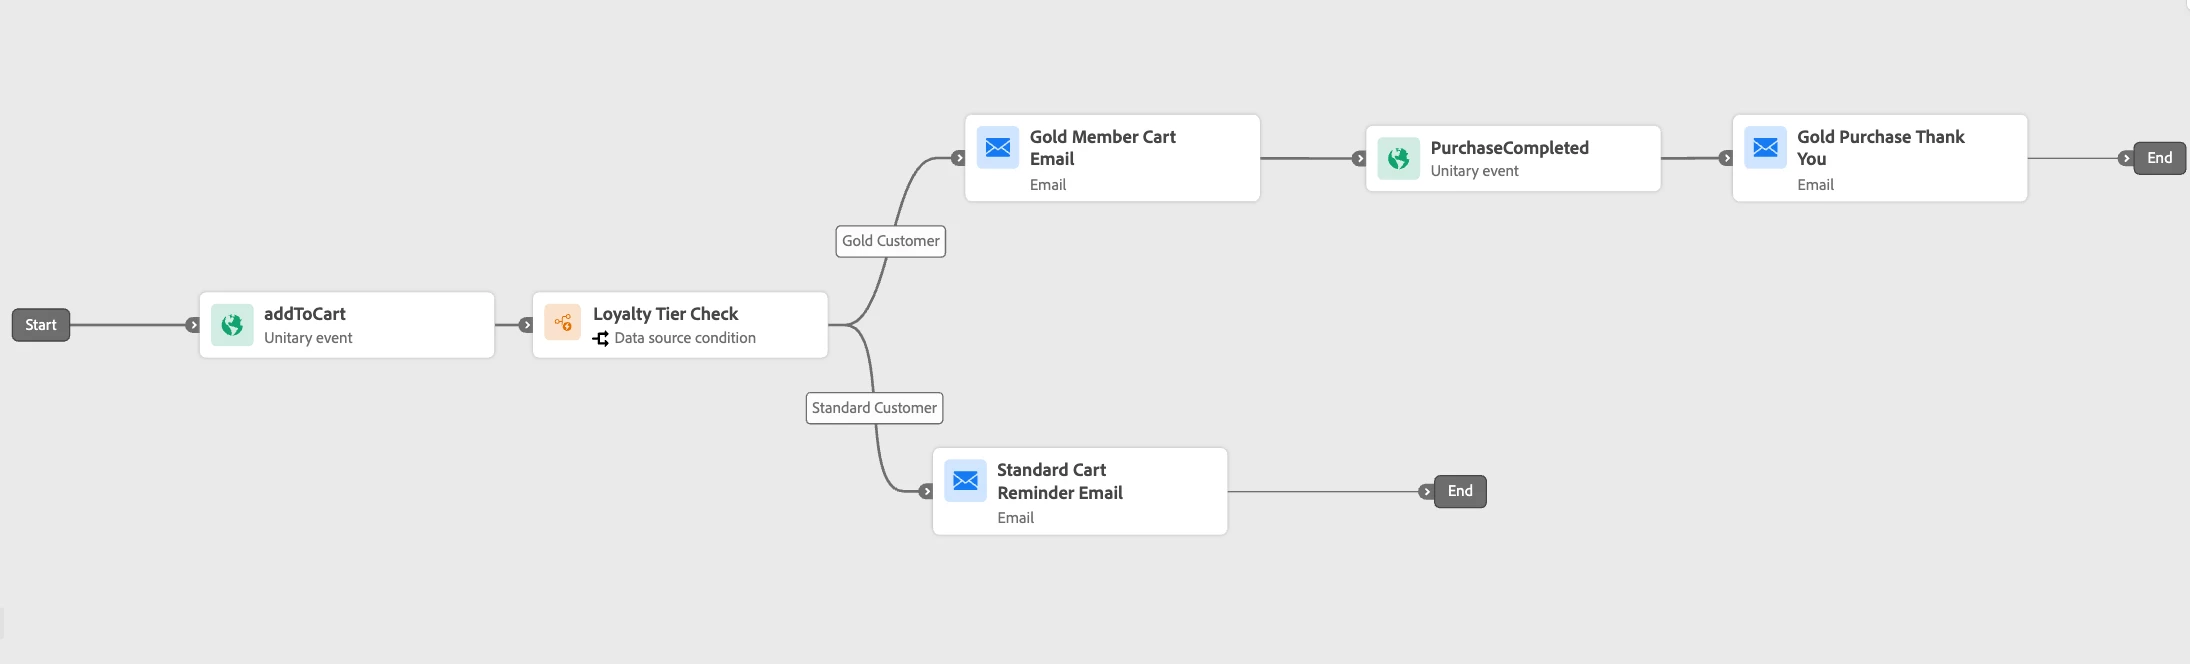
We'll use a loyalty-tiered cart-abandonment journey as our example — one that has an event-triggered entry, a condition split, and a mid-journey behavioral event.
Even after the test users are generated, you still have to:
- Figure out which events each path needs. Both users need
addToCartevent to enter — this is an event triggered unitary journey, so the entry event fires before anyone gets in. The Gold Customer also needsPurchaseCompletedevent mid-journey. The Standard Customer doesn't. - Know what goes inside each event payload. What fields does
PurchaseCompletedevent require? What's a realistic product name or order ID? What values make sense for the Gold Customer's specific profile? You have to consult the event schema yourself. - Build each payload by hand. Open the event creation form. Fill in every field. For every event. For every user.
- Map events to the right users.
PurchaseCompletedevent belongs to the Gold Customer — not the Standard Customer. One wrong mapping and your simulation proves nothing. - Trigger everything in the right order.
addToCartevent fires first for all users.PurchaseCompletedevent can only be sent after the Gold Customer has entered the journey and reached that event node. One wrong step and the simulation is invalid.
Two paths, two event types — already a lot to track. Add more branches, more event nodes, a deeper schema, and this quickly becomes the bottleneck between you and publication.
The Solution: The Agent Handles Your Test Events Too
The Journey Simulation Agent closes this gap completely. Here's what it takes off your plate:
- AI-generated test users, one per path. The Agent maps your journey graph, finds all valid paths, and builds a realistic, condition-satisfying test user for each one.
- AI-generated event payloads, per user per event node. For every event node on a test user's path, the Agent fetches that user's profile, inspects the event schema, and uses AI to produce a complete, realistic event payload — with values that fit the schema and make sense for that specific user. For event-triggered unitary journeys, this includes the entry event itself.
- Correct sequencing, handled automatically. Entry events fire first. Users enter. Mid-journey events fire only when users have reached the specific event node. The Agent manages the order — you don't.
- A clear publish verdict. The Agent checks each user's traversal log against their intended path and gives you a Simulation Analysis: paths covered, paths missed, and whether the journey is ready to publish.
Net effect: schema lookups, payload construction, user-to-event mapping, trigger sequencing — all gone. What's left is reviewing the results.
How to use the Journey Simulation Agent
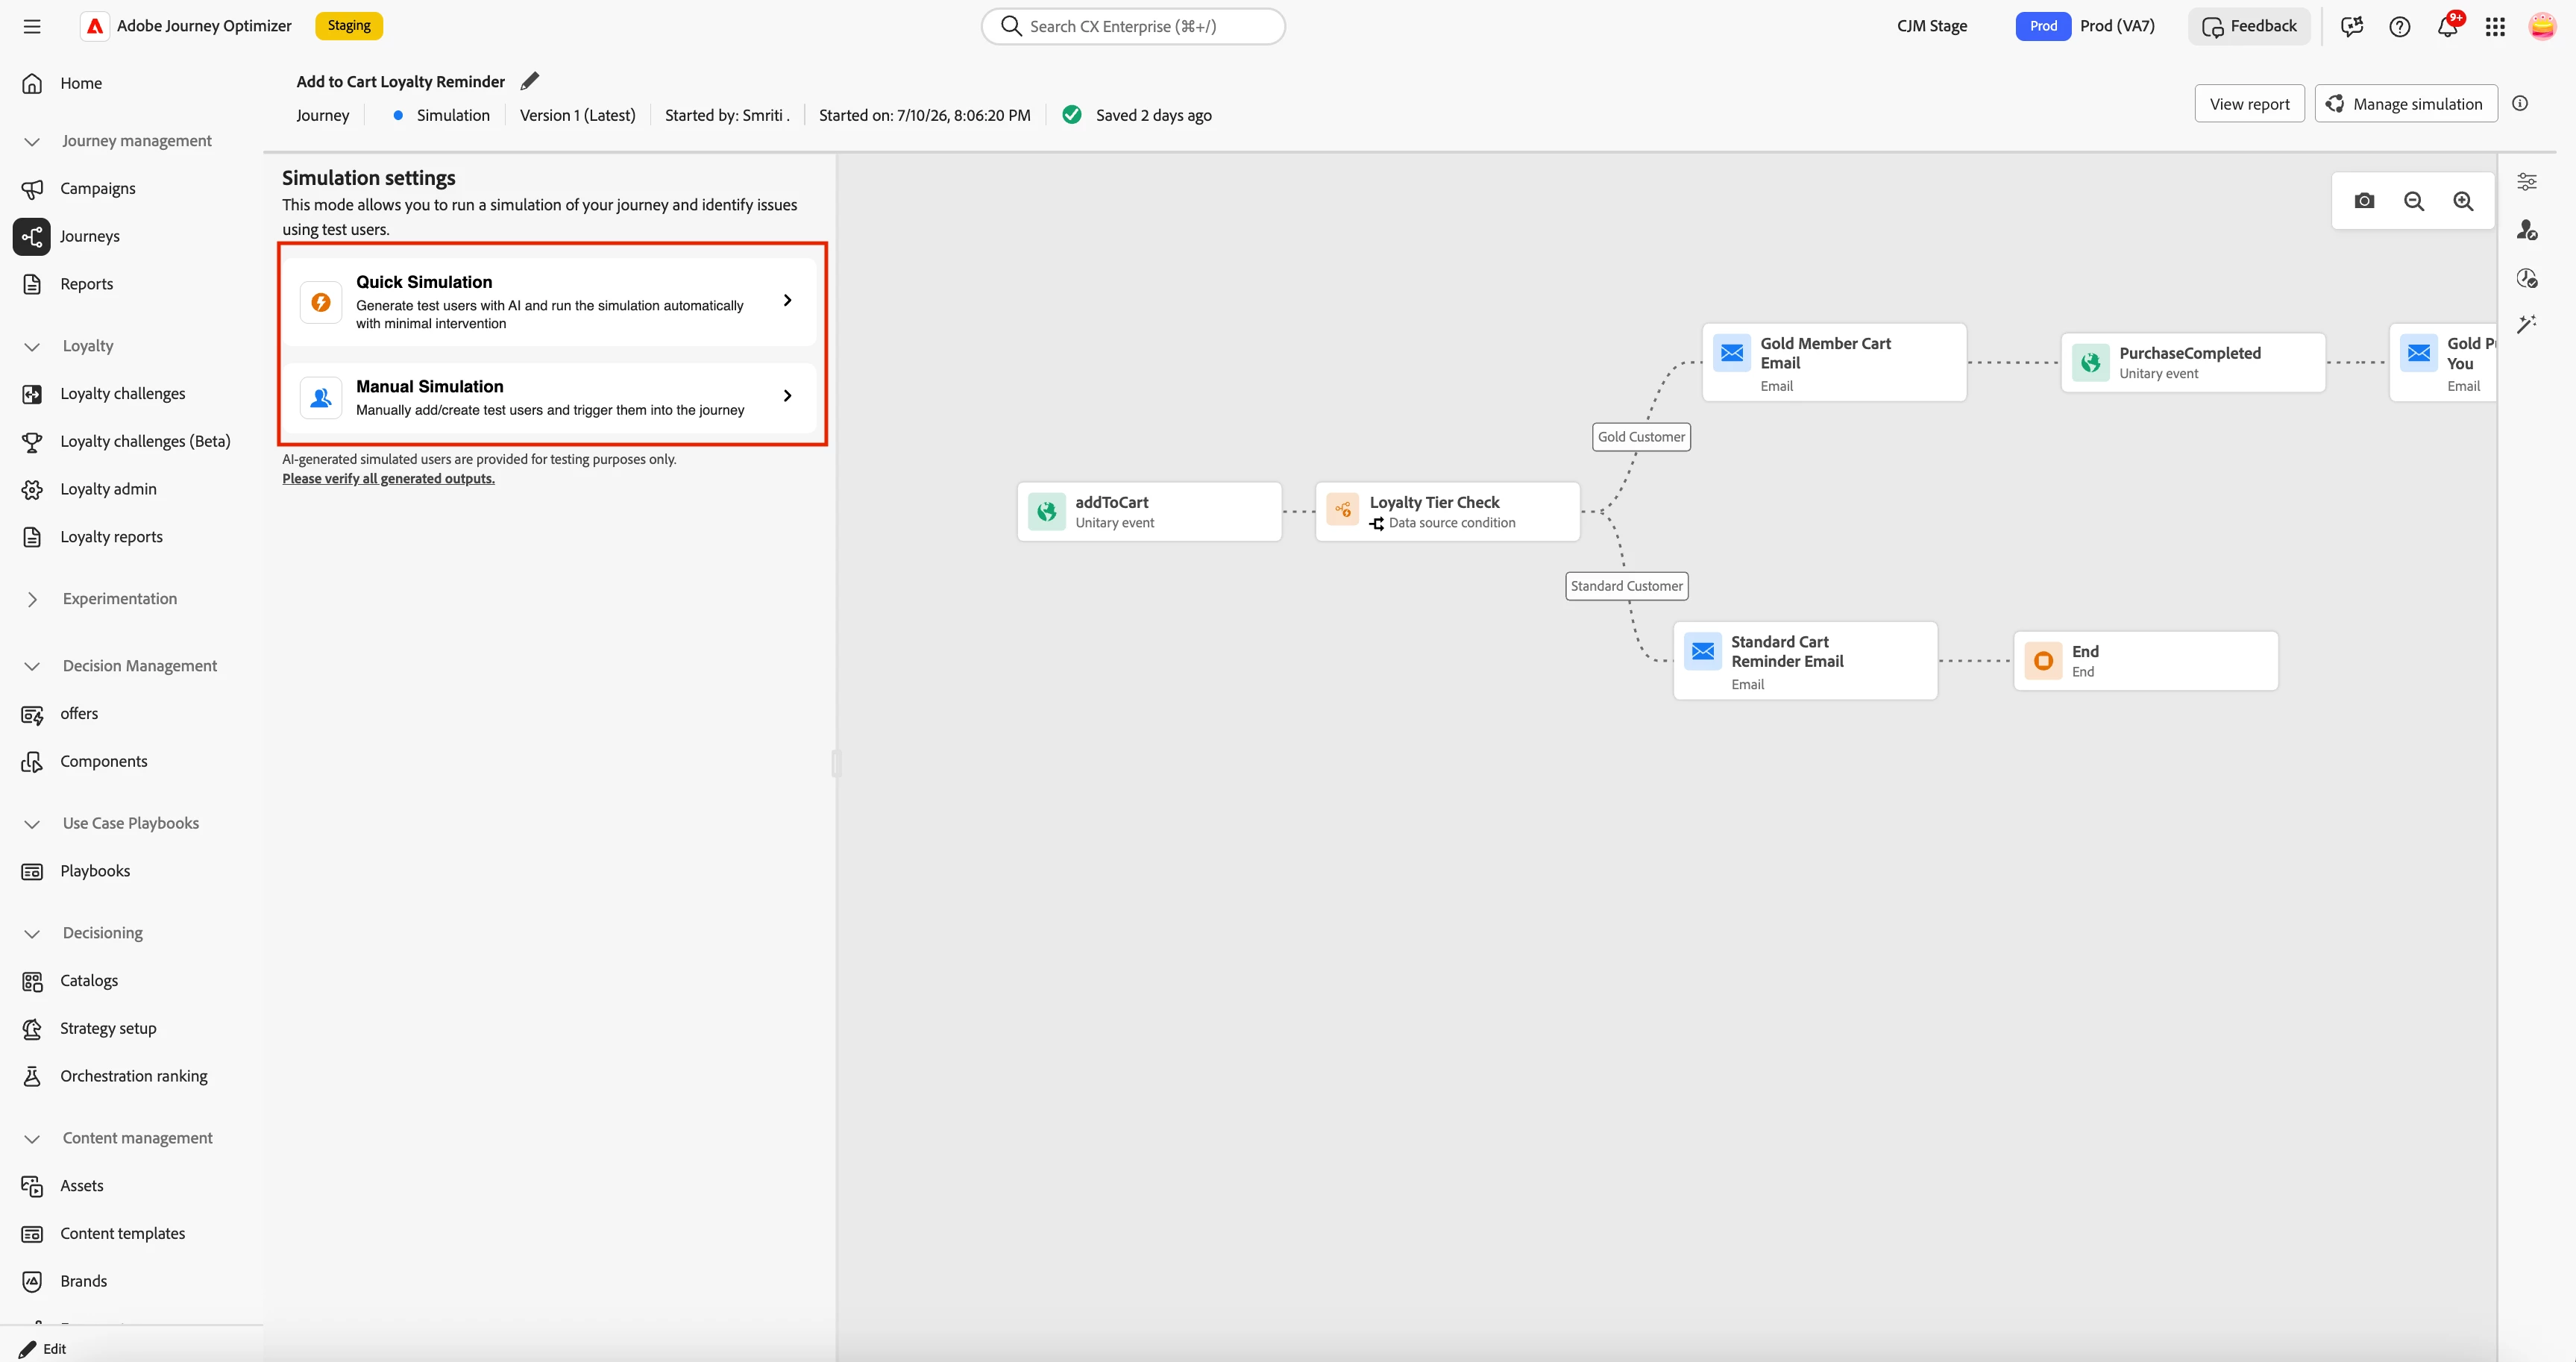
Journey Simulation Agent offers two ways to run:
- Quick Simulation — generate test users, generate test events, and trigger everything into the journey in a single click.
- Manual Simulation — do each as a separate step, so you can review generated users and events and choose exactly what to trigger and when.
Either way, once the users have run you simply open the results to see the verdict.
Entering Simulation mode
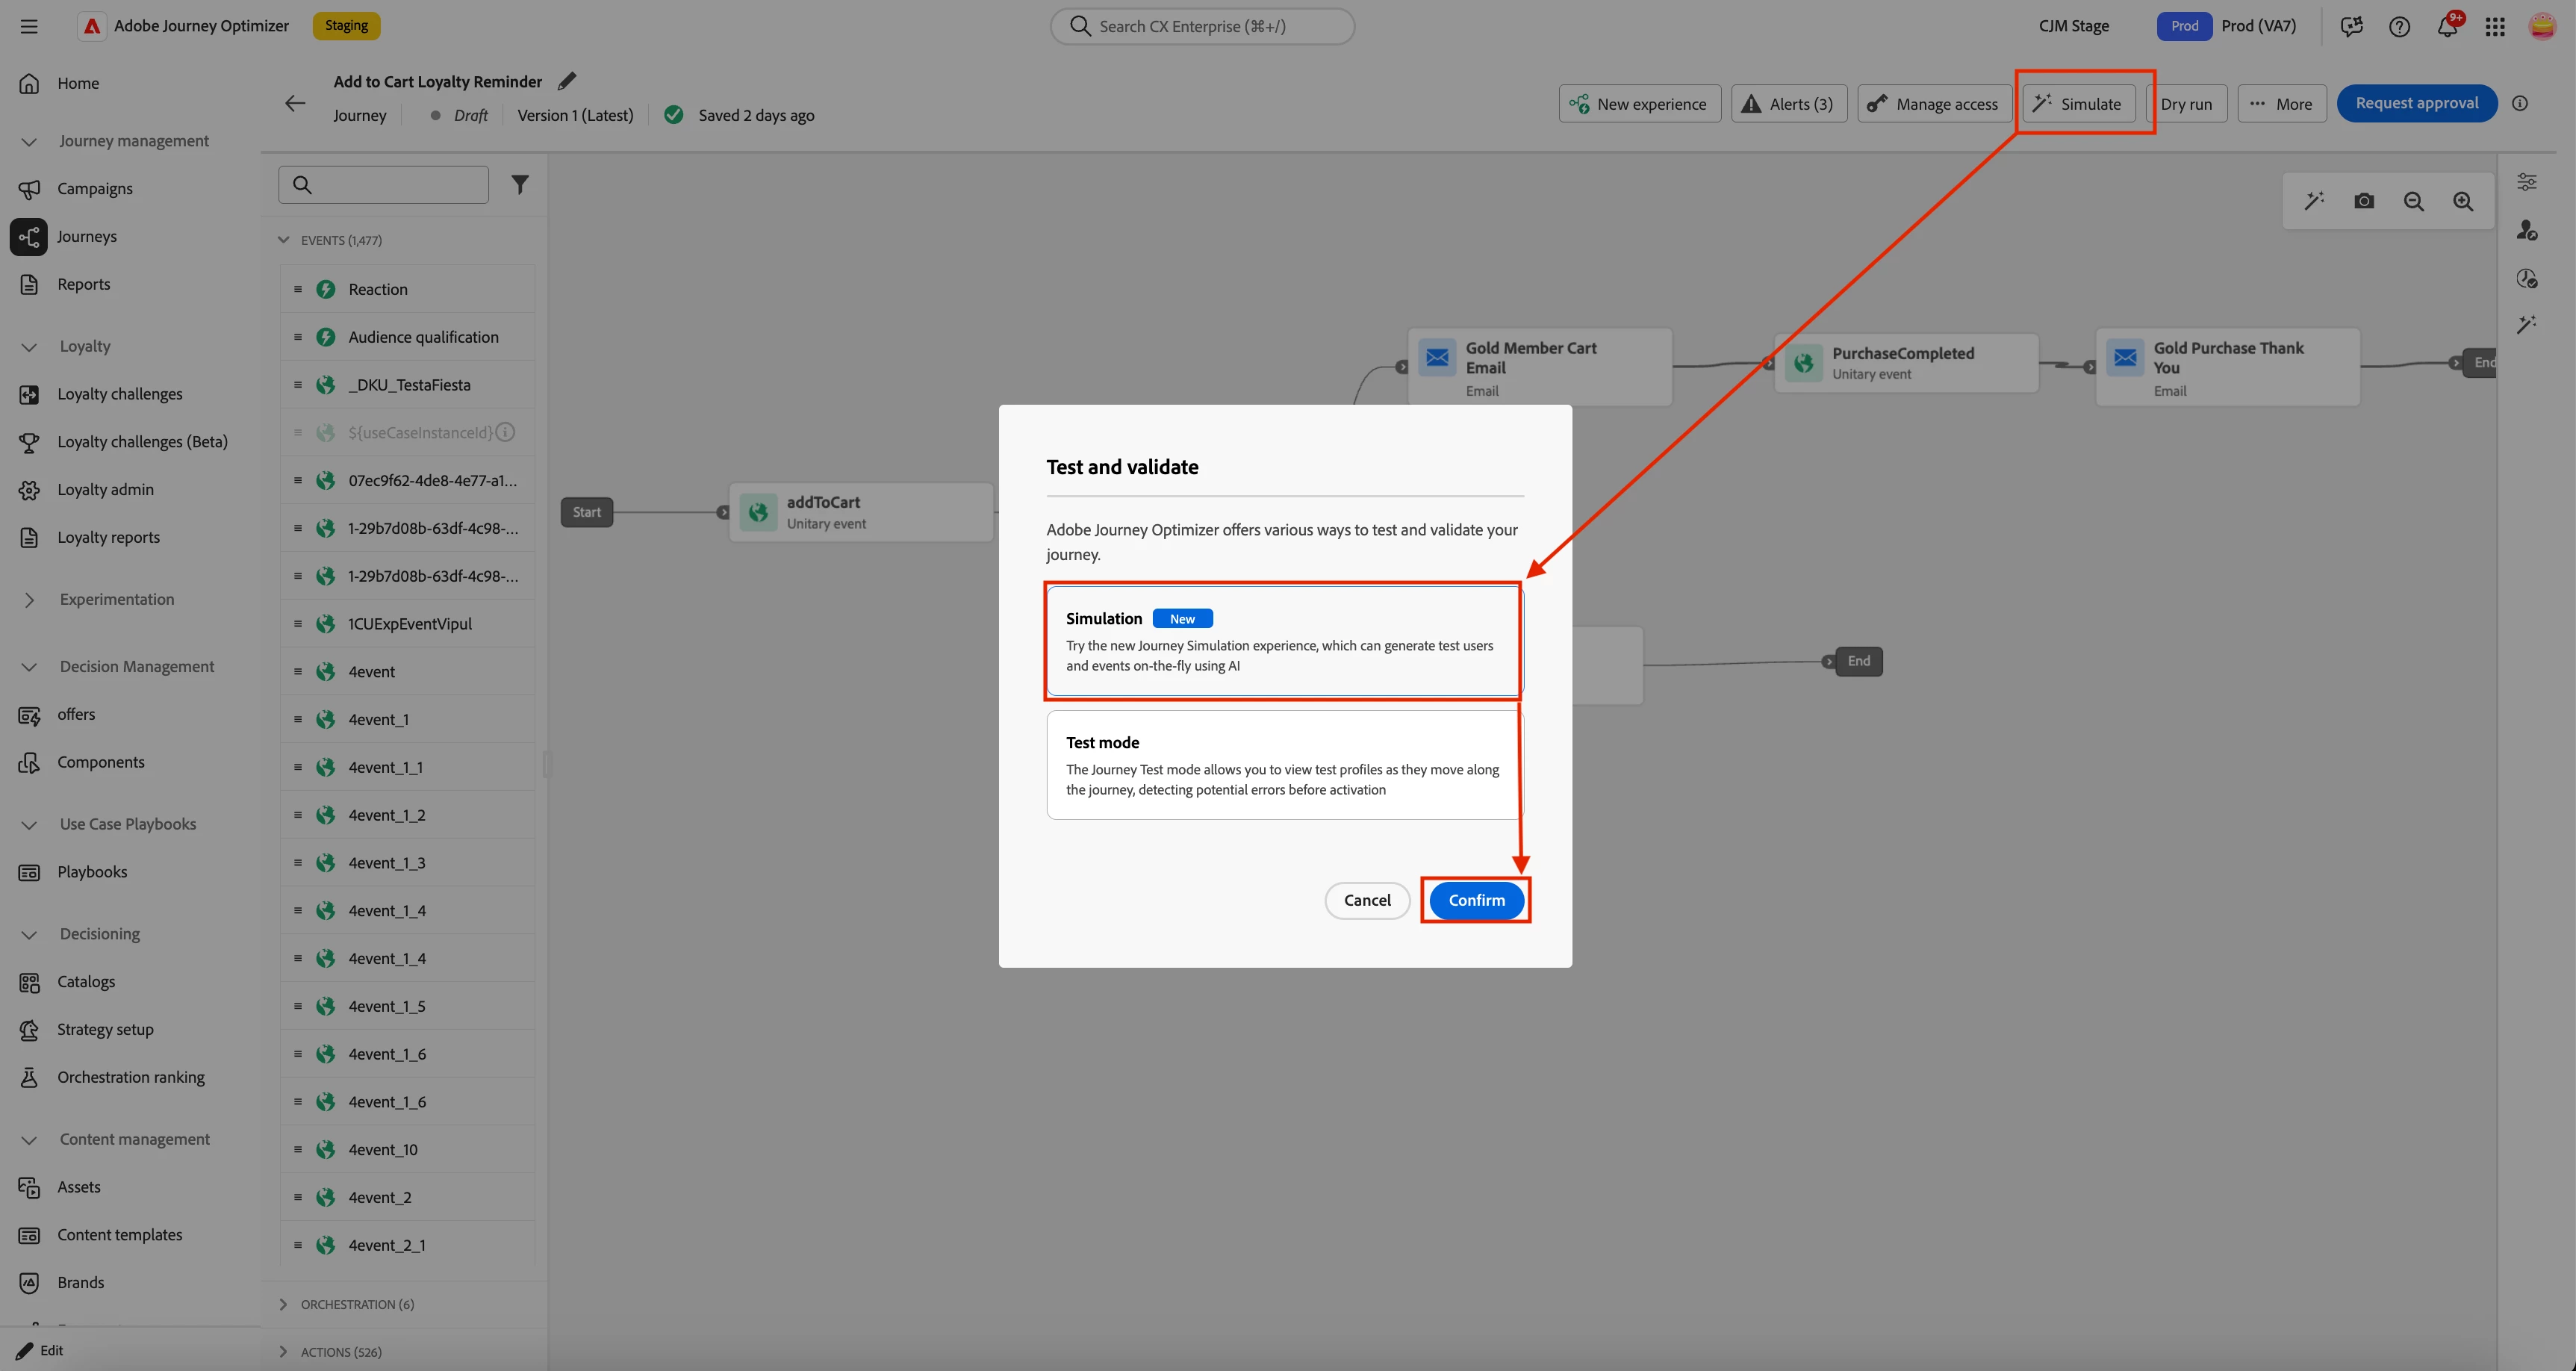
Open your draft journey and click Simulate in the top-right menu (This button is enabled only when the journey has no errors). Confirm Simulation in the dialog, and you land on the two modes of Journey Simulation Agent.
Quick Simulation: The Fast Path
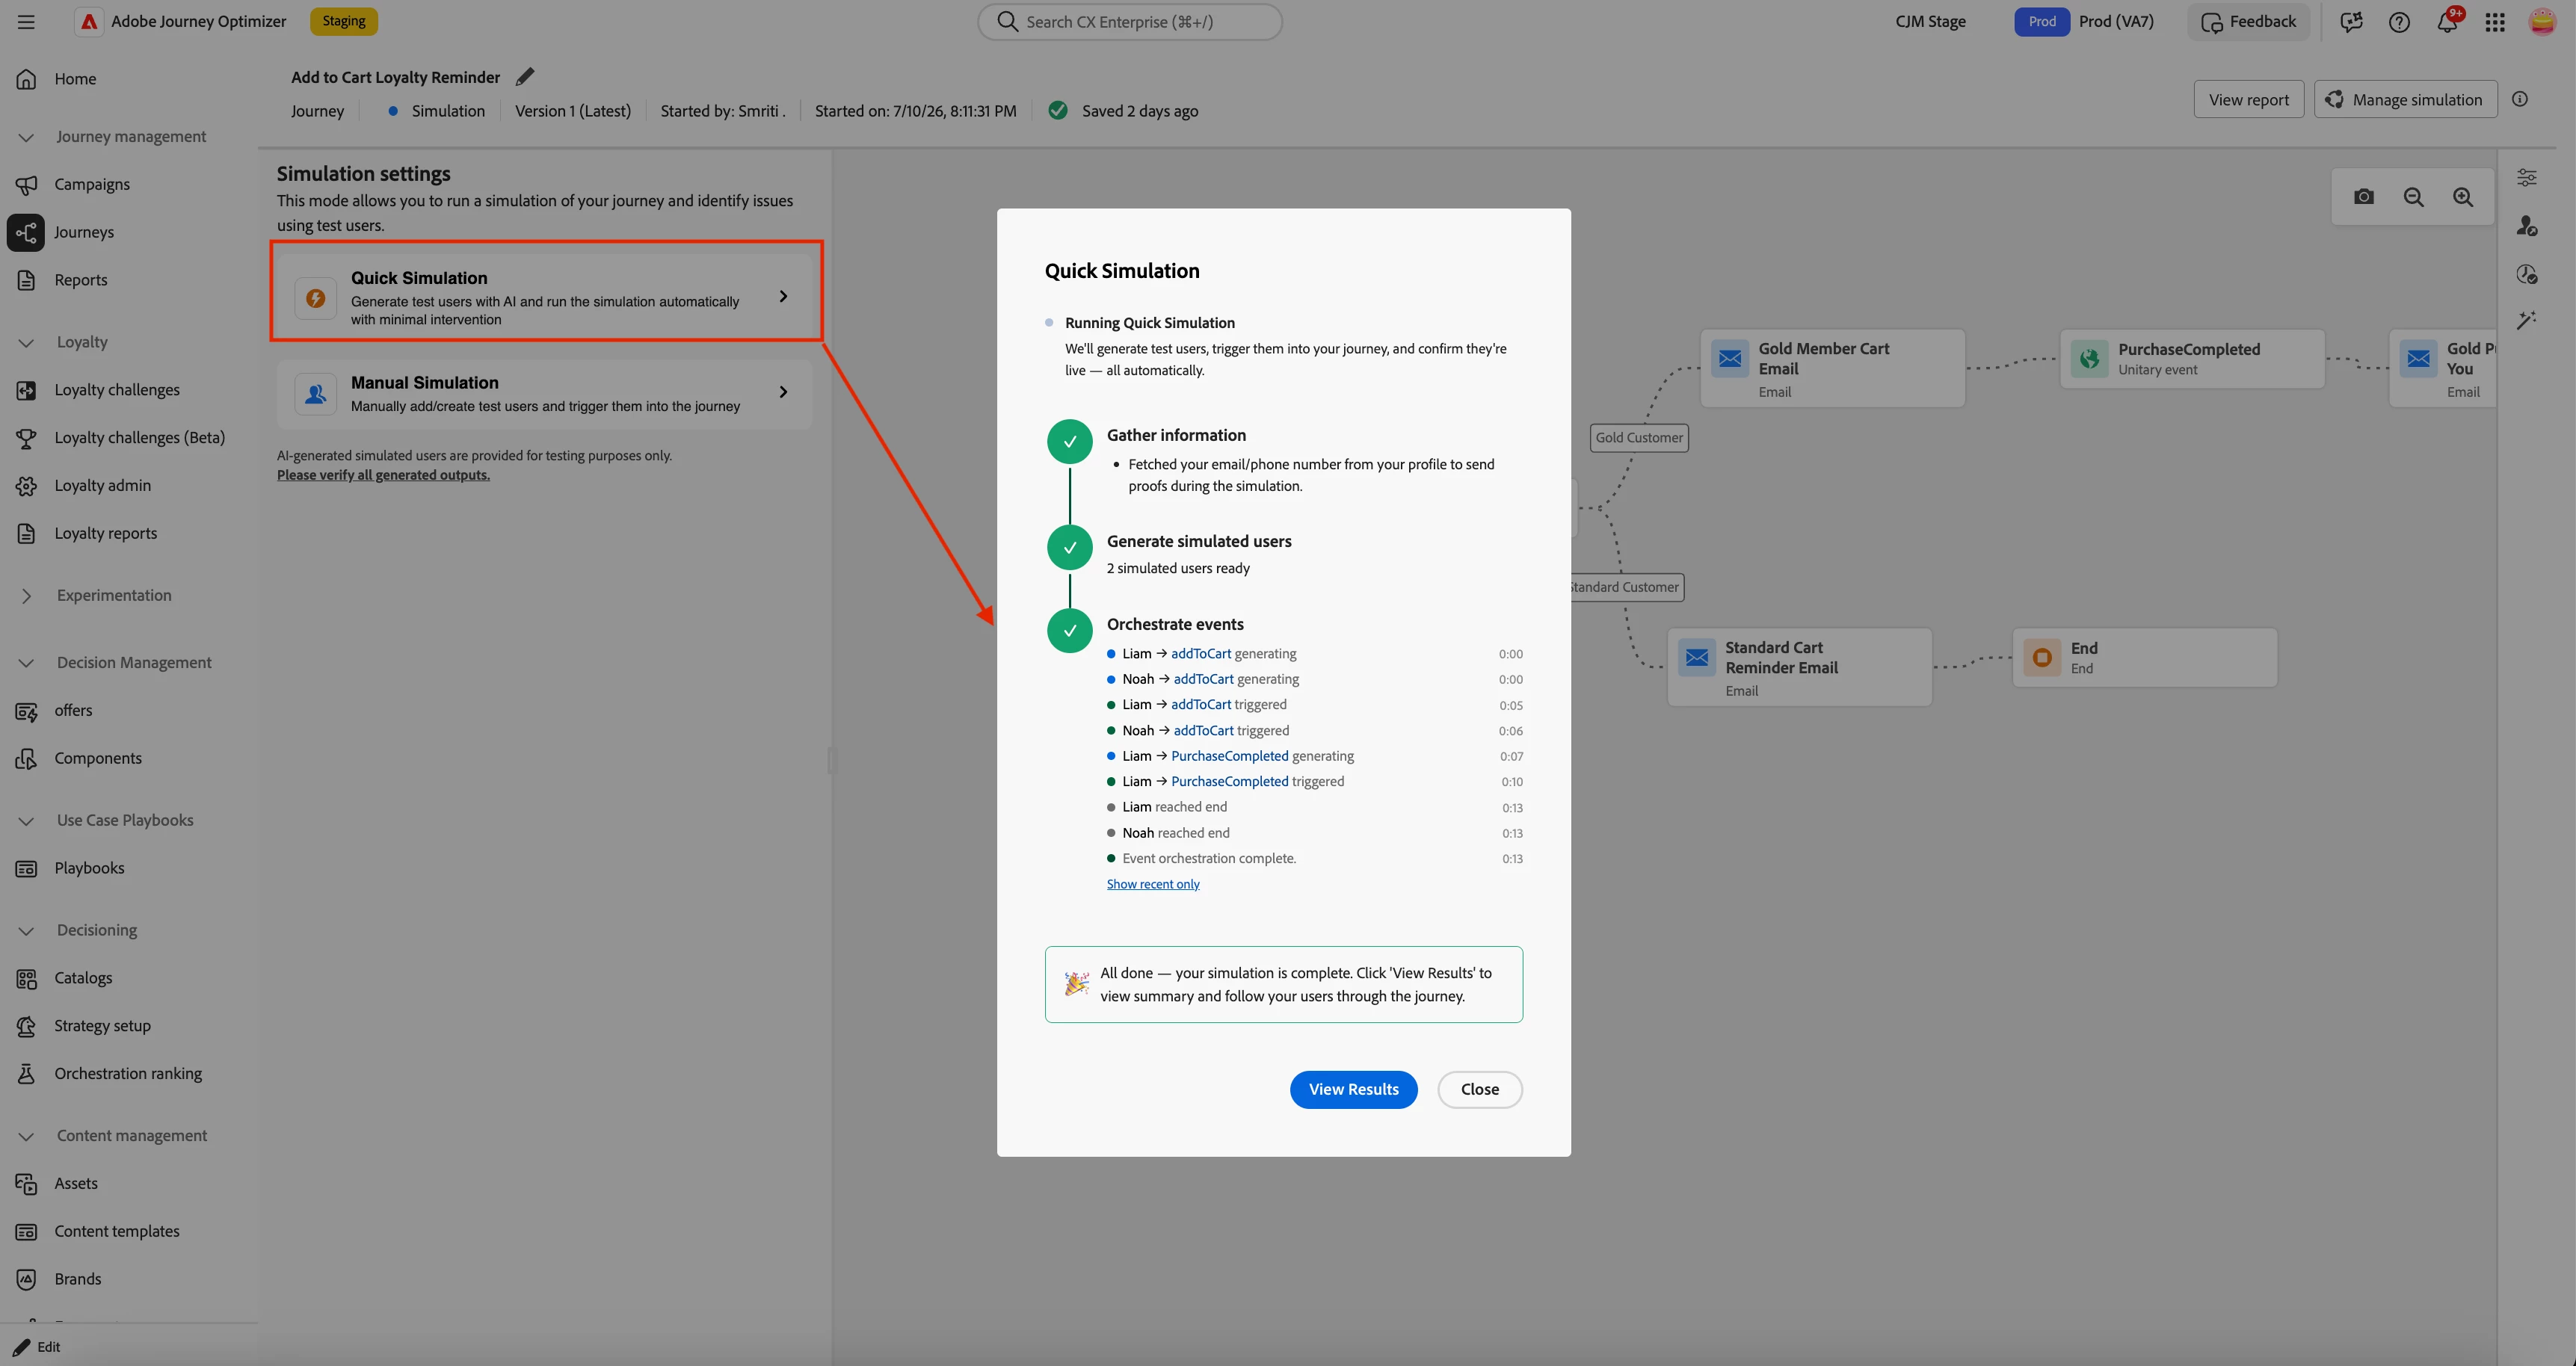
Quick Simulation takes a single click to go from draft to publish verdict. Behind that click, the Agent:
1. Reads your execution fields — the email and phone number from your profile — so proofs of any Email or SMS actions in the journey reach you directly. Editable before it proceeds.
2. Generates test users, one per valid path, with AI-chosen profile attributes satisfying each path's conditions. In our example: a Gold-tier user and a standard-tier user.
3. Generates and sends entry events — produces an addToCart event payload for each user and fires it. Since this is an event-triggered unitary journey, the entry event must go out before users can enter.
4. Triggers user entrance — with entry events sent, both users enter the journey automatically.
5. Orchestrates mid-journey events — as users advance and hit event nodes, the Agent generates the right payload for each waiting user and sends it. For the Gold Customer, that's PurchaseCompleted event — sent at exactly the right moment. This continues until every user has reached their path's end.
Manual Simulation: The Controlled Path
Manual Simulation gives you the same automation with an inspection point in the middle — useful when you want to review generated users or events before anything fires, or trigger only certain users or events.
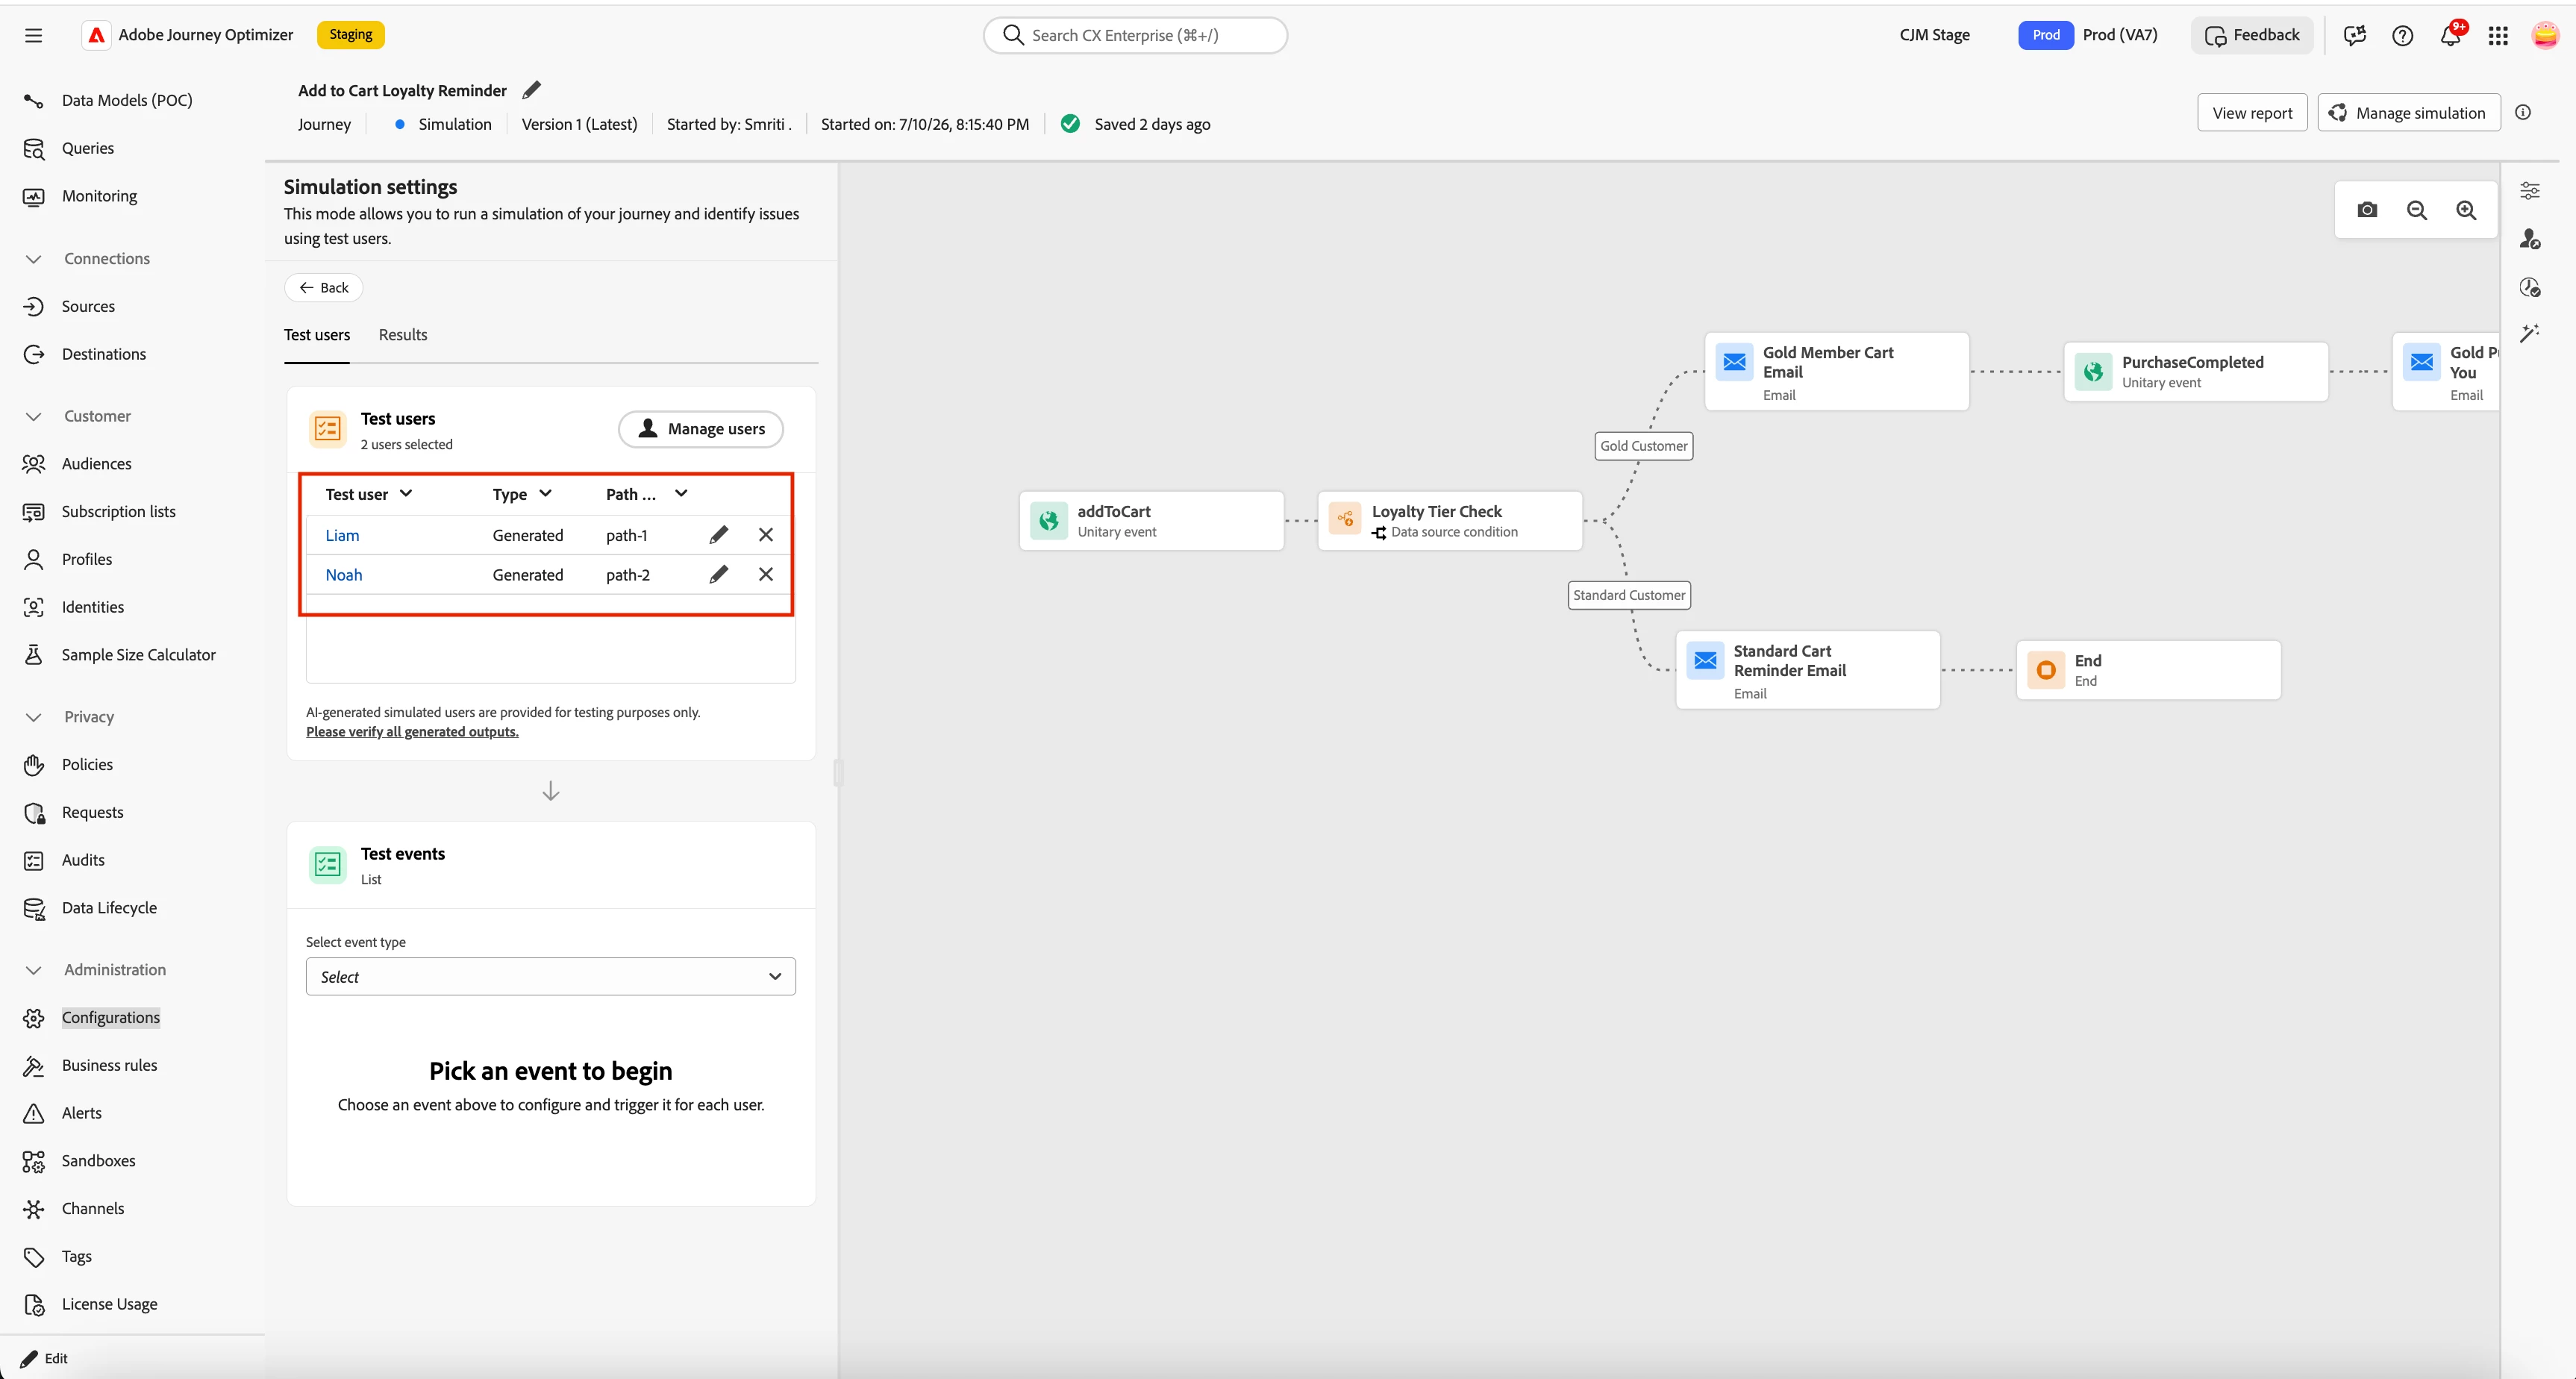
Generate: Click Manual Simulation → Generate with AI. A dialog shows the Execution Fields (email / phone) pulled from your profile; edit if needed, then click Generate. The agent builds the simulated users — one per valid path — and lays them out in a table to review.
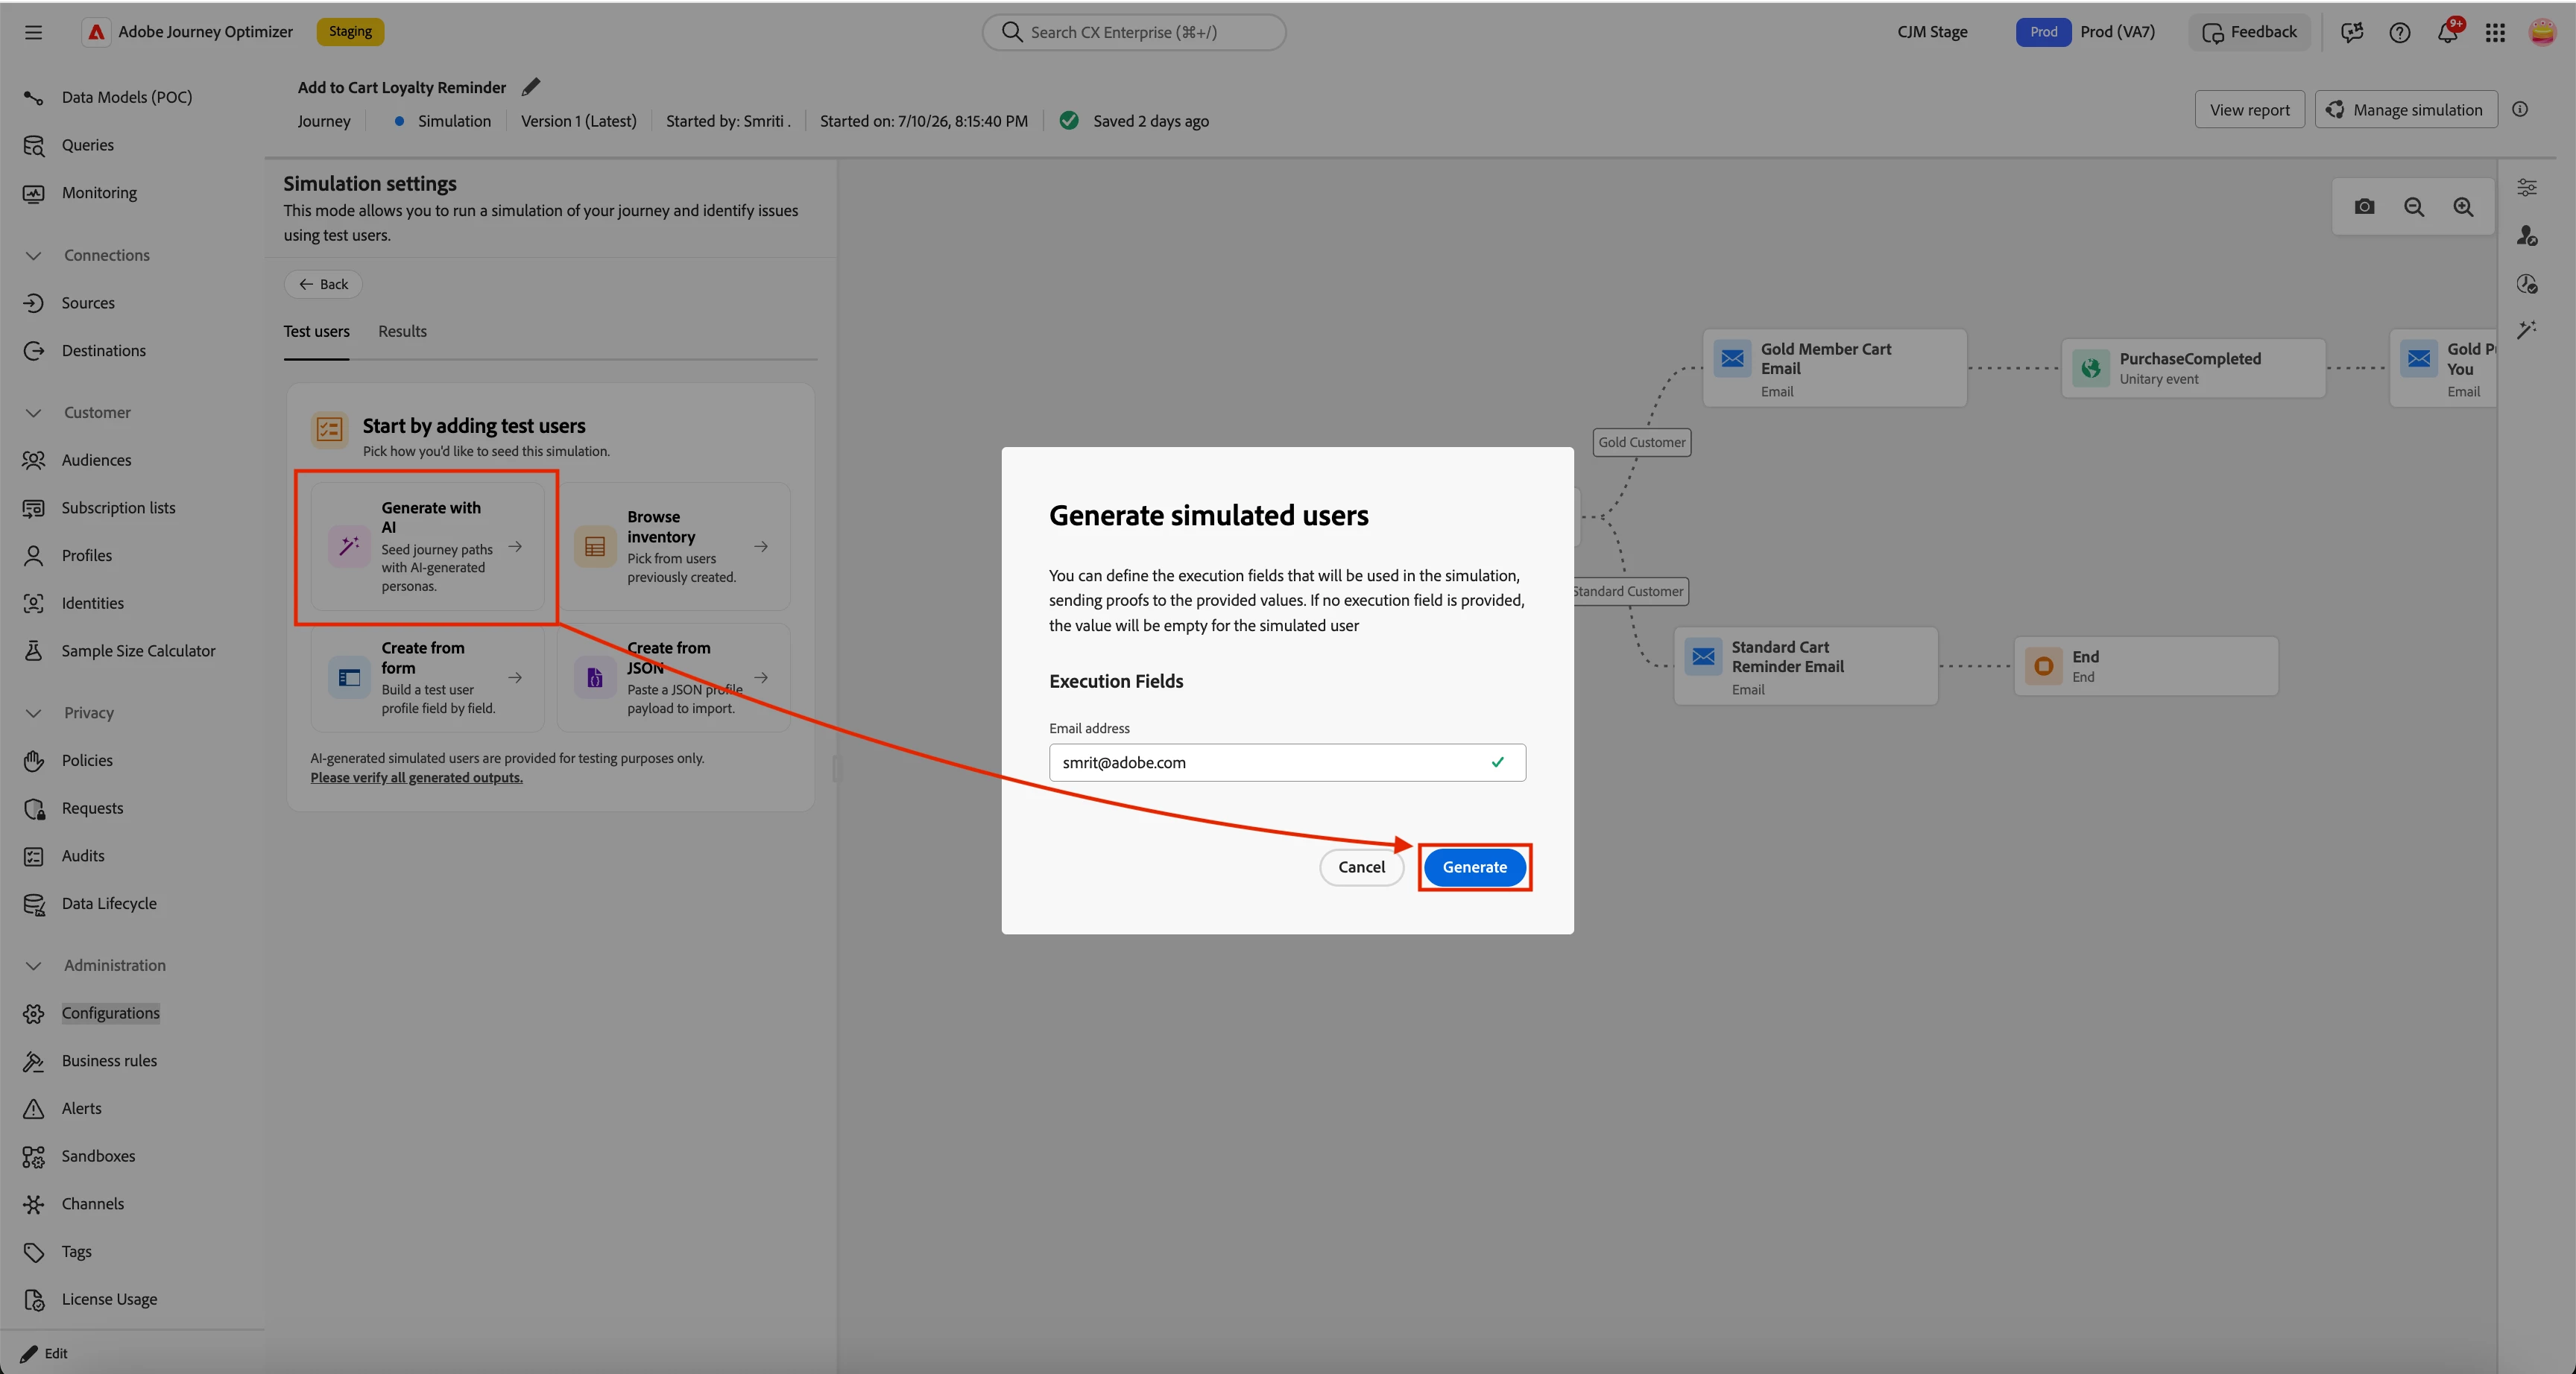
*Want to understand how path analysis and profile generation work under the hood? See our previous post (linked in the Reference Links section below).*
Since this is an event-triggered unitary journey, the test events panel opens immediately after user generation — the Agent already knows every user needs the entry event.
Generate test events: The events panel shows a dropdown to pick an event type and a table of test users with their status. The panel doesn't decide which events each user needs — you determine that from the journey canvas. For each user you want to configure, click the pencil icon. The Agent generates event field values — product names, order IDs, timestamps, and everything else the schema requires — tailored to that user's profile. Review, tweak if needed, confirm. Status flips to Ready.
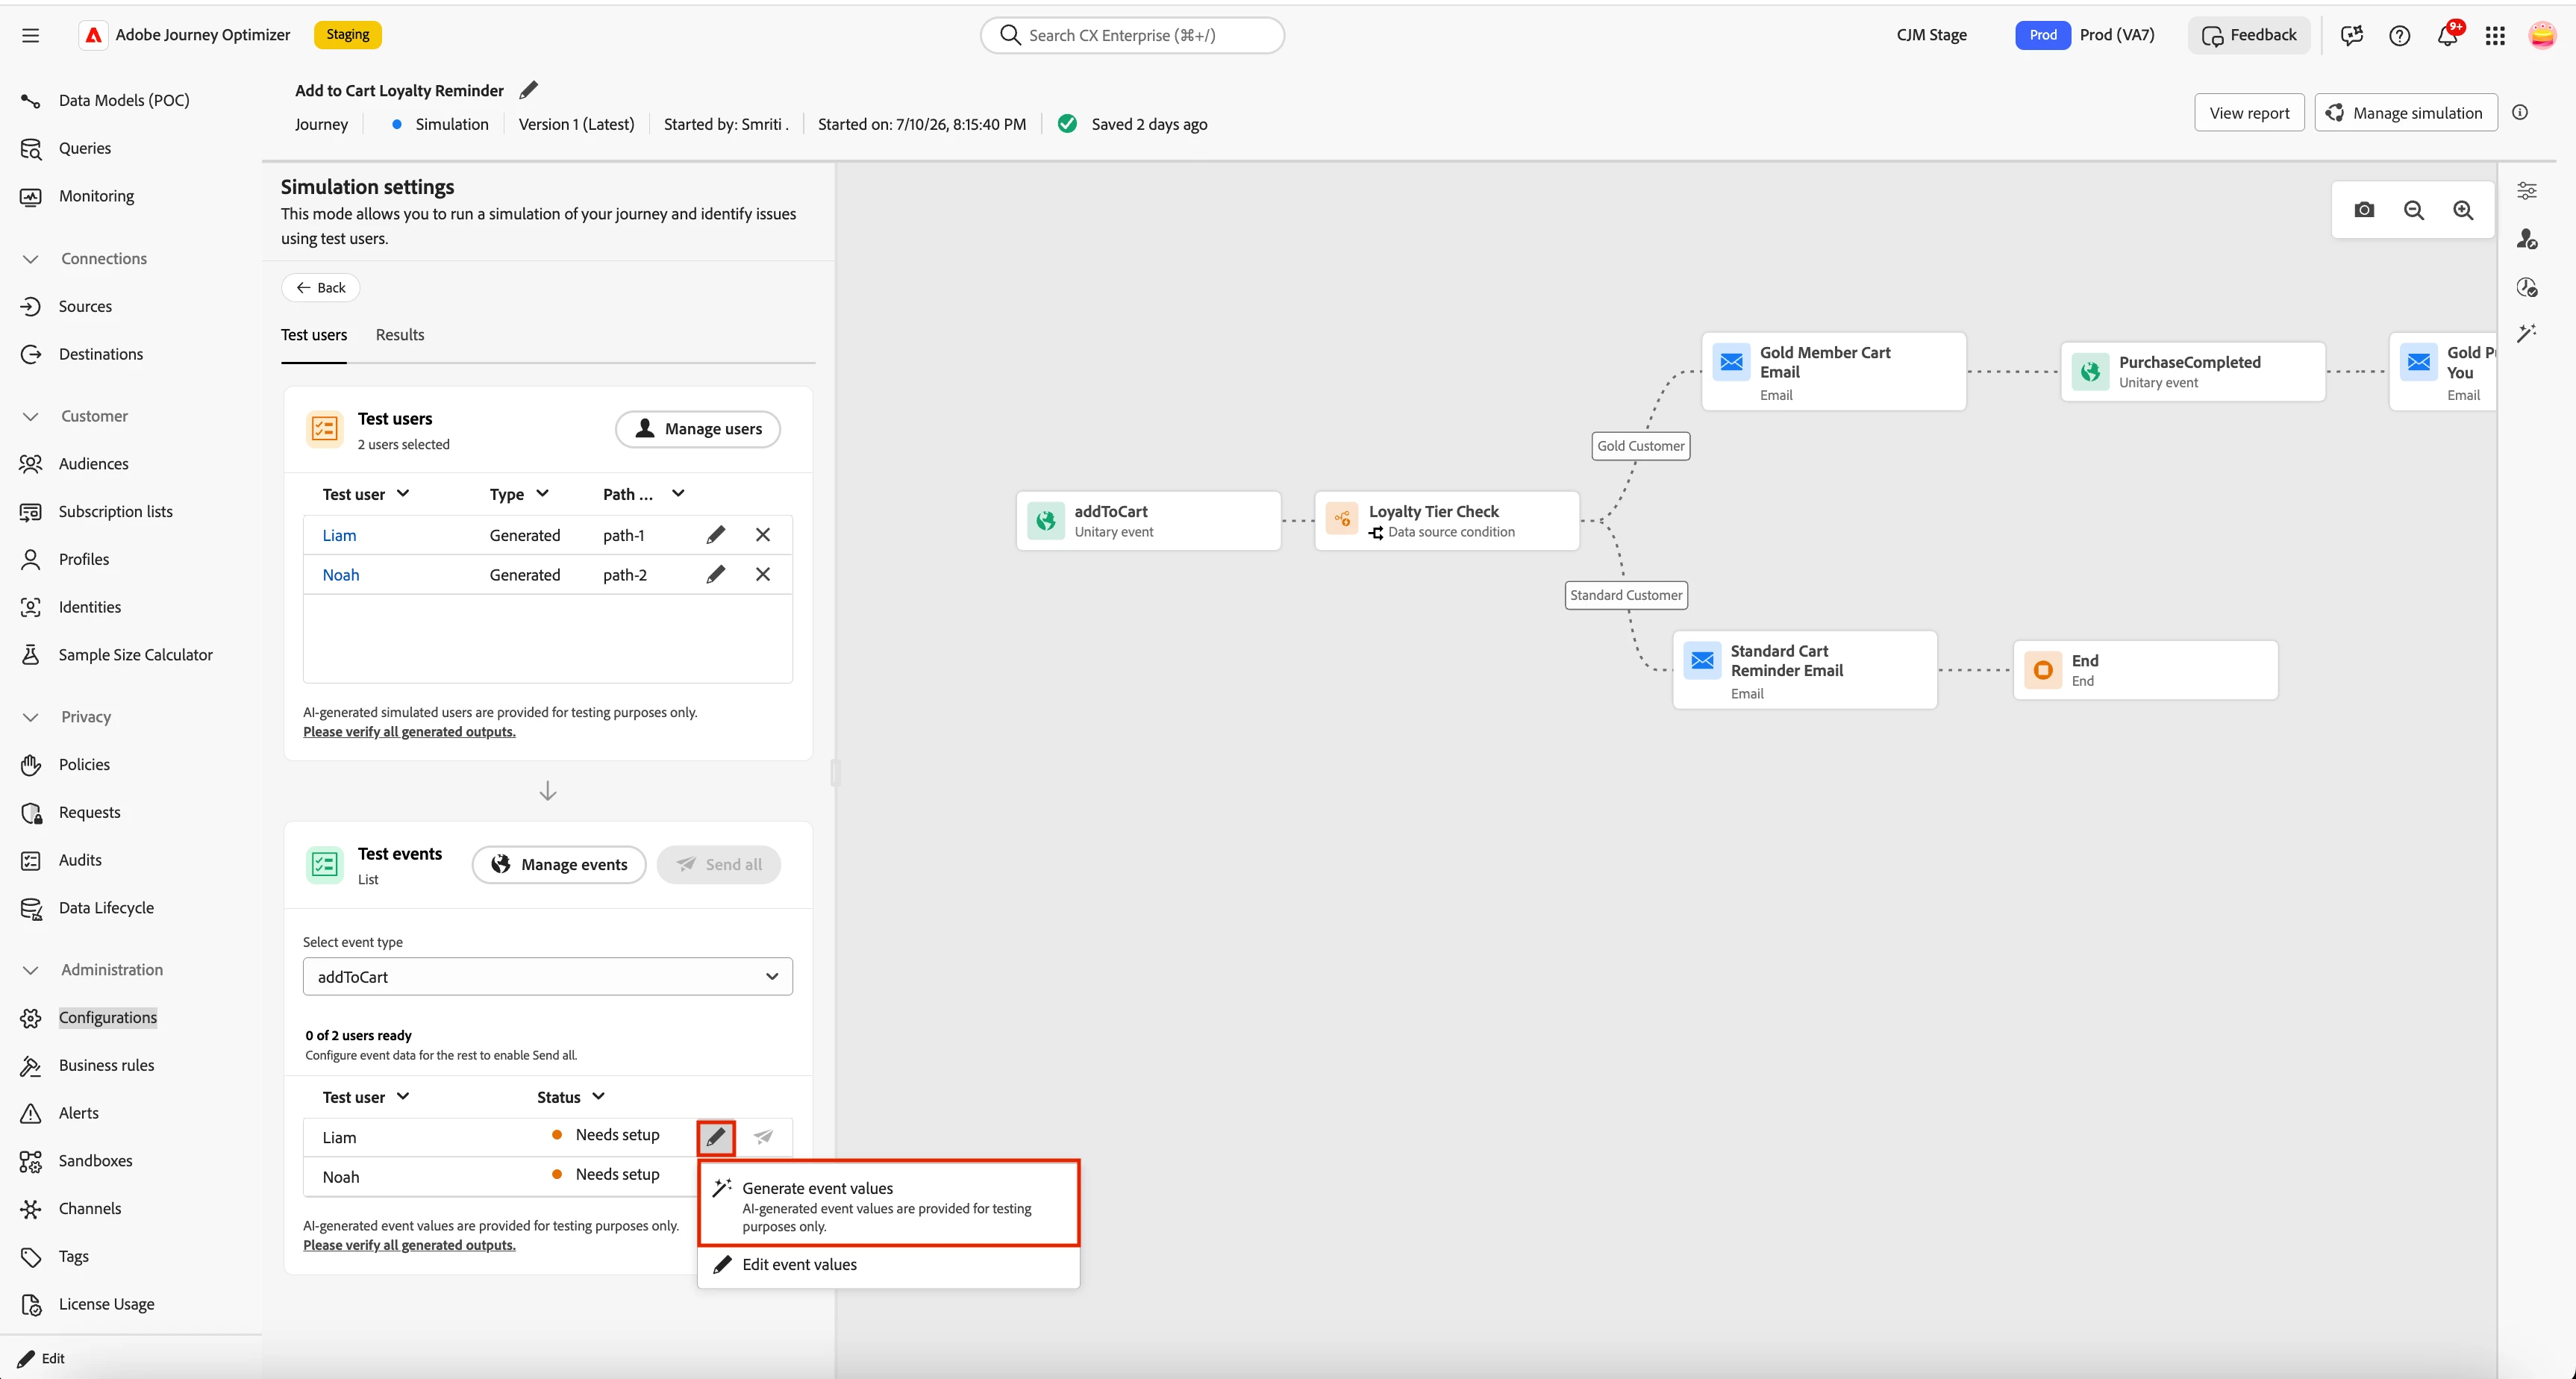
For this journey, work through two event types:
addToCart — entry event, required for all users: Select addToCart. Click the pencil icon for each user, review, confirm. Both show Ready.
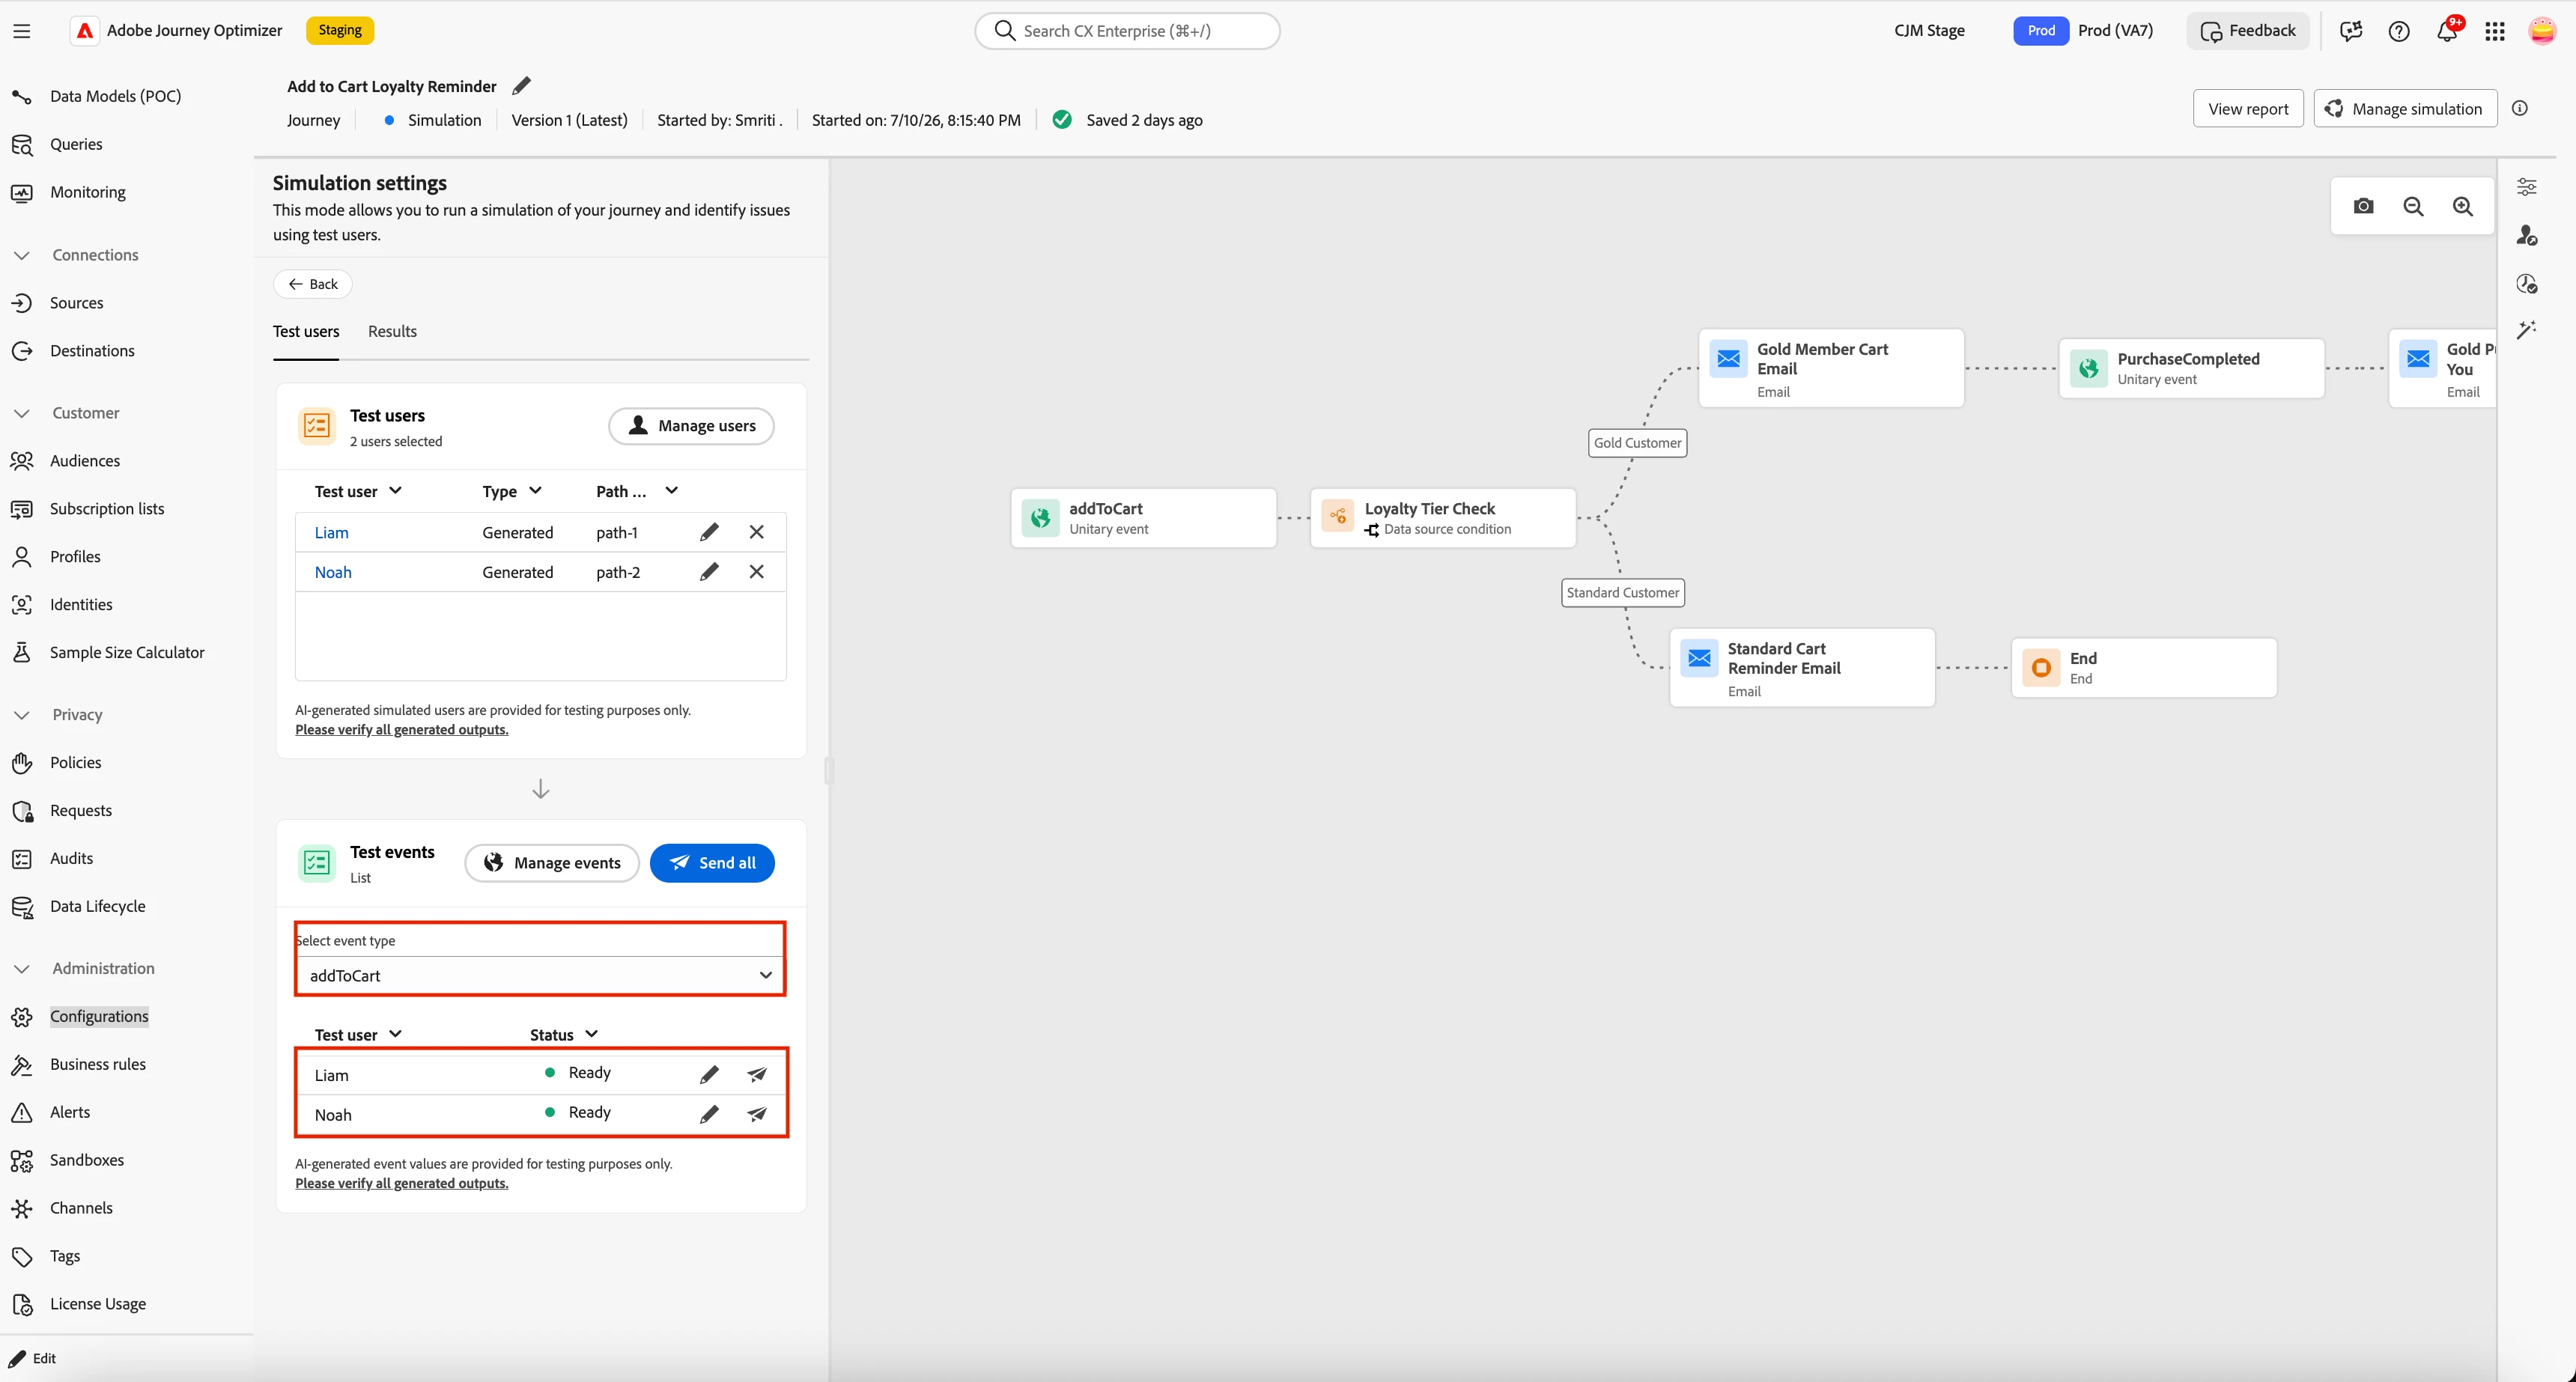
PurchaseCompleted— mid-journey event, Gold Customer only: Select PurchaseCompleted event. Both users appear — but based on the journey canvas, only the Gold Customer needs this event. Generate and confirm for the Gold Customer; skip the Standard Customer.
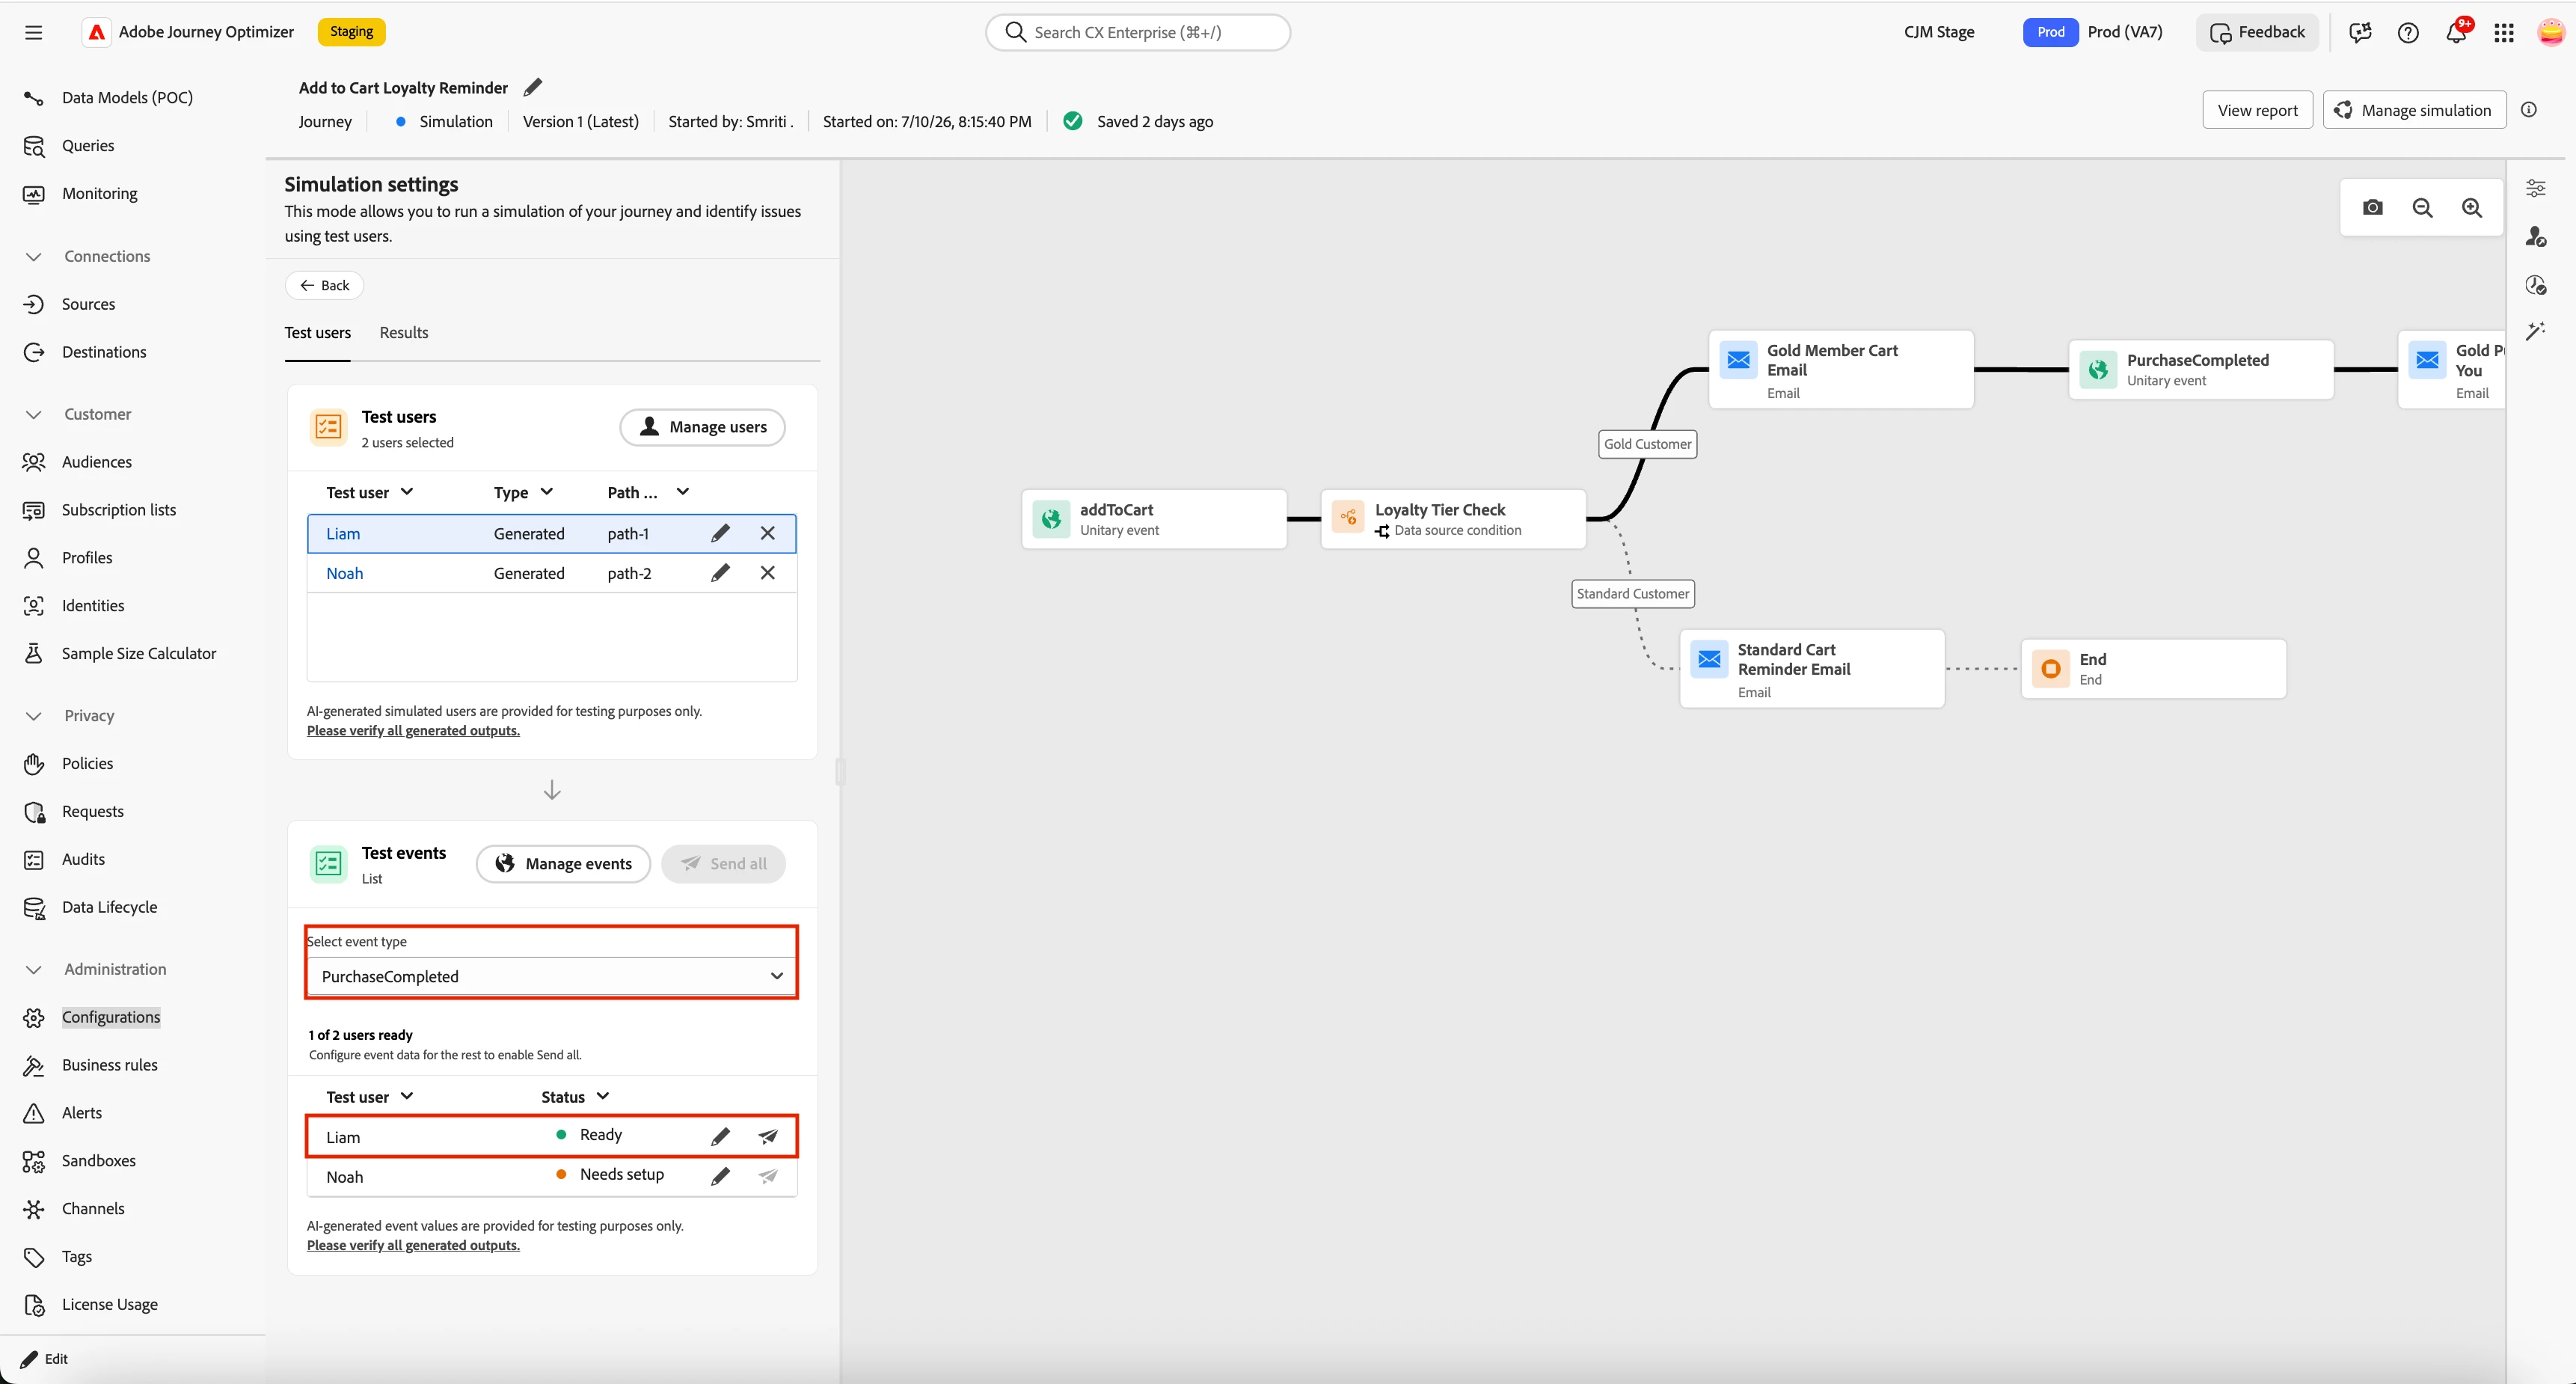
Trigger: All payloads are Ready. Trigger them in order:
1. Send entry events— Click Send for addToCart for all users. Both users enter the journey automatically.
2. Send mid-journey events — Once inside, the Gold Customer reaches the PurchaseCompleted node and waits. Click Send for that event. The Gold Customer moves forward, receives the thank-you email, and completes their path.
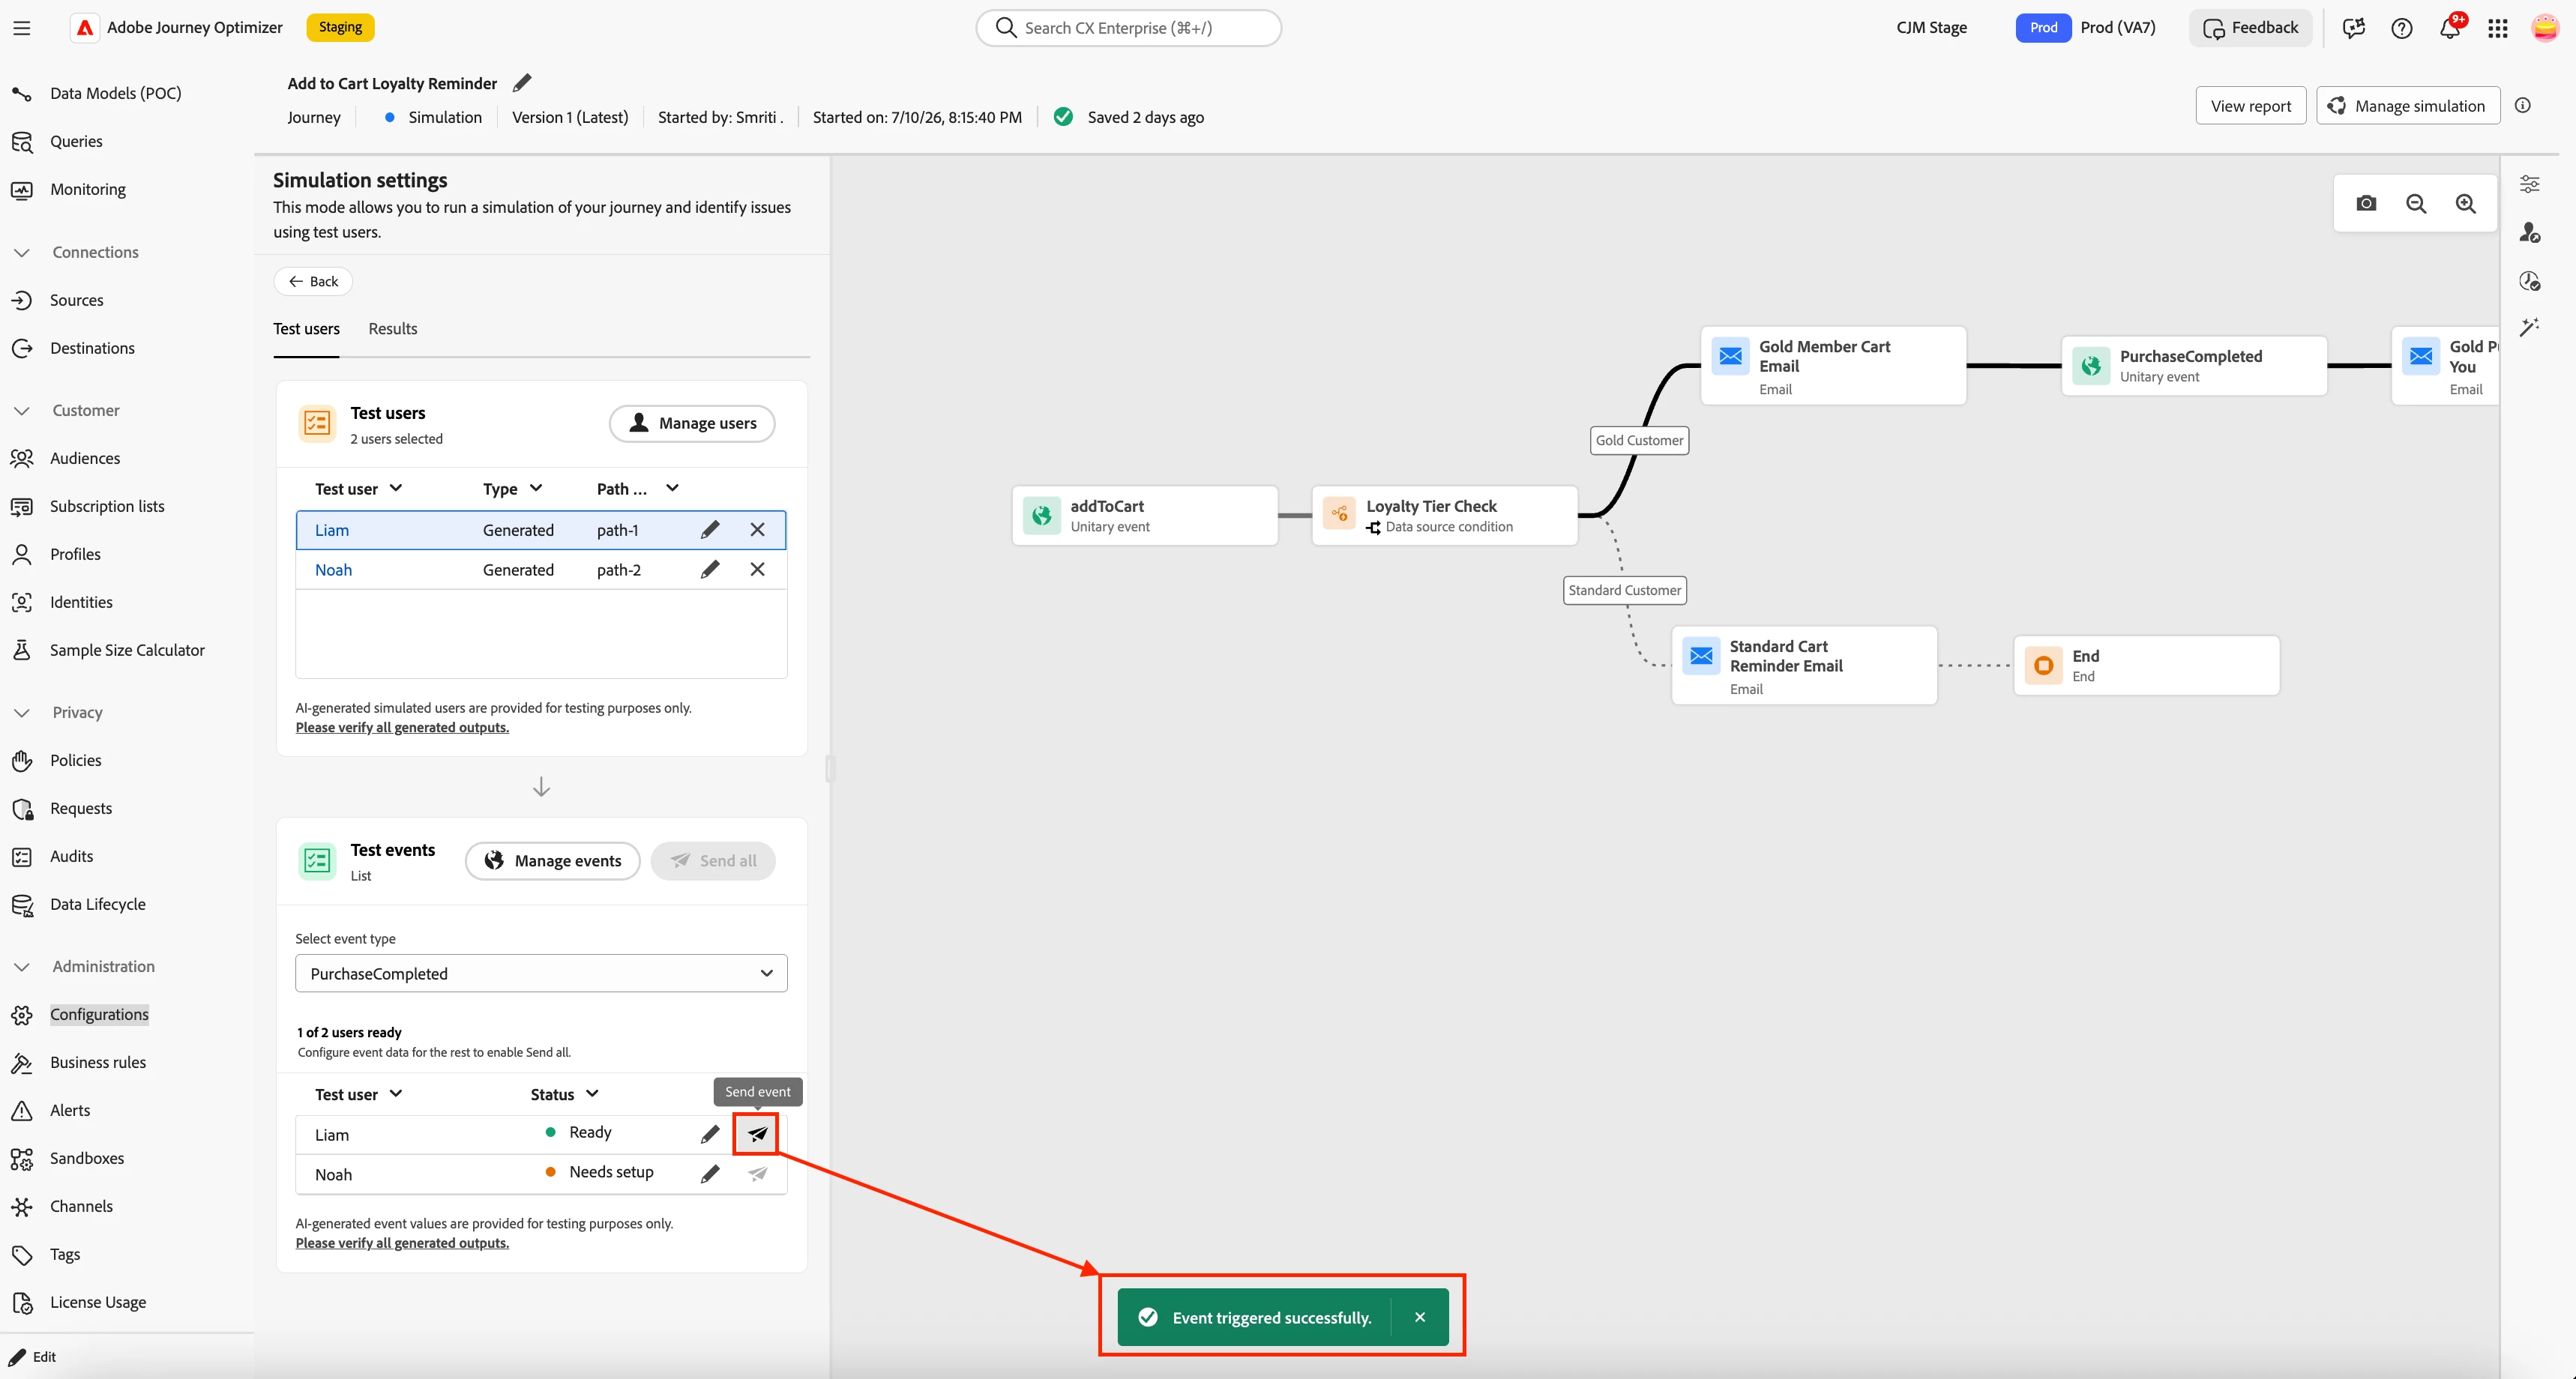
Viewing the Results
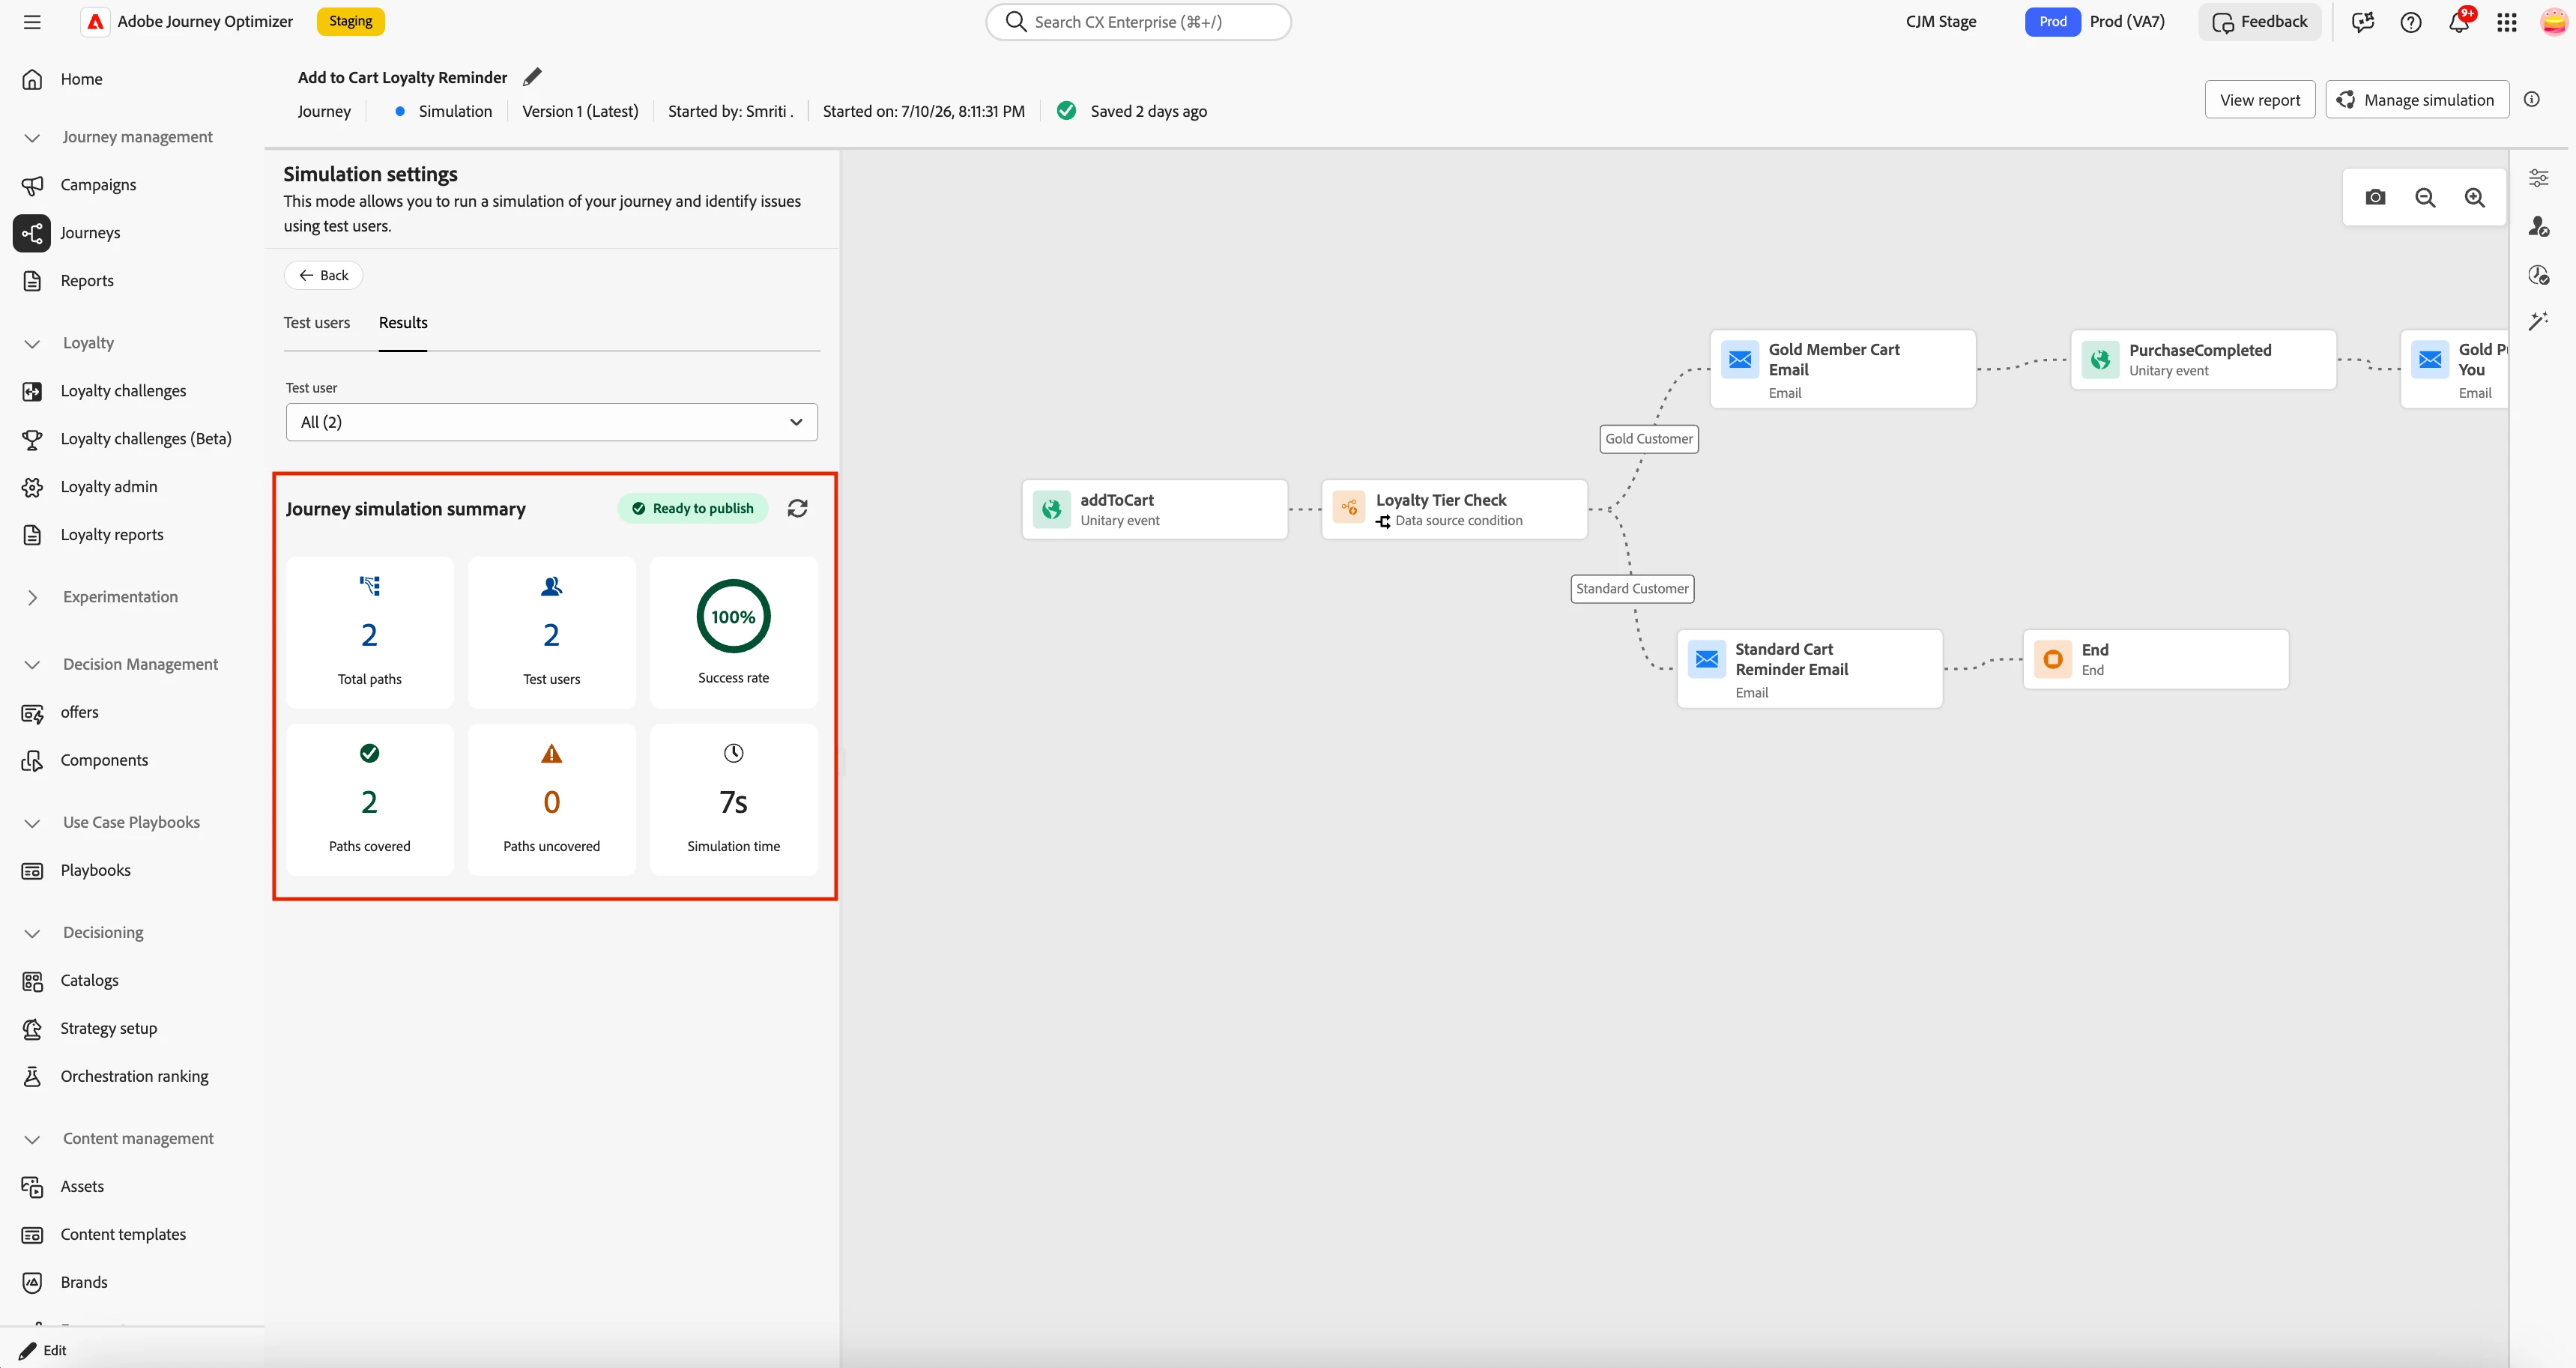
However you ran the simulation, the last step is the same. Once the test users have entered the journey, open the Simulation Analysis — click View Results in Quick Simulation, or switch to the Results tab in Manual Simulation.
It summarises the run: for this journey, all three test users covered their paths end-to-end, so it reports full coverage and marks the journey ready for publication.
Summary
Event-driven journeys used to mean one extra job after user generation: look up schemas, build payloads by hand, map events to the right users, get the trigger order right. The Agent removes all of it:
- No schema hunting — the Agent reads the XDM event schema for you.
- No hand-built payloads — AI generates realistic, schema-valid field values tailored to each test user's profile.
- No sequencing headaches — entry events fire first, users enter, mid-journey events follow at exactly the right moment.
- A clear verdict — the Simulation Analysis tells you which paths passed, which didn't, and whether you're ready to publish.
Use Quick Simulation when you want results fast. Use Manual Simulation when you want to inspect and control each step. Either way, a careful, error-prone pre-publication ritual becomes a handful of clicks.