

Journey Simulation Agent — Cover Your Whole Journey in a Few Clicks with AI-Built Test Users, No Hand-Crafted Data
Introduction
A little while ago we introduced Simulation Mode — a way to test run a draft journey with lightweight, AJO-native Simulated Users before you ever publish. It was a big step: instead of pulling in AEP test profiles to try out a journey, you could spin up purpose-built test profiles right inside AJO.
But Simulation Mode still left one job on your plate: you had to figure out which test users the journey needed, and you had to build each one by hand.
The Journey Simulation Agent takes that job off your plate. It reads your journey, works out the minimal set of paths needed to exercise every branch, and uses AI to generate a realistic test user for each one, complete with the profile attribute values that path needs. Then it triggers them into the journey and hands you a single verdict: is this journey ready to publish, or not? No path-tracing, no hand-built profiles, no digging through logs.
This post walks through that end-to-end, using an example journey.
The Issue: Hand-Crafted Test Data
Picture a welcome journey you've built for new members: it branches on the member's country, splits one branch further by city, and ends each of its three branches with a localised email.
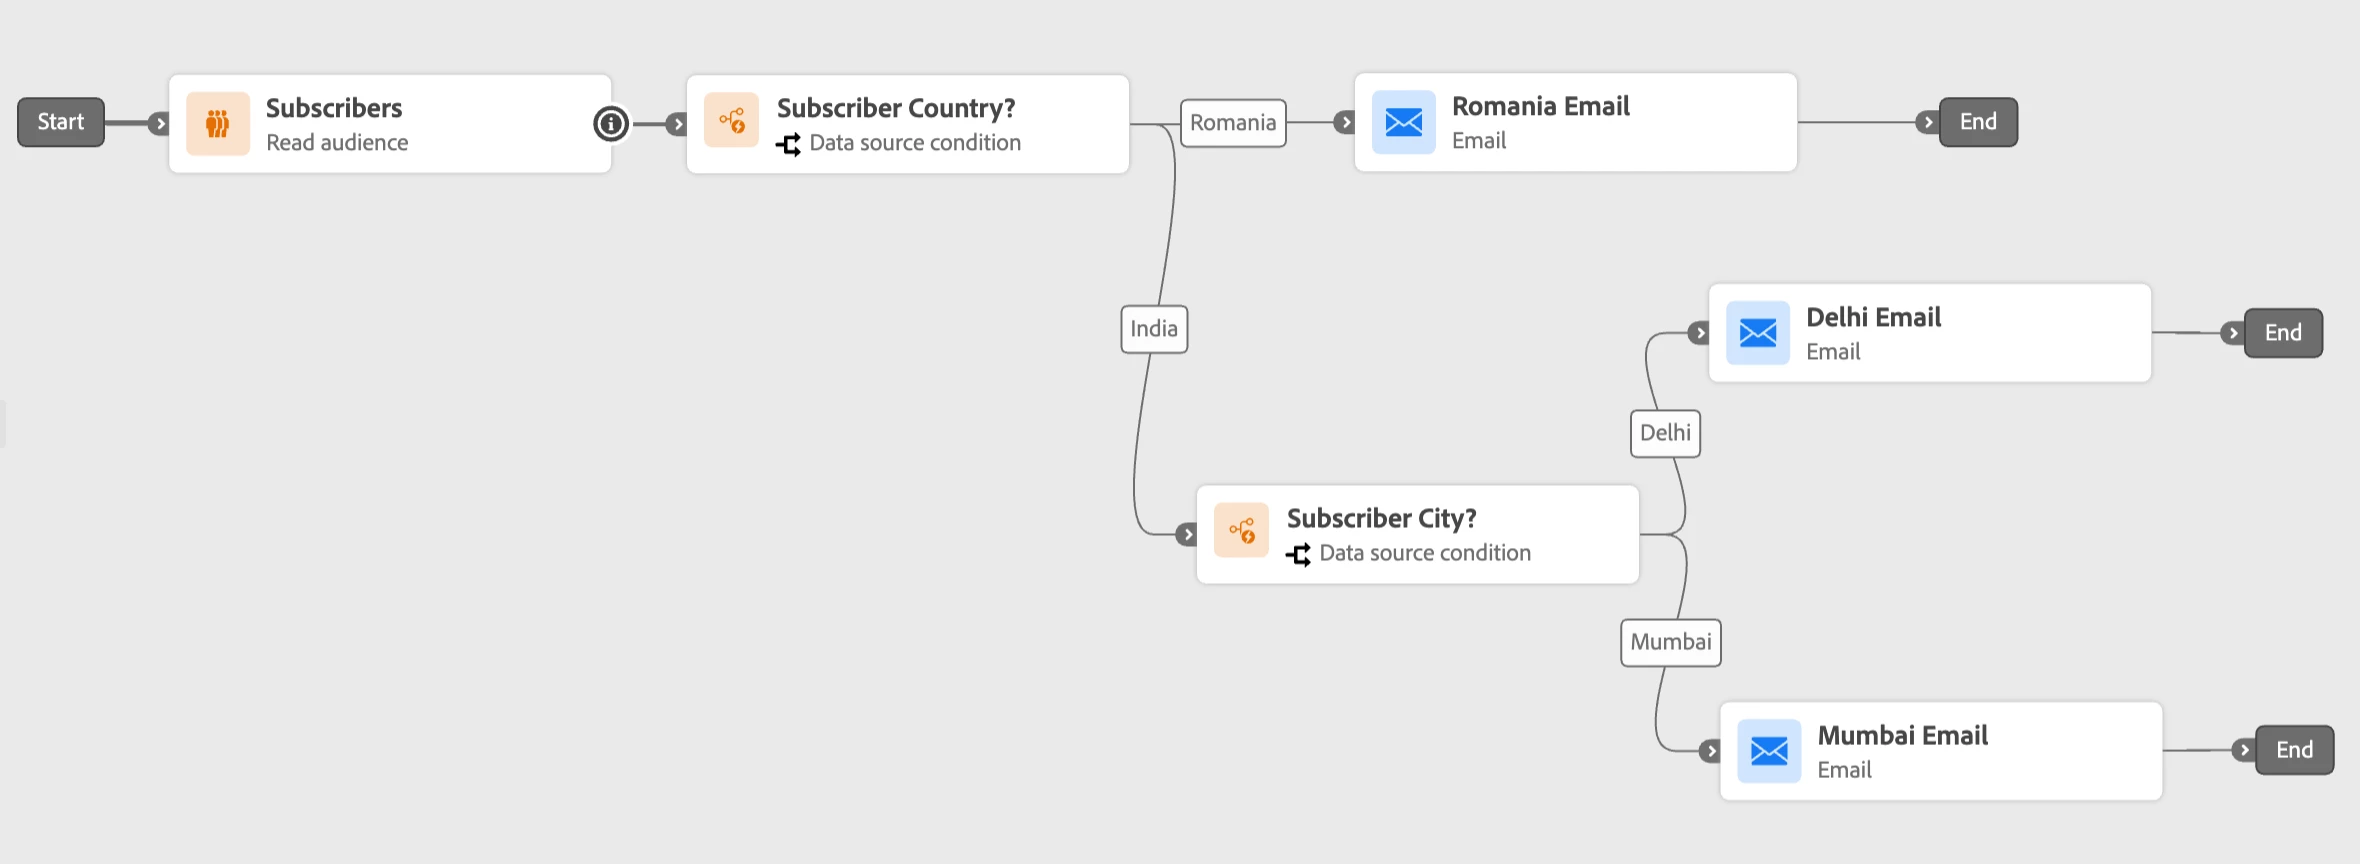
Simulation Mode lets you test the journey before publishing — but it solved only where your test data comes from, not how much work it is to produce. To simulate this journey properly, you still have to:
1. Map every path by hand. Trace each branch and list the distinct routes a member can take. Miss one and you ship an untested branch.
2. Work out the data each path needs. Path 1 needs country = "Romania"; Path 2 needs country = "India" and city = "Delhi". And because the emails personalise on person.firstName, every test user needs that attribute too.
3. Build a Simulated User for each path, typing in every attribute the journey touches.
4. Trigger them and read the logs yourself to see which users made it end-to-end and which stalled.
It's slow, easy to get wrong, and scales badly — one more branch means more paths and more hand-built users. That's a lot of manual bookkeeping standing between "draft" and "ready-to-publish".
The Solution: Journey Simulation Agent
The Journey Simulation Agent automates the entire loop you'd otherwise run by hand. Under the hood it does four things — each one replacing a chore you used to do by hand:
1. Finds the minimal set of paths that cover the journey. It walks the journey graph from start to every end node enumerating all the start-to-end paths, then applies a set-cover step to keep the smallest set of paths that still exercises every edge — no redundant profiles, no missed branches.
2. Generates a realistic test user for each path — with AI. It hands each path's conditions and profile schema to an LLM, which produces a realistic and consistent profile satisfying all the path's conditions: real names (Maria, not test_user_2), real cities, ISO country codes, well-formed dates, full names that contain the first name. Attributes the journey never references aren't invented.
3. Wires up real delivery details for first-hand verification. It uses the email address / phone number from your own profile as execution fields, so proofs of Email and SMS actions land in your inbox and on your phone — you read the actual rendered message, not just confirm a branch was reached. (Editable before the run if you'd rather send elsewhere.)
4. Runs the users and grades the results. It triggers the test users into the journey and inspects each user's node-by-node traversal logs, confirms it took its intended path end-to-end, and rolls this into a Simulation Analysis summary: how many paths the journey has, how many were covered, how many failed, and — the bottom line — whether the journey is ready for publication.
Net effect: journey paths tracing, manual test user data entry, and manual analysis of users’ logs all collapse into a handful of clicks.
How to use the Journey Simulation Agent
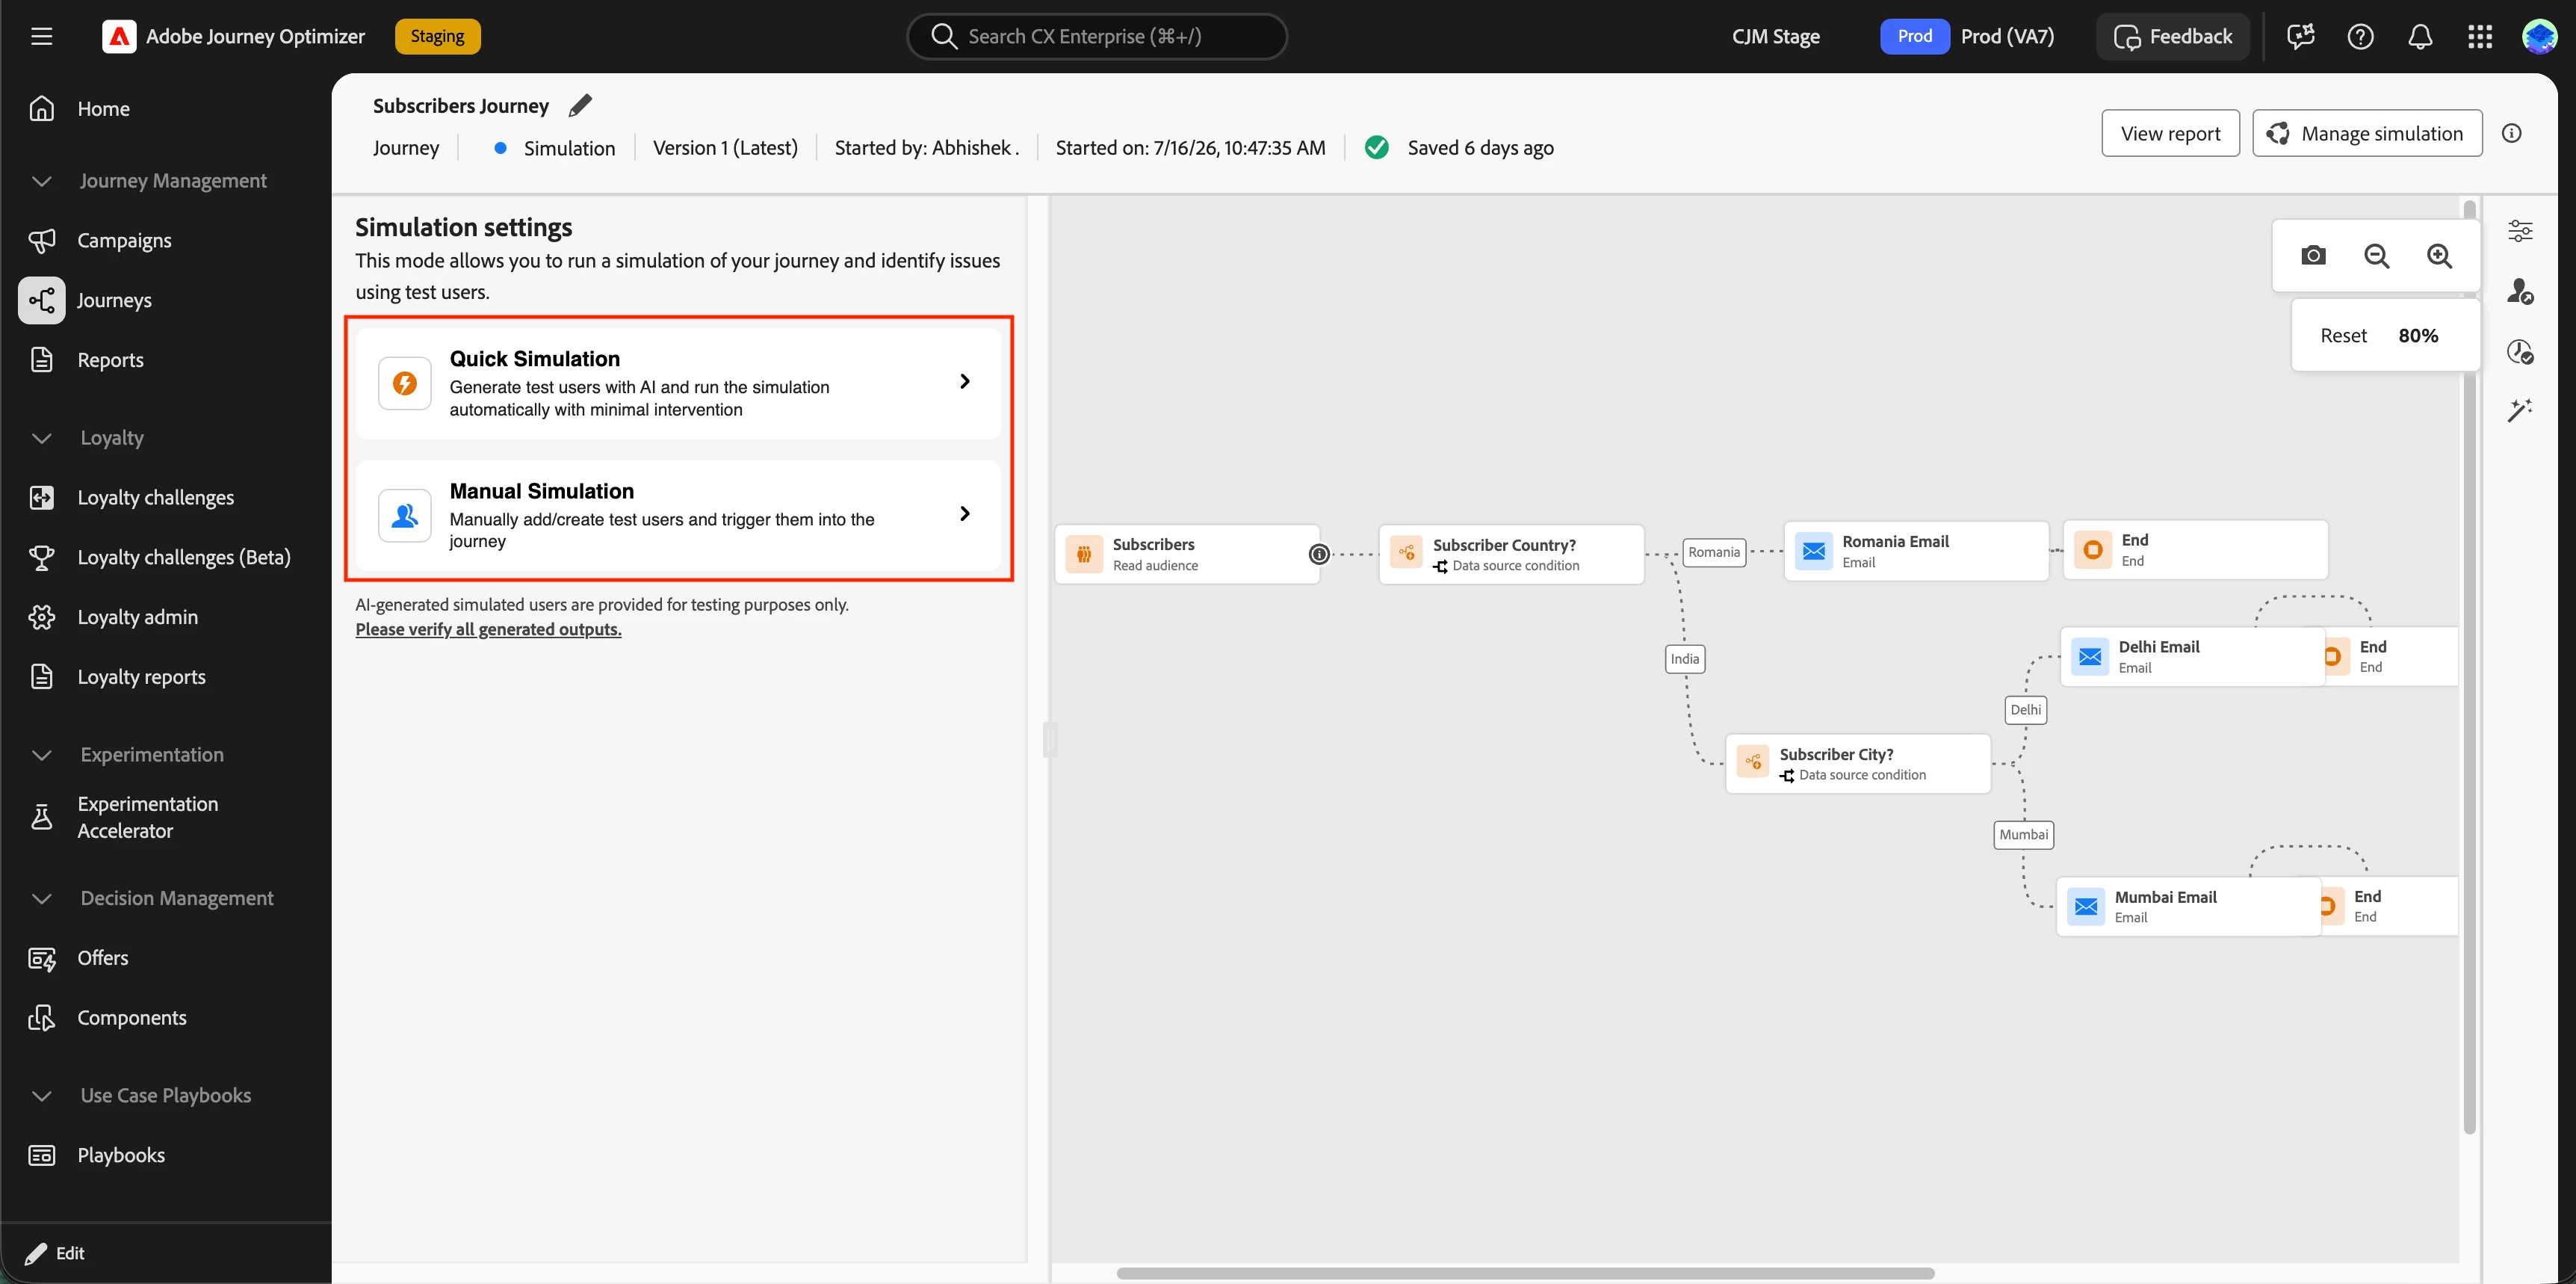
Once a journey is in Simulation mode, Journey Simulation Agent does the heavy lifting — and you decide how hands-on to be. The agent offers two ways to run:
- Quick Simulation — Fully automates the simulation in a single click, generating the simulated users and immediately sending them into the journey.
- Manual Simulation — Gives you complete control by separating user generation and journey triggering into two steps, so you can review, update, and select which users to send.
Either way, once the users have run you simply open the results to see the verdict.
Entering Simulation mode
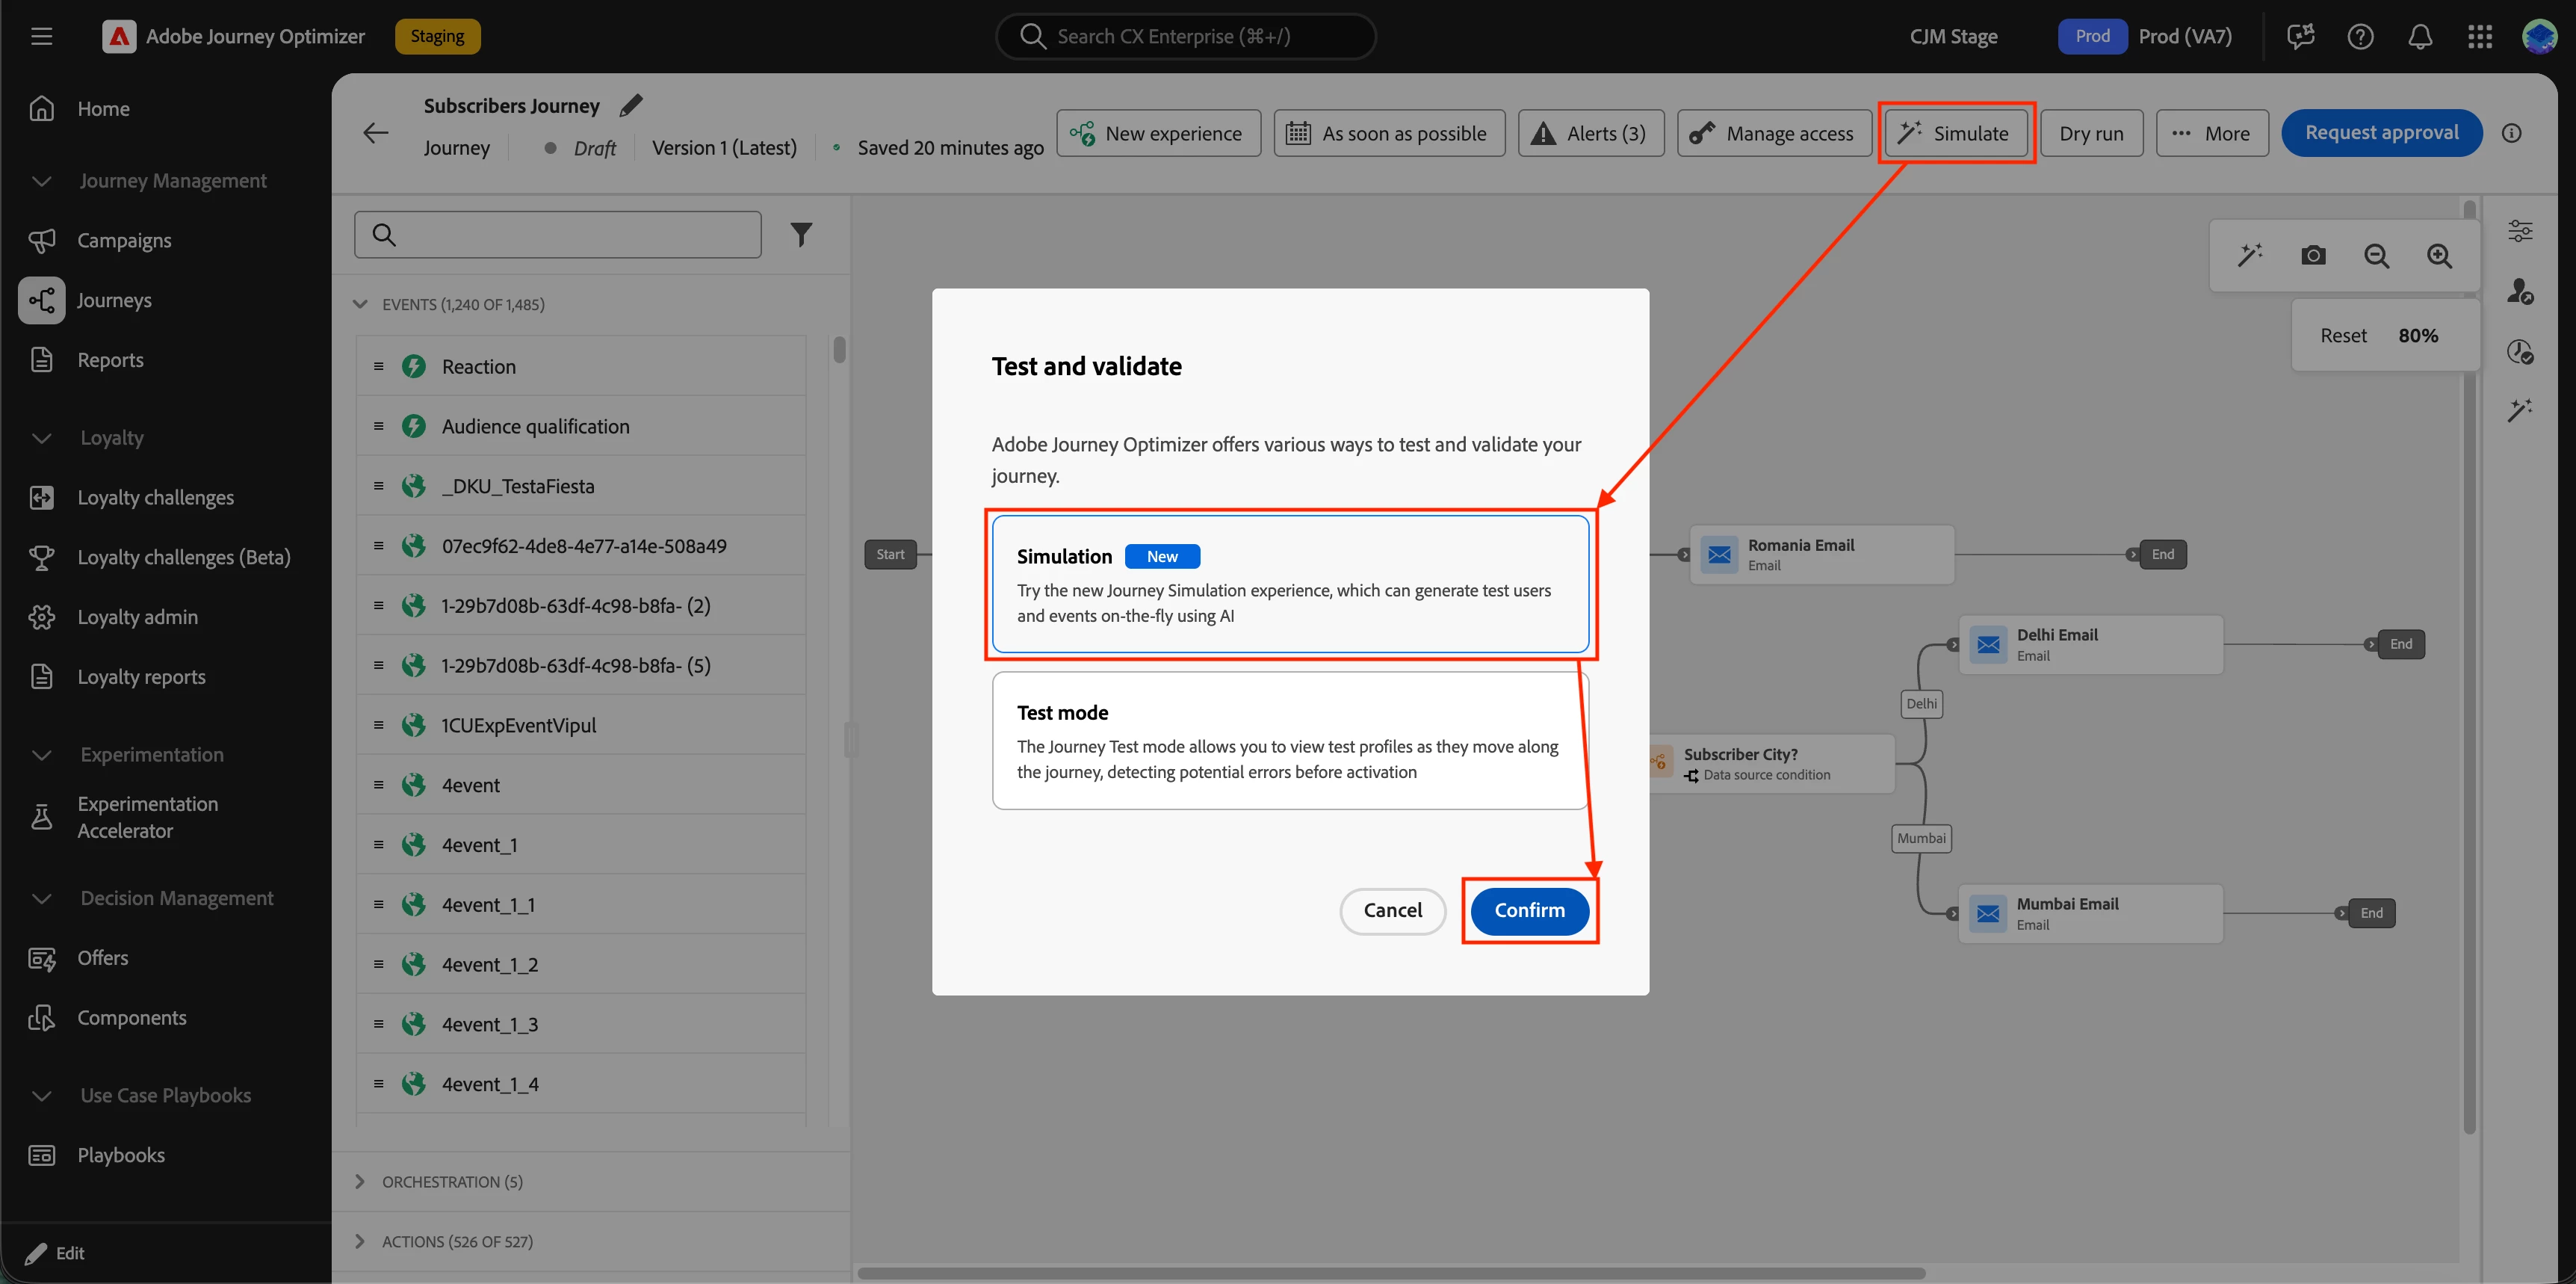
Open your draft journey and click Simulate in the top-right menu. (This button is enabled only when the journey has no errors.) Confirm Simulation in the dialog, and you land on the two modes of Journey Simulation Agent.
Quick Simulation: The Fast Path
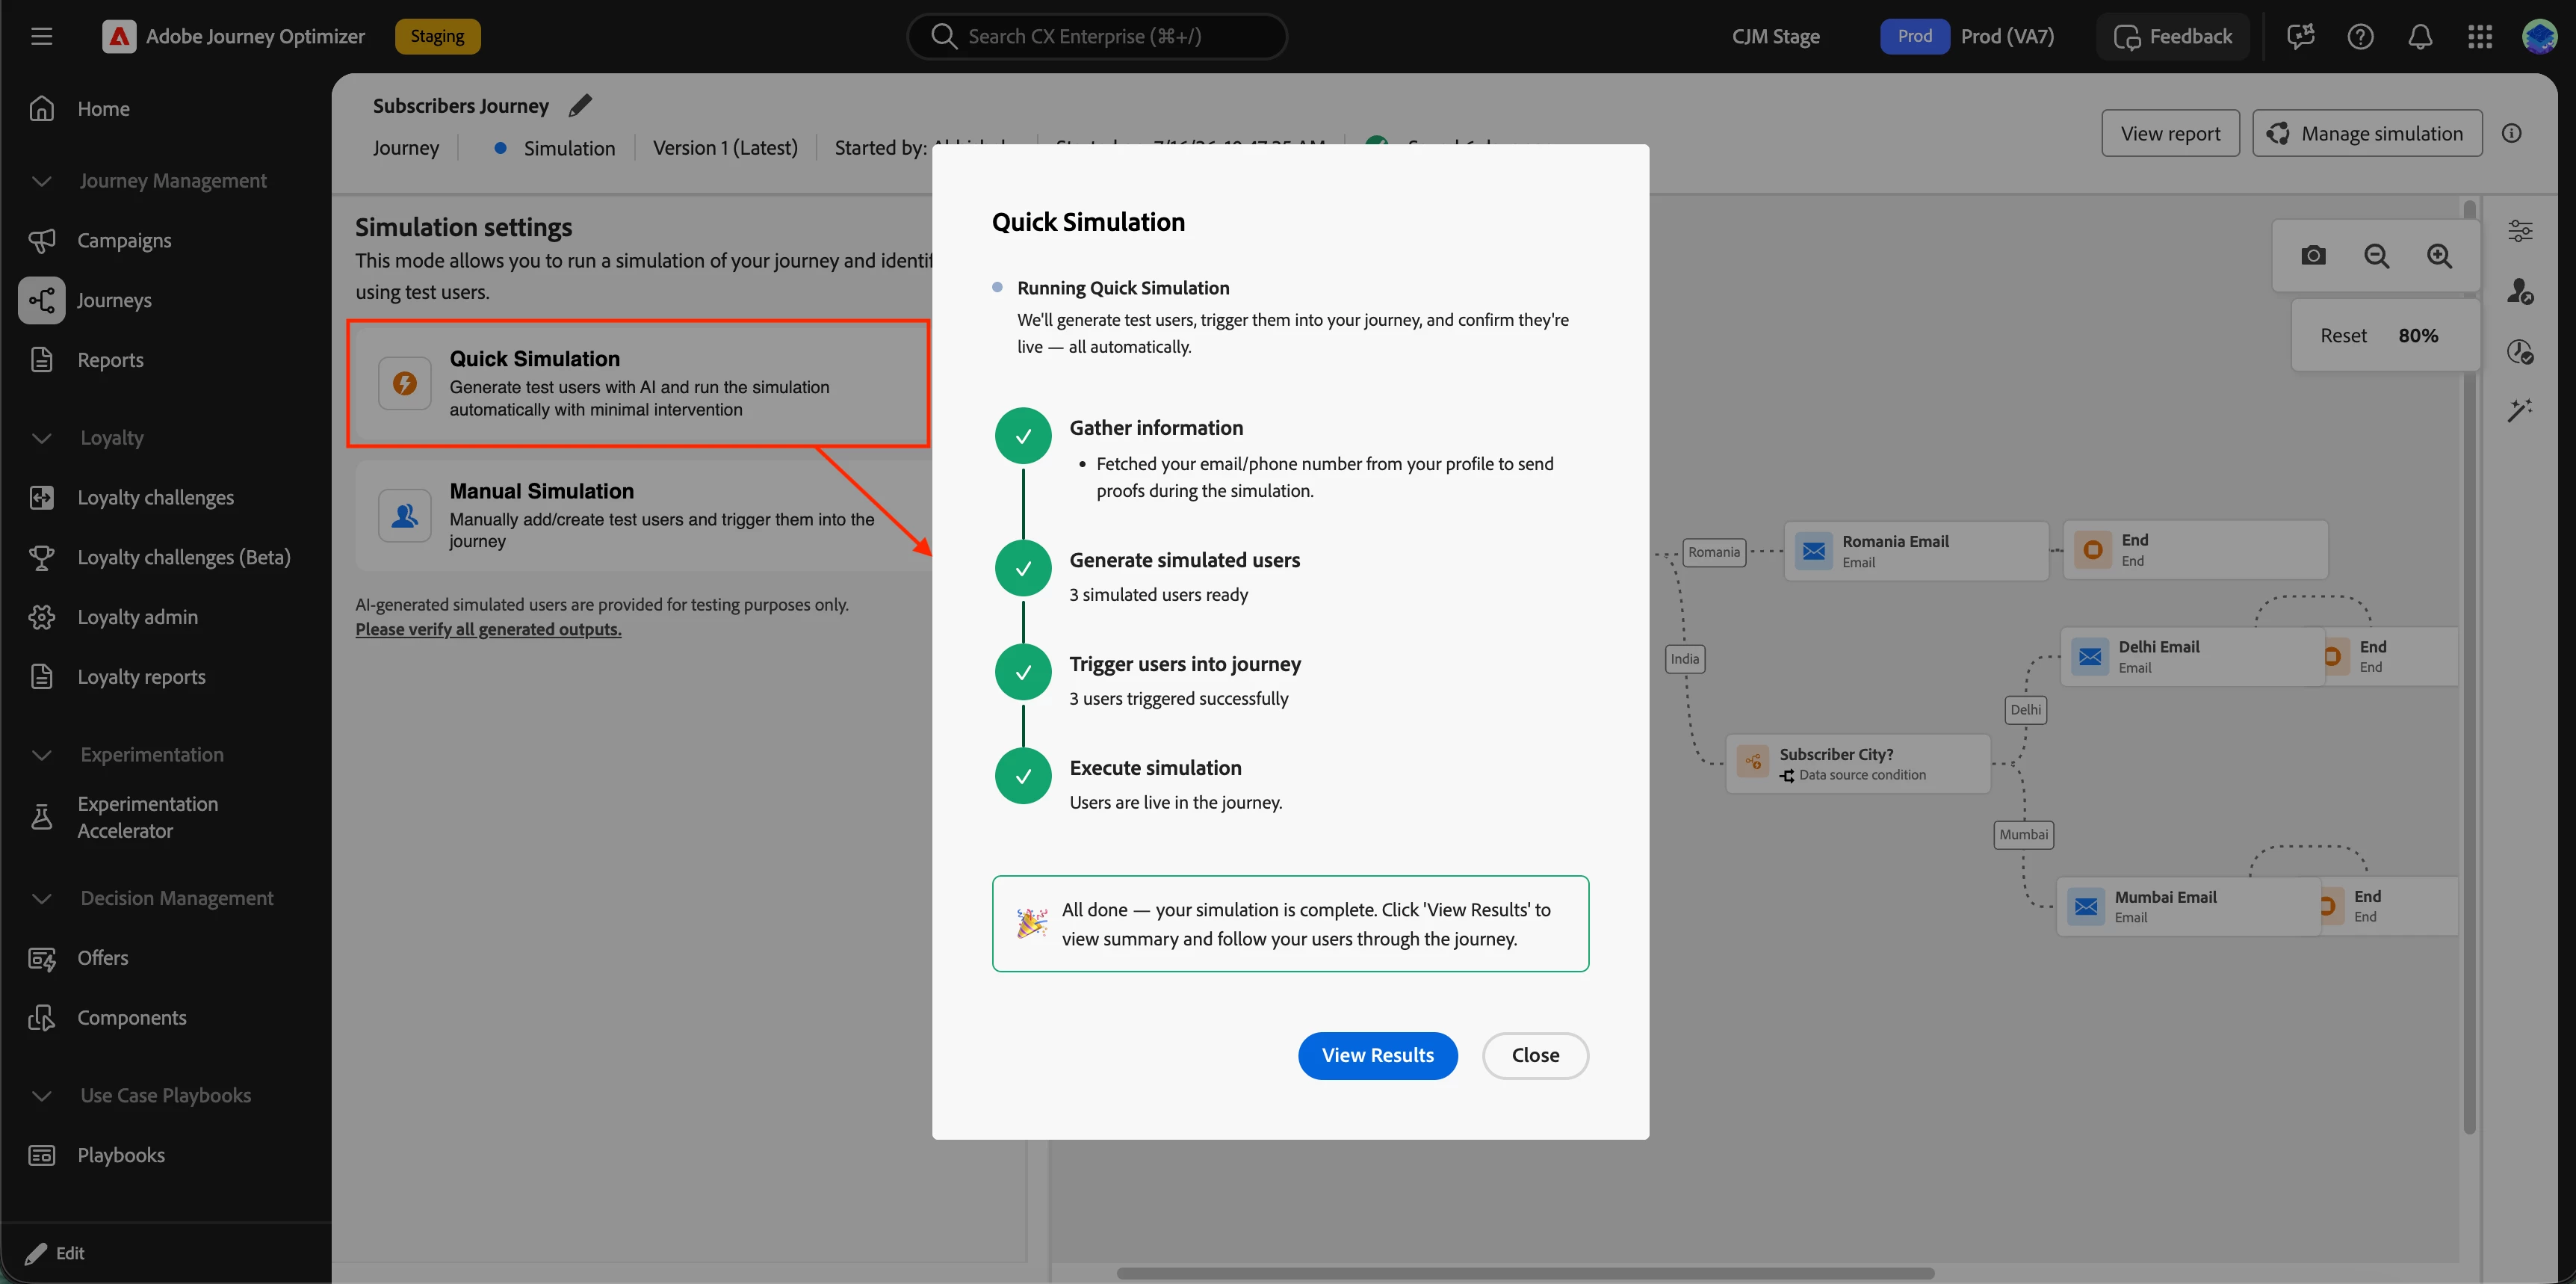
Quick Simulation is the fastest way to answer "does this journey work?" — one click, and the agent does everything. Behind that single click, it:
1. Reads your execution fields — the email and phone number that proofs of any Email/SMS actions are sent to. It reuses the values from your last run, falling back to those on your profile the first time (editable before it proceeds).
2. Generates the simulated users, one per valid path.
3. Triggers them into the journey and confirms they've entered.
Manual Simulation: The Controlled Path
Manual Simulation gives you the same AI automation, plus a checkpoint to review and fine-tune everything before it enters the journey — ideal when you want to see exactly what the agent built.
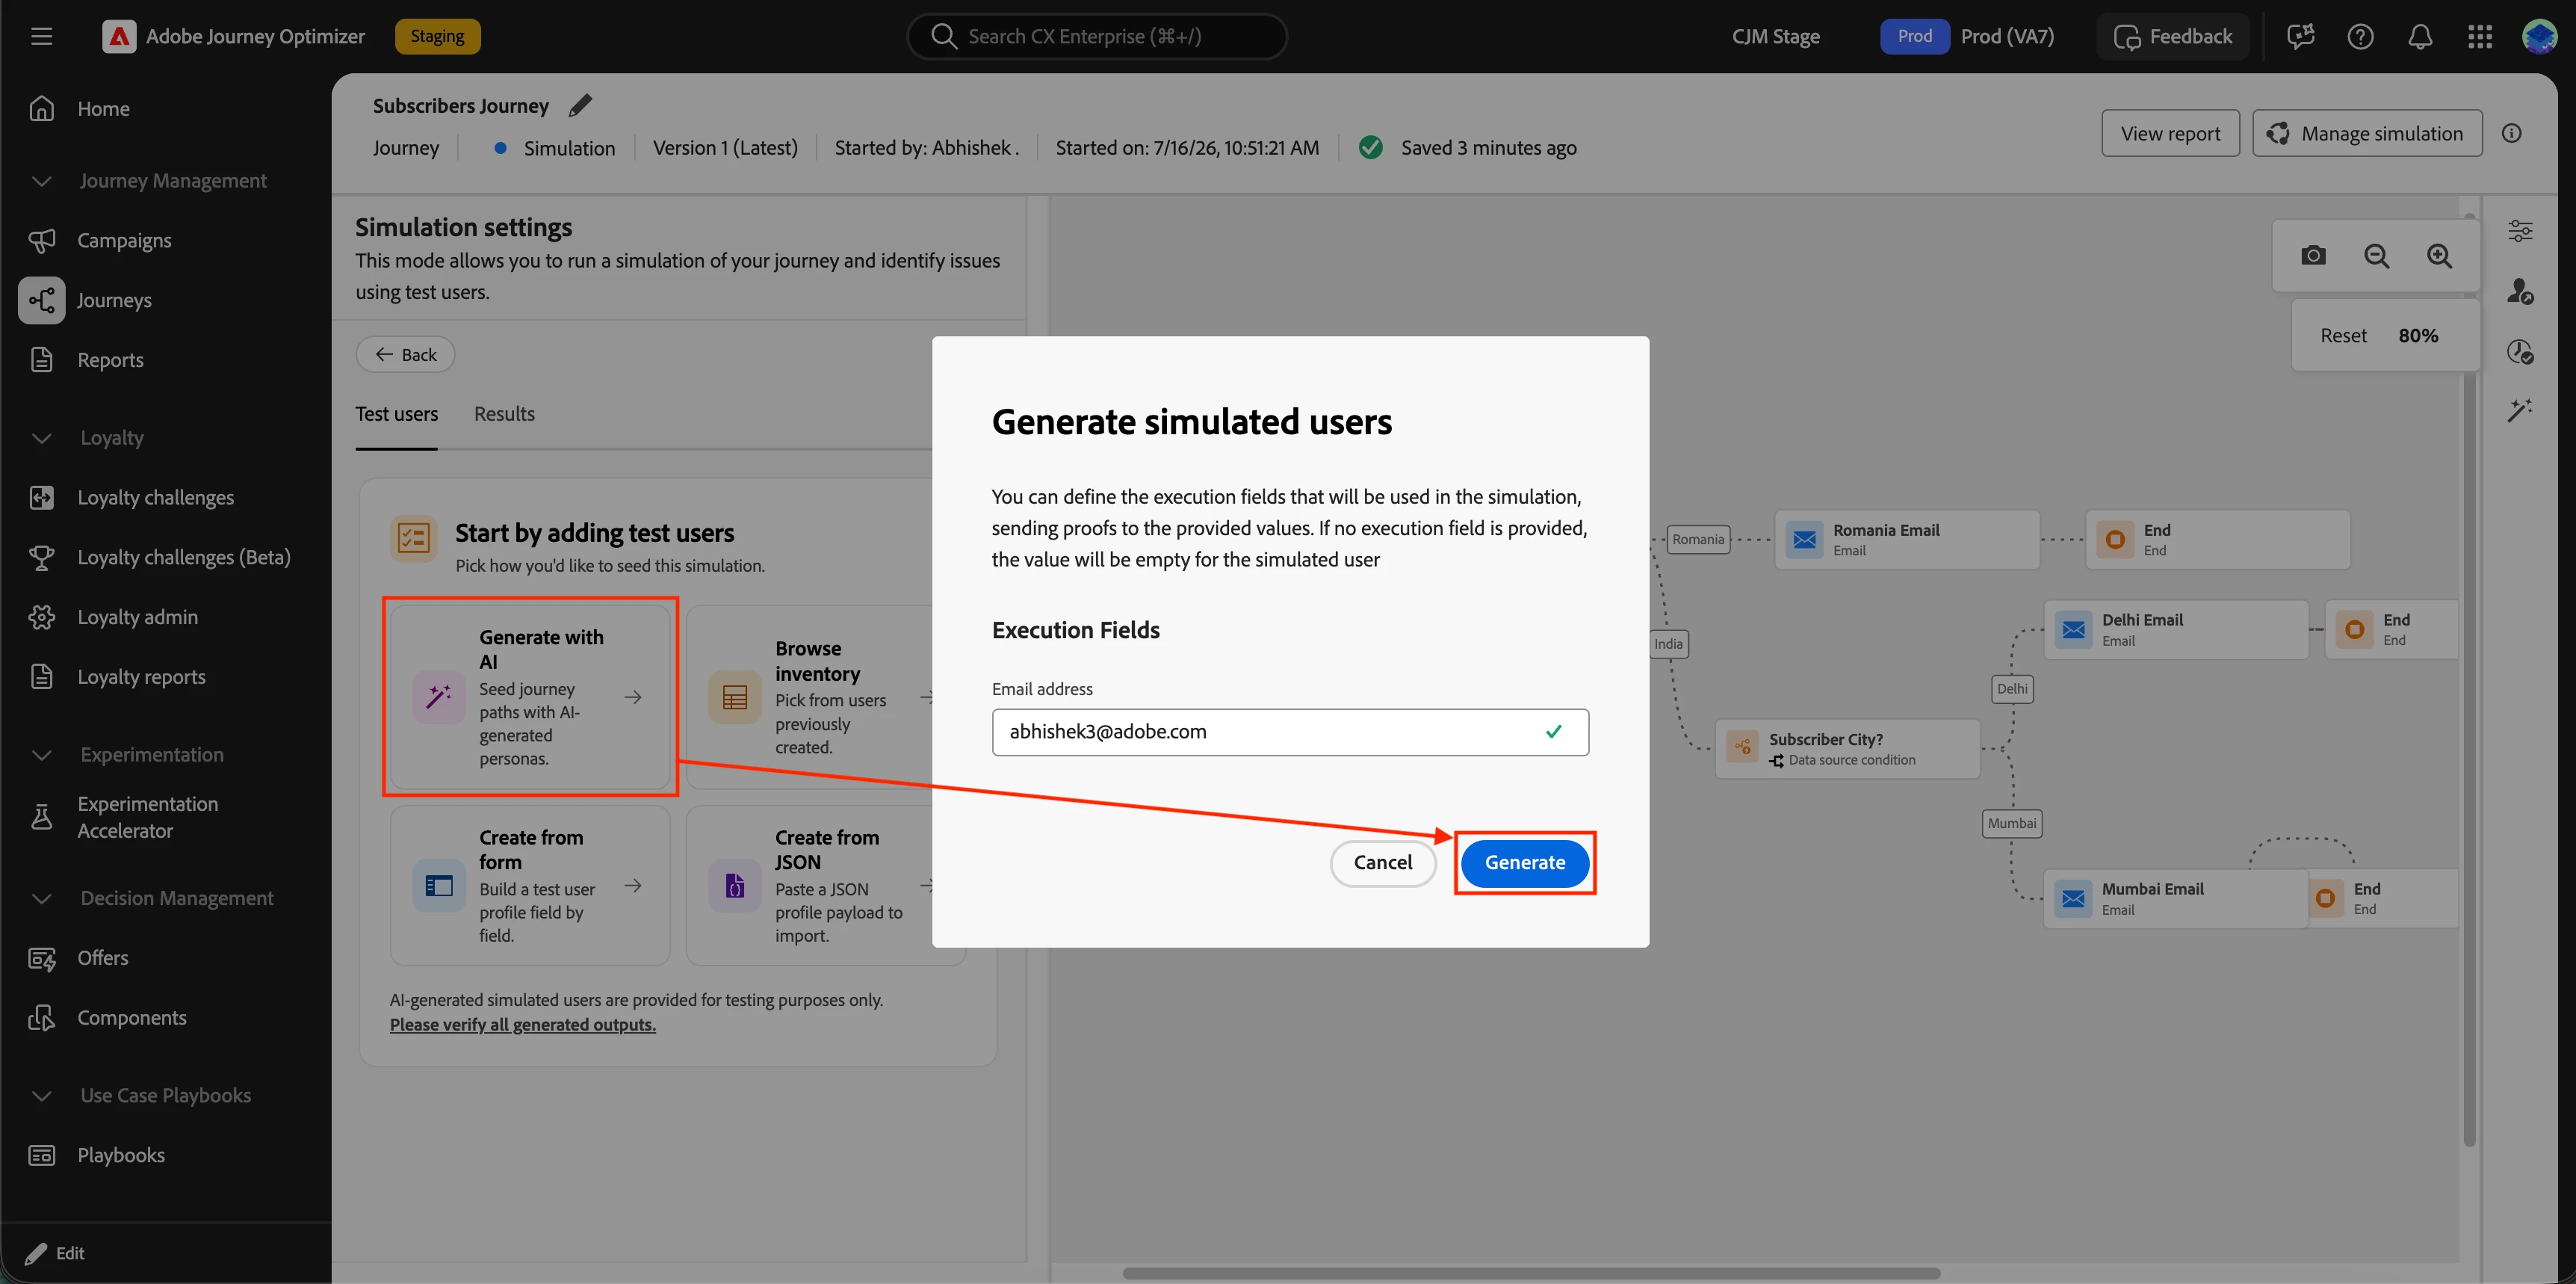
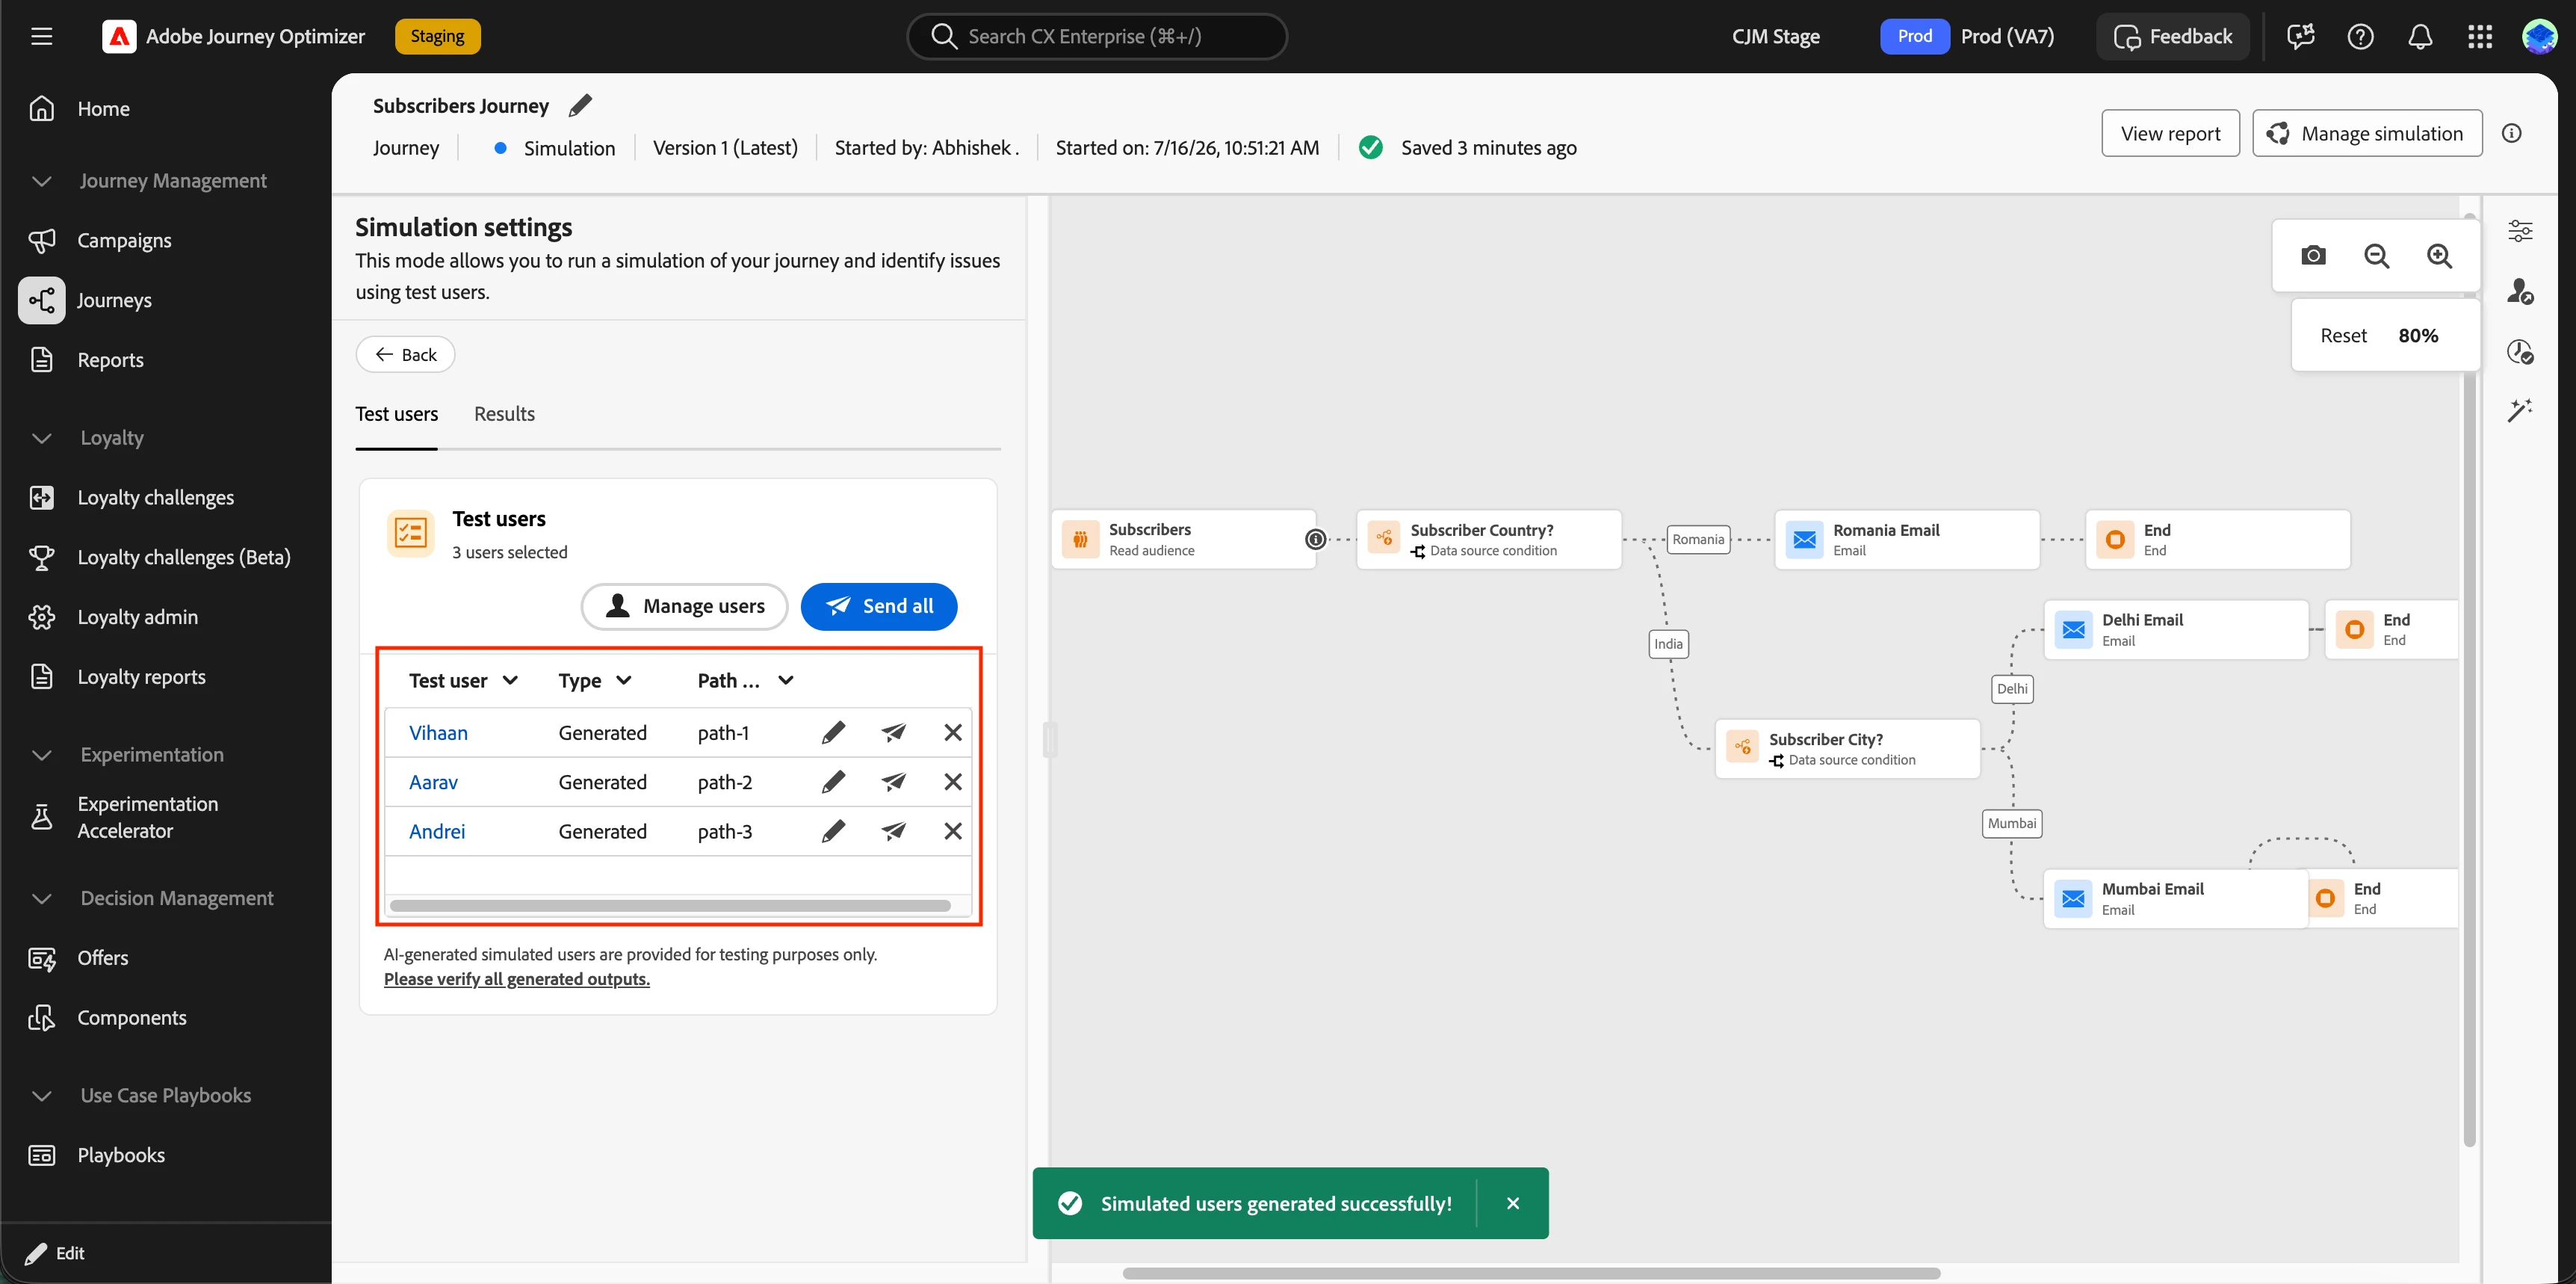
Generate: Click Manual Simulation → Generate with AI. A dialog shows the Execution Fields (email / phone) — reused from your last run, or pulled from your profile the first time; edit if needed, then click Generate. The agent builds the simulated users — one per valid path — and lays them out in a table to review.
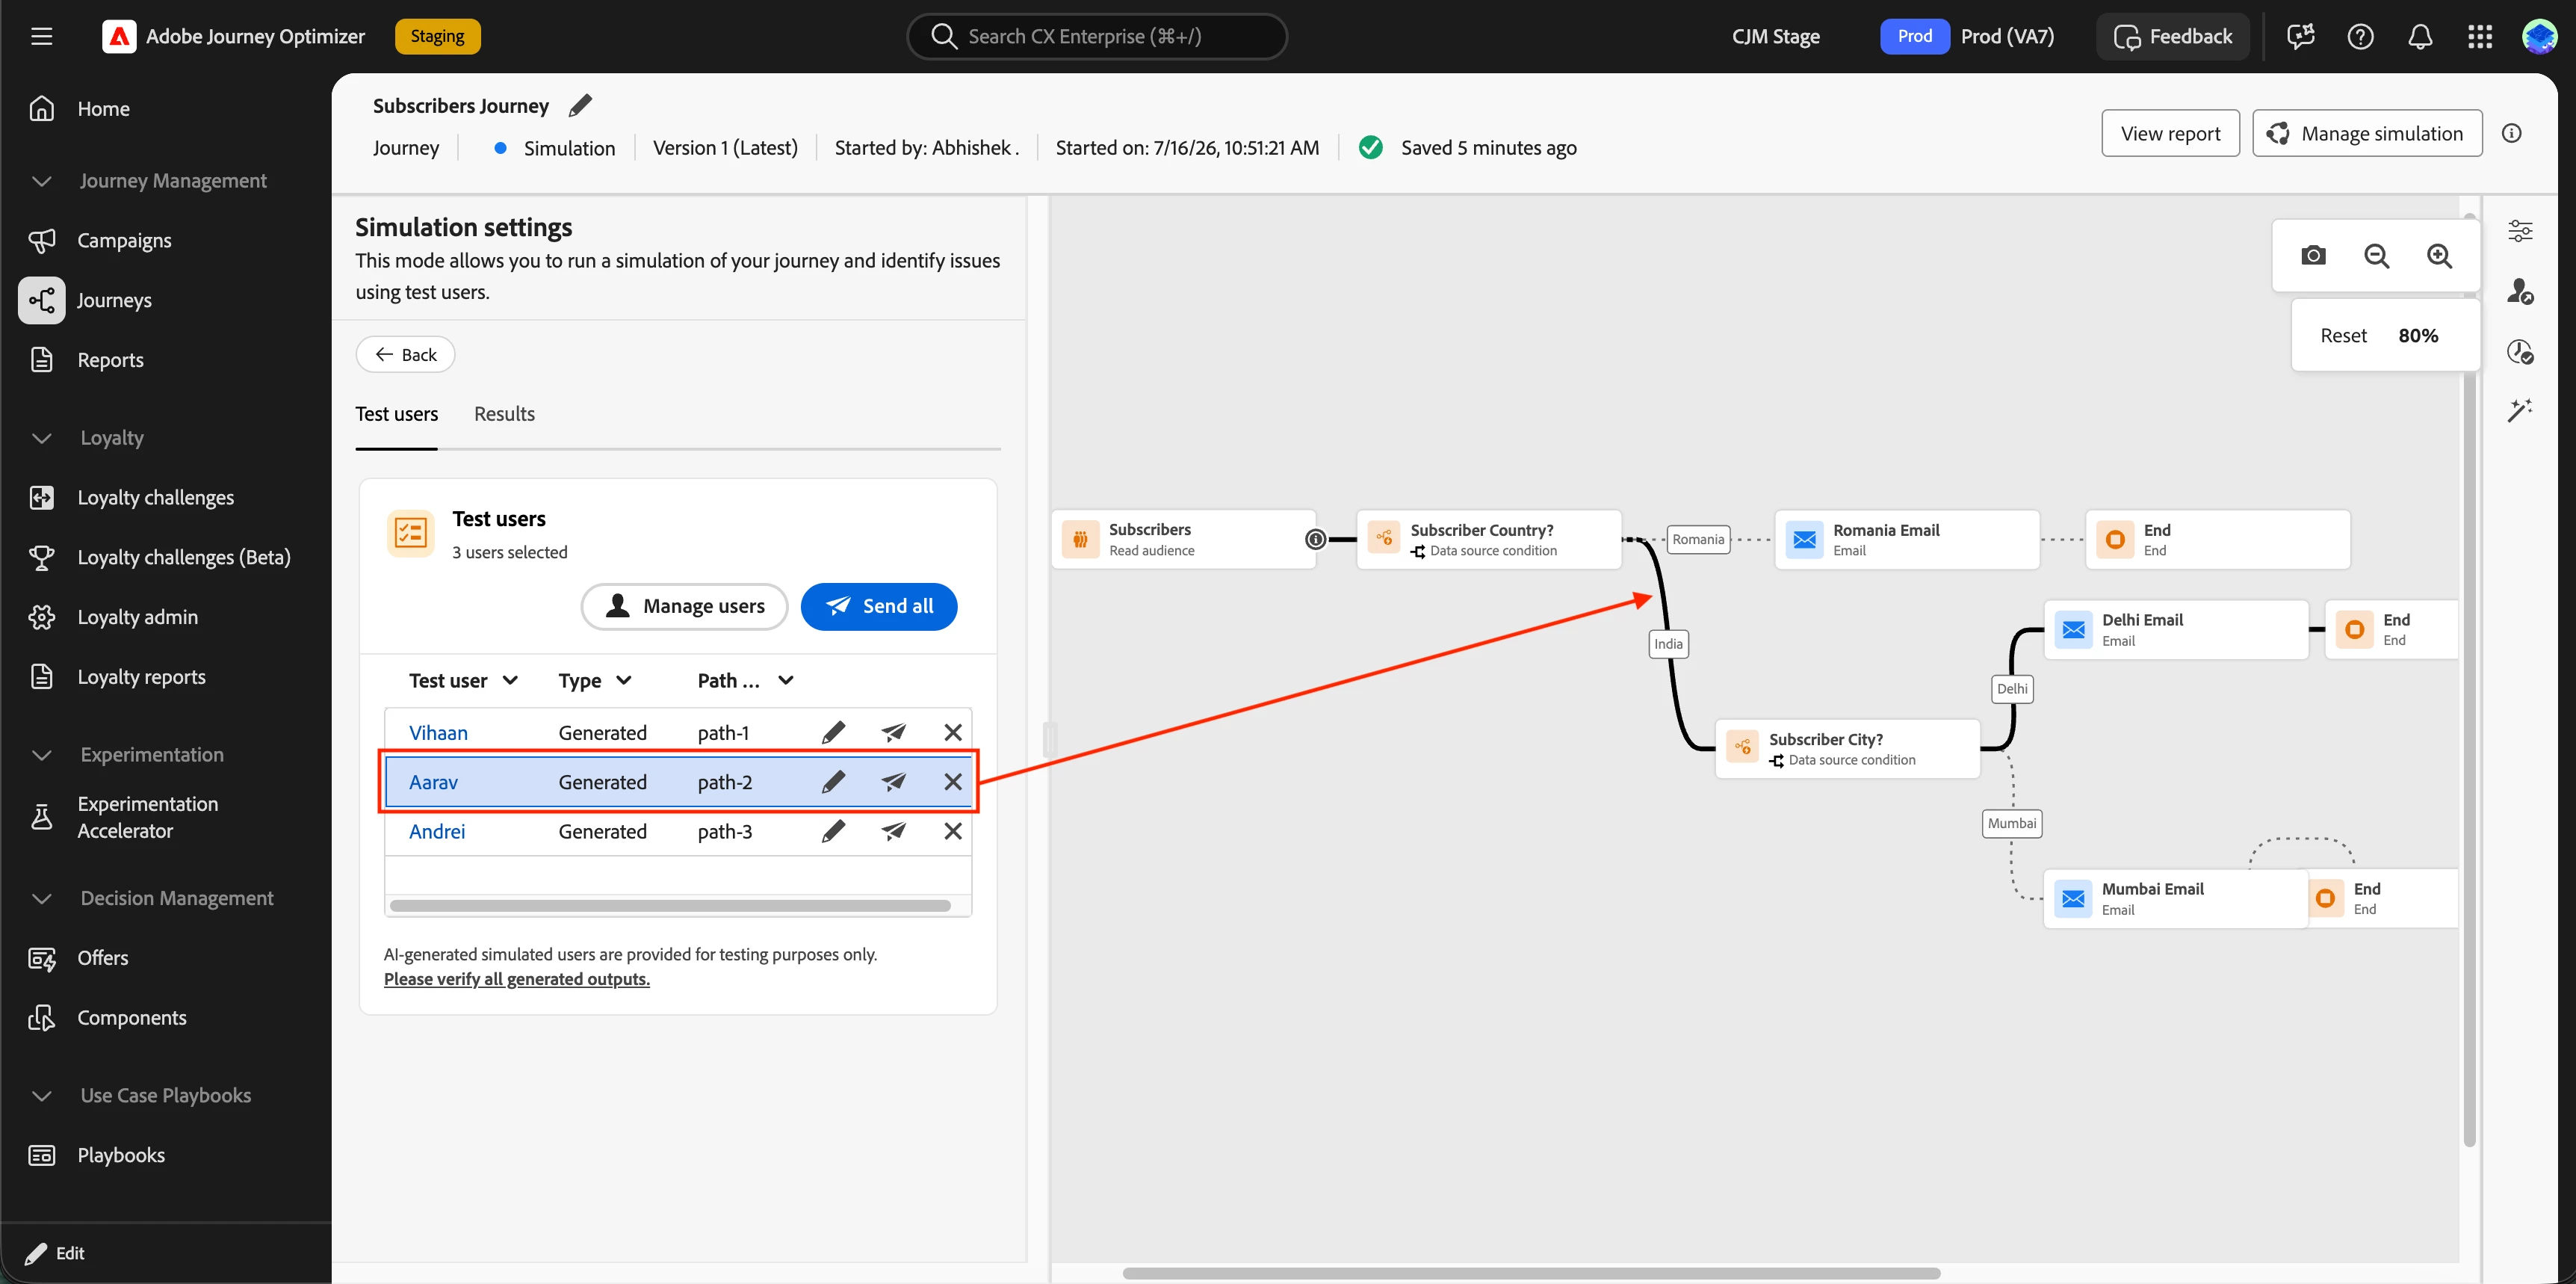
Highlight the user's path: Click a generated user's row and the path it's meant to cover lights up on the journey canvas — a quick way to confirm each user maps to the path you expect.
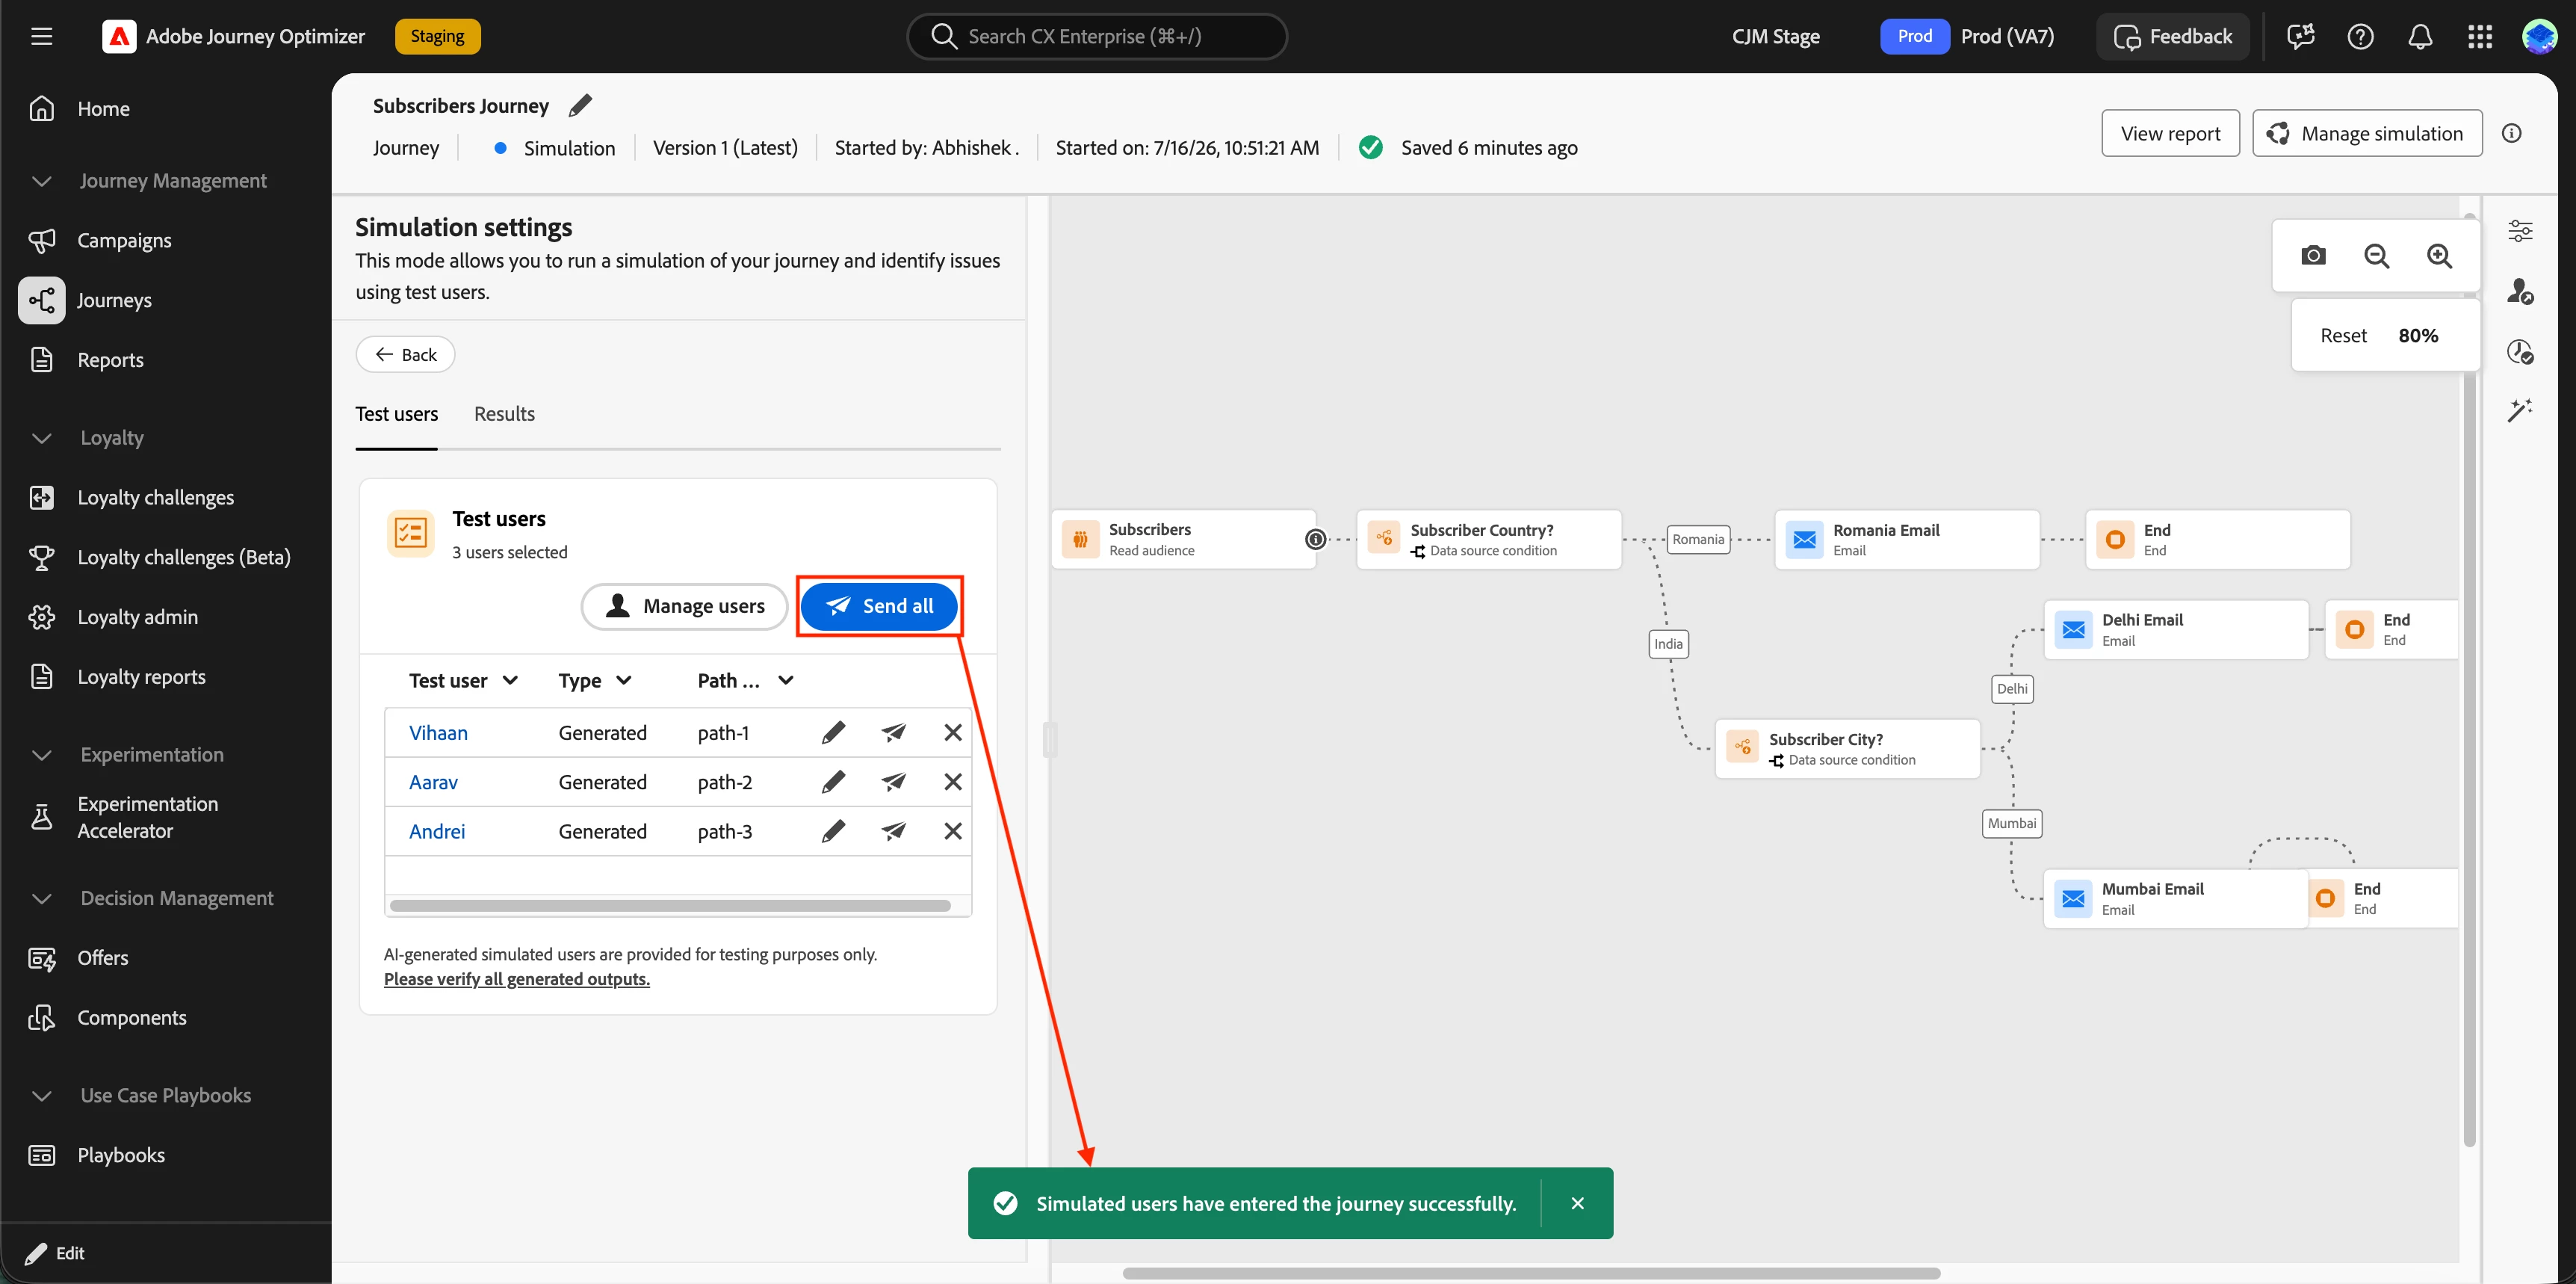
Trigger: Click Send all to push every user into the journey at once, or trigger (or skip) each one individually from its row.
Viewing the Results
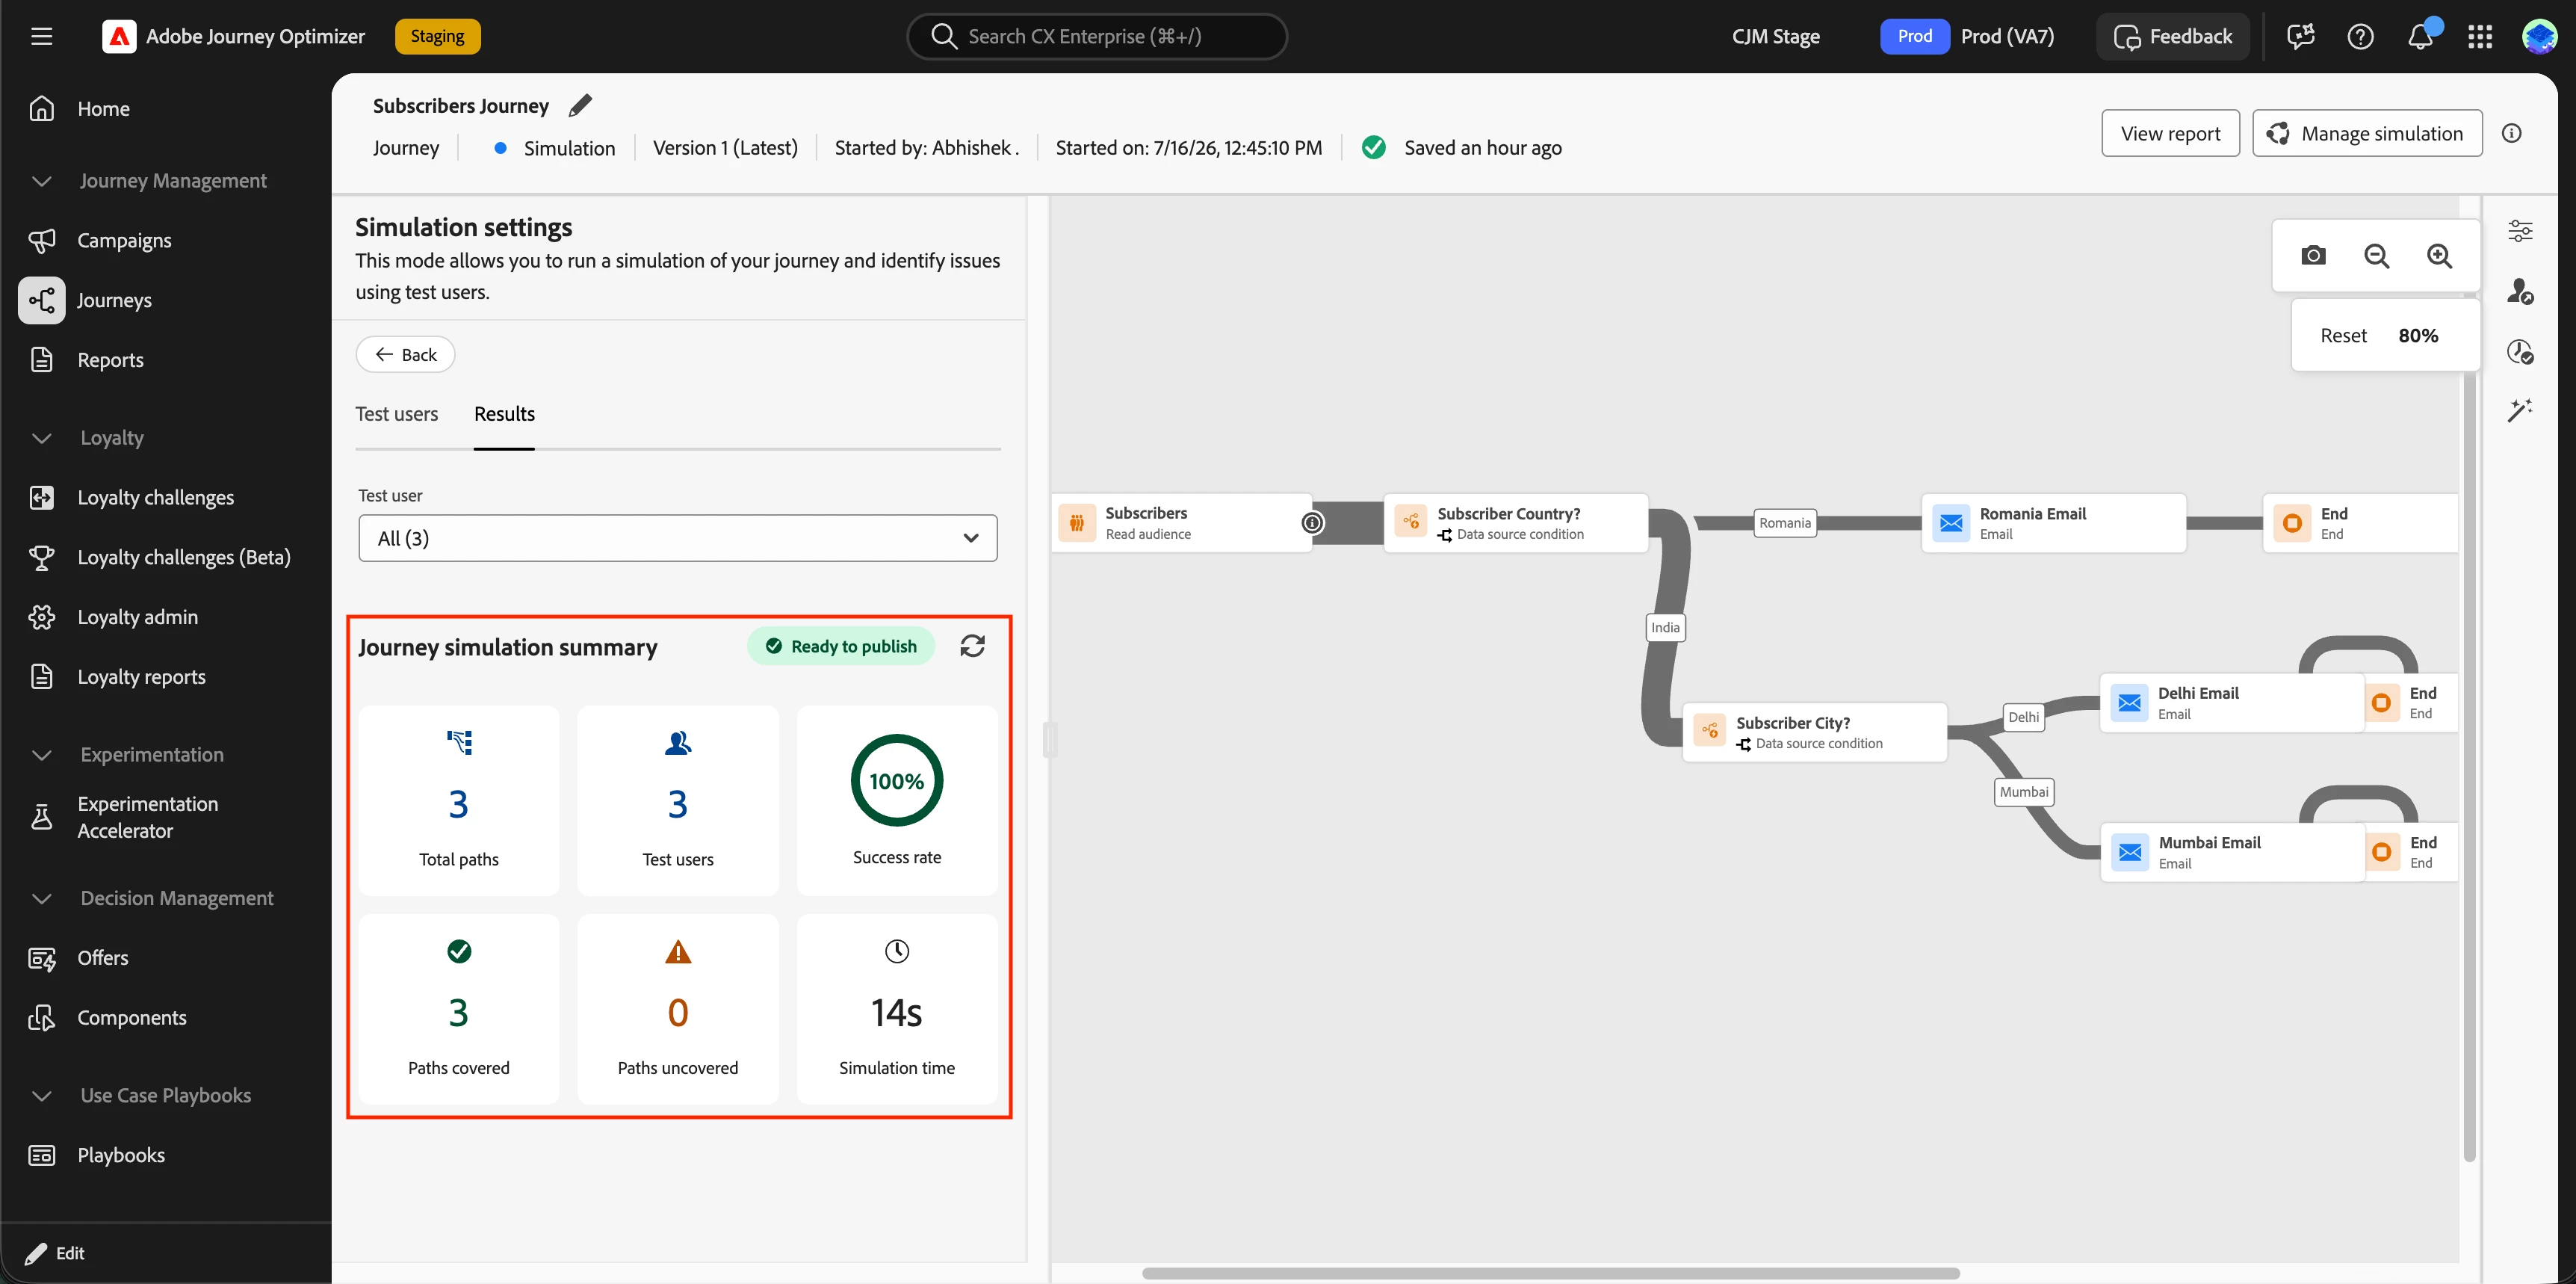
This is where it all pays off. Whichever way you ran the simulation, the final step is the same — open the Simulation Analysis by clicking View Results in Quick Simulation, or switching to the Results tab in Manual Simulation. In one glance it tells you what happened: for this journey, all three test users covered their paths end-to-end, so it reports full coverage and marks the journey ready for publication — no guesswork about whether you're safe to ship.
Summary
Simulation Mode gave you a convenient place to test a draft journey. The Journey Simulation Agent makes that test practically effortless:
- No path analysis by hand — the agent finds the minimal set of paths that covers every branch.
- No hand-built test users — AI generates a realistic, condition-satisfying profile for each path.
- First-hand verification — proofs of Email/SMS actions land on your own email and phone.
- A clear verdict — the Simulation Analysis tells you exactly which paths passed, which failed, and whether the journey is ready to publish.
What used to be a careful, manual pre-publish ritual becomes a handful of clicks — Quick Simulation when you just want the answer, Manual Simulation when you want to inspect the users first. Either way, you reach “publish-ready” far faster. Next time you have a draft journey to verify, let the agent do the busywork — just hit Simulate and see for yourself.
Reference Links
We deliberately kept this walkthrough to a journey with no event nodes. If your journey waits on events — an app open, a purchase, a custom event — simulation has a few extra moving parts, and the agent handles those too. That's the subject of our next post — Stop Crafting Test Events by Hand — Let the Journey Simulation Agent Do It. You can also consult Journey Simulation Agent — Experience League documentation.