
Custom Workflows in Content Hub
In our Unlocking Content Hub Extensibility, we discussed the business value of extending AEM Content Hub. This technical guide outlines how developers can use Adobe App Builder to embed custom panels and workflows directly into the Content Hub UI. We will walk through a real-world implementation of an "Extend Expiry" integration.
Overview
Content Hub extensibility, powered by Adobe App Builder, allows developers to embed custom panels and workflows directly within Content Hub—bring business actions closer.
Adobe App Builder is Adobe’s enterprise extensibility platform for building and deploying secure, scalable applications on Adobe-managed infrastructure.
Core Capabilities:
-
Custom React UIs rendered inside Content Hub
-
Serverless backends via Adobe I/O Runtime
-
Modern development workflows with CI/CD support
-
Secure hosting and authentication managed by Adobe
-
Zero infrastructure to maintain
The Extension Point
The primary extension point is the Asset Details extension. This allows you to render a custom React UI as a tab within the asset side rail.
-
Frontend: A custom React panel loads on demand when the tab is clicked.
-
Backend: User inputs are sent to Adobe I/O Runtime actions (serverless) to execute business logic, such as calling external APIs (e.g., Workfront).
Tech Enablement: Build Your Own Extend Expiry Integration
This section provides a technical walkthrough for developers who want to implement an Extend Expiry integration. We’ll cover the architecture, key steps, and recommended code patterns.
Architecture
Tech stack: React (Adobe React Spectrum), Adobe App Builder (Developer Console), Adobe I/O Runtime (serverless), Workfront REST API, Node.js.
Skill level: Intermediate (JavaScript/TypeScript, React, REST APIs).
Step 1. Scaffold the Content Hub Extension and Set Up for Workfront Integration
Initialize an Adobe App Builder project using the Content Hub Asset Details sample and enable aem/contenthub/assets/details/1. Configure the allowed delivery domain so the extension can load inside Content Hub. Follow this for more information and detailed steps.
Step 2. Register the Tab
To expose the Extend Expiry panel in Content Hub, register a custom tab in your extension registration code. Implement assetDetails.getTabPanels() to declare the custom tab. Define a unique id, title, icon, and contentUrl.
Content Hub renders this tab in the Asset Details side rail when an asset is selected.
Step 3. Build the Panel
Now, build the Extend Expiry panel UI.
Attach to the host using the guest connection API. Fetch the current asset and render a minimal form capturing:
-
New expiry date
-
Justification
Step 4: Submit to Runtime and Create Workfront Task
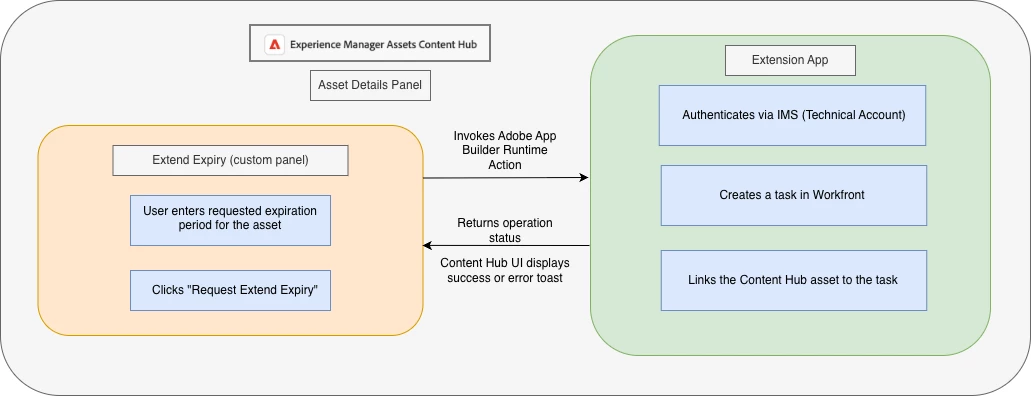
When the Extend Expiry form is submitted, the extended UI panel sends the asset ID and request information data along with an action parameter (for example, createTaskAndLinkAsset) to an Adobe I/O Runtime action.
This backend exposes a single-entry point that inspects the action parameter and routes the request to the appropriate handler.
If the action matches createTaskAndLinkAsset, the handler processes the submitted asset details, creates a new task in Workfront, and links the created task to the corresponding asset in AEM Content Hub.
Step 5: Preview and Deployment
During development, run and preview the extension locally by using the command aio app run
Once the application is in good shape, it can be fully deployed to your targeted workspace.
To switch workspaces, use: aio app use -w
After workgroup switching, we can deploy with the command: aio app deploy
Resources
Full implementation, environment configuration, and troubleshooting steps are here.
Official Documentation:
-
Adobe Developer App Builder: https://developer.adobe.com/app-builder/
-
Adobe Developer Console: https://developer.adobe.com/console
-
Adobe Content Hub: https://experienceleague.adobe.com/docs/experience-manager-cloud-service/content/assets/content-hub/
-
Set Up Local Environment: https://developer.adobe.com/app-builder/docs/getting_started/
-
AIO CLI: https://github.com/adobe/aio-cli