Guidance on EDS site creation using adobe repo | Community
Skip to main content
Level 2
March 26, 2026
Question

Guidance on EDS site creation using adobe repo

  • March 26, 2026
  • 6 replies
  • 319 views

Hi everyone,

I’m currently working on setting up an Edge Delivery Services (EDS) site using an Adobe repository and would appreciate some guidance.

My goal is to:

  • Set up a new EDS project using the official Adobe repository

  • Configure the required integrations to create and load the website using AEM Sites authoring

  • Create pipelines, deploy the site, and preview content

I’ve gone through the documentation, but most of the references are based on using a public GitHub repository. In my case, I’m working with a private repository (Adobe repo).

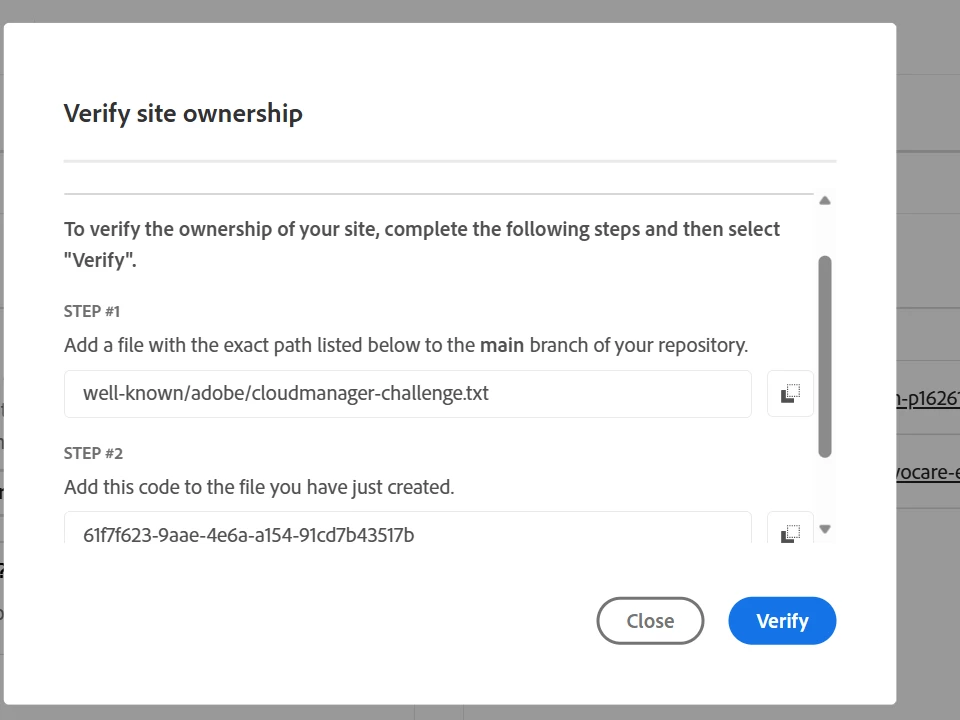
At the moment, I’m facing an issue with site ownership verification. Even after adding the required verification file, the verification is not successful. Currently, my repository only contains this verification file and does not yet include files like fstab.yaml or other standard EDS configuration files.

It would be really helpful to understand the correct approach for private repository setups, EDS site creation, especially around ownership verification and when to introduce standard configuration files like fstab.yaml.

Any guidance, suggestions, or relevant resources would be greatly appreciated.

Thanks in advance!
 

6 replies

AmitVishwakarma
Community Advisor
Community Advisor
March 26, 2026

Hi ​@VishnuRa5 

1. Make sure the EDS site actually exists and is live

Before Cloud Manager can verify the repo, the Edge Delivery site must resolve:

  • Create the site either:
    • via Cloud Manager > Edge Delivery > Create site now, or
    • from the boilerplate (adobe/aem-boilerplate) + BYO Git onboarding.
  • Confirm you can open:
    https://main--<site>--<org>.aem.live/ (any 200 page is fine)

    Cloud Manager's validator calls the EDS origin; an empty/non-onboarded repo (only the challenge file, no site) usually gives 404 and verification fails.

2. Create the correct challenge file for EDS

In the main branch of the Edge Delivery repo for that site:

3. Temporarily disable site authentication (if used)

If your EDS site uses Helix/EDS auth ("protected site"), .page often returns 401, which breaks verification:

4. When to add fstab.yaml / config files?

For Helix 5 / modern EDS, fstab.yaml is no longer required; content sources are configured via admin / site config

You can add fstab.yaml, paths.yaml, blocks, etc. after:

  • The site is live on main--<site>--<org>.aem.live.
  • Repo ownership is verified in Cloud Manager.

These files do not affect the repo-ownership check; only the challenge file and its HTTP 200 response matter.

5. If you are using a private external repo (BYO Git)

If the "private Adobe repo" is an external Git (GitHub Enterprise / GitLab / Bitbucket) onboarded via Repositories > Add external repository:

Amit Vishwakarma - Adobe Commerce Champion 2025 | 16x Adobe certified | 4x Adobe SME
Level 4
August 6, 2026

@VishnuRa5  
have you figured out the solution,? if so can you share the solution, even am also trying to setup EDS on Cloud using Adobe repo (https://git.cloudmanager.adobe.com) there is no clear documentation for the Repo setup using Adobe internal Cloud supported repo.

Level 2
August 10, 2026

Hi ​@VishnuRa5 ,

The main issue is the order you're doing things in. fstab.yaml isn't a file you add later once everything else is working — it's one of the first files that needs to be there. It's what tells AEM where your content actually lives, so until it exists the preview and verification side of things has nothing to work with. A repo that only has the verification file and no fstab.yaml yet basically can't pass, that's expected.

Also, if your goal is AEM Sites authoring (Universal Editor), don't start from the regular aem-boilerplate. Use aem-boilerplate-xwalk instead. It already comes with the correct fstab.yaml, paths.json and the component config that the Universal Editor needs. The plain boilerplate is meant for the document-based setup (Google Drive/SharePoint) and it'll send you the wrong way.

On the ownership verification for a private repo — this is the part that tripped me up. For private repos it's not really about a file you commit. Ownership comes from installing the AEM Code Sync GitHub App on the repo (or the org) and giving it access to that private repository. Once that app is installed and can see the repo, the verification clears and your preview URLs start resolving. If the app isn't installed, or it's installed but wasn't granted access to that specific private repo, it'll keep failing no matter what file you drop in. Worth double checking under the repo settings → GitHub Apps that Code Sync is actually there with access.

So the order I'd suggest:

  1. Create the repo from aem-boilerplate-xwalk
  2. Install the AEM Code Sync app and give it access to the private repo
  3. Add fstab.yaml pointing at your AEM author content path
  4. Check the preview resolves at main--<repo>--<owner>.aem.page
  5. Then move on to the site config/integrations and open the Universal Editor
Level 4
August 10, 2026

Thanks for the update ​@jaideep_2026,
Can you suggest how to install the Adobe Code Sync app Adobe repo (https://git.cloudmanager.adobe.com) which we don’t have a ownership on the repo to login and perform actions like on github.com

Level 2
August 11, 2026

Hi ​@Kkkrish , Since this is an Adobe-managed repository on AEM Cloud Service, this falls under the Bring Your Own Git (BYOG) setup. EDS supports GitHub, but GitHub is not mandatory in this case. Cloud Manager acts as the bridge between the external repository and EDS.

Because of this, the standard EDS setup process of installing the Code Sync app and adding a verification file does not apply here.

For an Adobe-hosted repository, repository ownership is verified through Cloud Manager rather than by adding a verification file to the repository.

The flow should be:

  1. Configure the external repository in Cloud Manager and wait until the repository status shows READY. This confirms that the repository has been successfully configured and verified.
  2. Once the repository is in READY state, the Bring Your Own Git option should be available while configuring the EDS site. Select the repository, and Cloud Manager will provide a secret. Make sure to copy it, as it is displayed only once.
  3. Update the EDS site configuration using the Admin API and set the repository type as:
    "type": "byogit"

One additional point to keep in mind: the EDS organization name still needs to exist as a GitHub organization that you control. This is mainly required for the organization name/reservation; the actual source code does not need to be hosted in GitHub.

For more details, refer to the Bring Your Own Git documentation - https://www.aem.live/developer/byo-git

For any program-specific Cloud Manager questions, you can also reach out to cloudmanager_byog@adobe.com.

salamswapnil
Community Advisor
Community Advisor
August 10, 2026

Hi ​@Kkkrish 
Login to you Github account and go to below URL to install AEM Code Sync app.
https://github.com/apps/aem-code-sync

Check this document for more details on how to install AEM Code Sync app.

https://www.aem.live/developer/tutorial

Also note that you must have admin access to your Enterprise Github org to install AEM Code Sync app.